 |
 |
 PART
FOUR - "WILD TILE" VARIATION TECHNIQUES
PART
FOUR - "WILD TILE" VARIATION TECHNIQUES
-
One way to make your "Wild Tile" more user-friendly, is to decrease
the opacity of the image. The simplest way I've found is to create
a NEW IMAGE. In the NEW
IMAGE WINDOW, we choose the same height and width of our "Wild
Tile". Which for me is always the same size, WIDTH=200
HEIGHT=200 in
PIXELS, RESOLUTION=400 PIXELS/INCH,
BACKGROUND COLOR=WHITE,
IMAGE TYPE=16.7
MILLION COLORS (24-BIT) [NOTE:Remember,
if you aren't working in 16 million colors, many of the features won't
work. Reduce the finished file to 256 colors, this will bring your
file size down, and make your images look good to almost everyone.], and
choose OKAY.
-
Now choose FLOOD FILL (that little paint can
dripping on the toolbar), now on the CONTROL PALETTE
WINDOW, choose FILL STYLE=PATTERN,
MATCH MODE=NONE,
TOLERANCE=0,
OPACITY=50 (that's percentage), SAMPLE MERGED
IS NOT
CHECKED, now click on OPTIONS.
This opens the FLOOD FILL OPTIONS WINDOW.
Choose FILL STYLE=PATTERN
(which should already be chosen for you), BLEND MODE=NORMAL,
NEW PATTERN SOURCE="THE NAME OF YOUR WILD
TILE". Now CLICK INSIDE OF THE NEW IMAGE
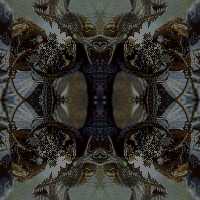
and the "Wild Tile" is now softer, like so:
 "Wild Tile" Image at 50% Opacity
on White (Click on tile to view full background)
"Wild Tile" Image at 50% Opacity
on White (Click on tile to view full background)
-
How about the same technique using different color
background images:
 "Wild Tile" Image at 50% Opacity
on Red (Click on tile to view full background)
"Wild Tile" Image at 50% Opacity
on Red (Click on tile to view full background)
 "Wild Tile" Image at 50% Opacity
on Blue (Click on tile to view full background)
"Wild Tile" Image at 50% Opacity
on Blue (Click on tile to view full background)
 "Wild Tile" Image at 50% Opacity
on Green (Click on tile to view full background)
"Wild Tile" Image at 50% Opacity
on Green (Click on tile to view full background)
 "Wild Tile" Image at 50% Opacity
on Black (Click on tile to view full background)
"Wild Tile" Image at 50% Opacity
on Black (Click on tile to view full background)
-
But what about the buttons we made? They won't match the different
color tiles, unless... With the button as the current image, choose COLORS,
COLORIZE, this opens the COLORIZE
WINDOW. You will see the button displayed in two windows.
The left window shows the original image, while the right window shows
the image in a different color. Just SLIDE
the HUE and SATURATION BARS until you achieve
the colorization desired. You can do this with any image for some
interesting effects.
-
Now you can see the versatility of Paint Shop Pro 5, even just using the
basic techniques. There are many tutorials on the web that explain
in-depth the usage of the more complex functions, but the scope of this
tutorial is limited to the beginner. But I digress. Now we're
going to create an interesting background (especially useful for those
who cannot make up their minds, as you will see).
-
Now let's try Animation Shop, which is part of the Pain Shop Pro 5 package.
First, COPY the image the image you want to
use in Animation Shop. I chose the lighter version of our Wild Tile.
Next, choose FILE, RUN
ANIMATION SHOP. This will open Animation Shop in the topmost
window. In Animation Shop, choose FILE,
NEW, HEIGHT=200,
WIDTH=200, BACKGROUND=TRANSPARENT
(makes for smaller file size). This will create an image which differs
in appearance from the PSP files you're used to. In the center you
will see an empty white and gray tiled square. RIGHT
(OR LEFT)-CLICK INSIDE THE EMPTY FRAME (this will select it and
at the same time bring down a DROP MENU).
Choose PASTE, then INTO
SELECTED FRAME in the fly-out menu. Your image is now a single,
selected frame for an animation.
-
Now choose EFFECTS form the top-most
toolbar, then IMAGE TRANSITIONS, which brings
up the ADD IMAGE TRANSITIONS WINDOW.
Under DEFINE TRANSITIONS: TRANSITION
LENGTH=2.0 secs; FRAMES
PER SECOND=4 fps; in the drop down
menu, choose ROTATE COLORS; SHOW
PREVIEW IS CHECKED.
This will create an eight-frame animation which changes the colors of your
original image, like so:
 Animated Background Tile;
150 x 150 Pixels (45k)
Animated Background Tile;
150 x 150 Pixels (45k)
-
I used the original tile, at 50% opacity on white for this animation
(brighter colors will cause more dramatic color changes), and to save it,
I clicked on SAVE (that little floppy disk
on the toolbar), gave it a FILE NAME, and
clicked on SAVE. This brings up the
ANIMATION QUALITY VERSUS OUTPUT SIZE WINDOW.
OPTIONS=DEFAULT SETTINGS,
IMAGE QUALITY SLIDE BAR=STANDARD
SETTINGS SELECTED, LEVEL 3. Now select NEXT,
which opens the OPTIMIZATION PROGRESS WINDOW
(Animation Shop will automatically apply filters and compression according
to the previous selection), then click NEXT,
which will display the OPTIMIZATION RESULTS WINDOW.
This showed that my 200 x 200 pixel animation was 243k, gave me the load
times of 2 min 59 sec at 14.4k; 1 min 29 sec at 28.8k; 47 seconds at 56k,
and 20 seconds on ISDN. This is much too large for a background tile...
I don't think I'd wait for it to load. What's the solution?
-
First, click CANCEL (no point in going forward);
make the tile animation smaller in physical size. Choose EDIT,
RESIZE ANIMATION, which will open the RESIZE
WINDOW (this should look familiar!). PERCENTAGE
OF ORIGINAL IS CHECKED,
WIDTH=75, HEIGHT=75,
RESIZE TYPE=SMART SIZE,
and MAINTAIN ASPECT RATIO IS
CHECKED, and click OKAY. Try
the optimization wizard this time. Choose FILE,
OPTIMIZATION WIZARD, which opens the OPTIMIZED
OUTPUT WINDOW. OPTIMIZE FOR=ANIMATED
GIF FILE, WHEN FINISHED=CREATE
A NEW ANIMATION FROM THE OPTIMIZED ANIMATION (this is important,
because if your image looks really bad when you're done optimizing, you
can just delete it and start over again with the original). Click
NEXT, and the ANIMATION
QUALITY VERSUS OUTPUT SIZE WINDOW will open again. This
time let's try making it as small as possible by moving the SLIDE
BAR TO THE BOTTOM=STANDARD SETTINGS LEVEL
1, then click NEXT, and NEXT
and view the settings. This changed my file size to 152k, and click
FINISH. Then I repeated the process
trying different compression factors until I was satisfied with the image
size and quality. Play around with this a little and you'll see what
I mean. I now have a 45k animation tile which isn't too bad, considering.
-
Well, this concludes this installment of Phantasmagoria's Paint Shop Pro
5 Backgrounds & Wild Tiles Tutorial, I hope you enjoyed it.
Believe it or not, if you've followed along with this, you have learned
how to:
-
RESIZE AN IMAGE
-
CREATE SEAMLESS PATTERNS
-
FLOOD FILL WITH PATTERNS
-
VARY FLOOD FILL OPACITY
-
CHANGE FOREGROUND/BACKGROUND COLOR
-
DECREASE/INCREASE COLOR DEPTH
-
CREATE TRANSPARENCY
-
BUTTONIZE
-
COLORIZE
-
USE THE MAGIC WAND
-
USE THE SELECTION TOOL
-
INVERT A SELECTION
-
INCREASE CANVAS SIZE
-
CREATE A NEW IMAGE
-
SAVE AN IMAGE
-
MIRROR
-
FLIP
-
COPY
-
PASTE
-
CREATE A TILED BACKGROUND IMAGE
-
CREATE A NEW ANIMATION FILE
-
USE THE IMAGE TRANSITION EFFECT
-
OPTIMIZE FILE SIZES WHEN ANIMATING
-
RESIZE AN ANIMATION
-
That's a lot of stuff, if you think about it - heck, even if you don't
think about it. The next tutorial will be on Text Effects and will
include creating buttons and title text, using text transition in Animation
Shop (with which the title on these pages was made), and go into creating
bars and transparent gif files. Thanks for visiting, check back soon
for updates.


|