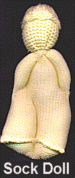
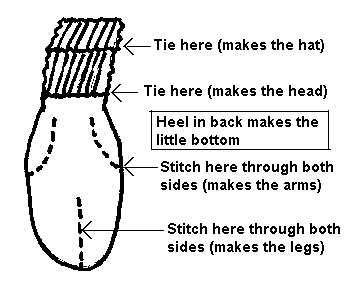
I have a lot of crochet patterns for hats and huggies, several knit hat patterns, and a hat pattern to sew from fabric available - free for the asking. Contact me by email or snail mail at the address shown on the main page.
|
VERY QUICK AND EASY! | ||||
|---|---|---|---|---|
|
||||
 + +  = = 
|
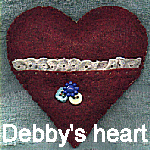
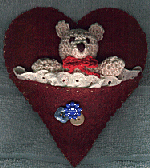
Debby109 made the heart with the pocket on it from felt and trims. I thought it was just adorable, and thought how CUTE it would be if there was a little huggy to tuck into the pocket! So inspired, I sat down and designed the little Tom Thumb Teddy to go with it...(The finished heart measures 5 1/4 inches tall and 5 1/2 inches wide at it's widest point, the teddy is 2 1/2 inches tall).
Materials:
Half-ball of J&P Coats LusterSheen in desired color (I used natural)
Small amount of black
Small amount of red
Crochet hook: size US E4 (3.50 mm)
Small amount of fiber-fill
Finished size: 2 1/2 inches
ARMS:(make 2)
Note: do NOT join rnds
RND 1: ch 2; work 8 hdc in 1st ch (8 hdc)
RND 2: hdc in each hdc around (8 hdc)
RND 3: sc in each hdc around, sl st in next hdc (8 sc)
Stuff with fiberfill, pinch opening shut, sl st closed; fasten off, leaving length for sewing
LEGS:(make 2)
Note: do NOT join rnds
RND 1: ch 2; work 10 hdc in 1st ch (10 hdc)
RND 2: hdc in each hdc around (10 hdc)
RND 3: rep rnd 2 (10 hdc)
RND 4: sc in each hdc around, sl st in next hdc (10 sc)
Stuff with fiberfill, pinch opening shut, sl st closed; fasten off, leaving length for sewing
SNOUT:(make 1)
ch 3; join to beg ch to form ring
RND 1: 10 hdc in ring; sl st in 1st hdc; fasten off, leaving length for sewing
EARS and TAIL:(make 3)
Note: do NOT join rnds
RND 1: ch 2; work 4 sc in 1st ch (4 sc)
RND 2: work 2 sc in each sc around, sl st in next sc (8 sc)
ASSEMBLY:
Stitch ears, snout, arms and legs to body as shown in the picture.
Stitch tail to his little teddy behind *g*
With black, stitch on eyes and nose. With red, make ch st long enough to form bow and stitch to neck.
(I've been told this pattern makes a nice juggling ball too)
Materials:
6 skeins embroidery floss
Crochet Hook: Size 4 steel
Stuffing
You might want to fill it with those plastic craft beads, they are *really* nice and it's harder to squish... So, it's more effective *g*. Or you can use the left overs from plastic canvas projects (the little nubs left over from cutting the plastic canvas).
You could use size 5 crochet cotton from DMC instead of embroidery floss. [Kate] used embroidery floss because it is softer than the standard crochet cotton, also the amount of colors available are a plus.
When starting the beg ch, you can adjust the size of the ball by chaining the length from the point just under your index finger across to the bottom of your palm above your wrist x 2. I know this sounds funny, but it's 100% right, every time. :)
Ch 65, sl st to beg ch. Do not twist chain!
Rnd 1-3: Ch 2, dc in each around. Join with sl st.
Finish off and start on other side of ring.
Rnd 4-6: Ch 2, dc in each around. For a neat effect, turn inside out.
Rnd 7: Ch 2, dc in each around. Join with sl st.
Rnd 8: Ch 2, *dc dec, dc* rep around. Join with sl st.
Rnd 9: Ch 2, dc in each around. Join with sl st.
Rnd 10: Ch 2, *dc dec, dc* rep around Join with sl st.
Rnd 11: Ch 2, *dc dec over next 3 sts* rep * around. Join with sl st.
Rnd 12: Ch 2, *dc dec* rep * around. Join with sl st.
Rep Rnds 7-12 for other side of ball.
~~~Thank you cklit for sending this in!~~~

|
~Hat/Volunteer Page~ |

 Get your own Free Home Page