

 |
 |
| This is anti-aliased text | This is alised text |
The anti-aliased has smoother edges and looks better on the web.
The alised text seems to be better for printing.
I then cropped the picture to a square size.
I used the Photo Edge tutorial from
GrafX Design
I set the background color to white. Then I went to Masks - New - Empty.
Then again to Masks- edit. My image is now black.
Now go to View - Through mask. My image is now red tinted.
Next I selected a paint brush size 35 round with parchment. Brush around the picture leaving the center red tinted. Then I used a size 20 brush with none picked as texture to clean up the outside edges.
Went back to View - clicked on through mask to turn it off.
Went back to Mask - clicked on edit to turn it off.
I now went to Colors - Adjust - Brightness/Contrast.
Set Brightness to 100% and Contrast to 0%. Clicked okay.
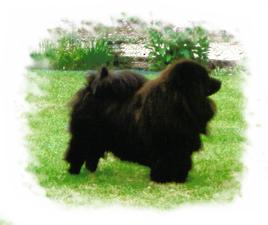
Now you have this which I also saved at 25% compression. Can you see where I didn't cleanup the bottom left hand corner very well?
 This was the original photo which I scanned in and saved the original as a tiff file. Then I resaved as a jpg which was 238 x 273 and 191k.
To put this up on my page as an example I resampled it to 71 x 81 to save space and compressed it 25%.
This was the original photo which I scanned in and saved the original as a tiff file. Then I resaved as a jpg which was 238 x 273 and 191k.
To put this up on my page as an example I resampled it to 71 x 81 to save space and compressed it 25%.
Next step was to resample. I selected Height of 60 and let it pick Width which is 71. Saved work.
Opened a new file size 468 x 60 white background. I copied small image as a transparent image and clicked on the new file and pasted image in left corner. Then I pasted a new copy in right and before clicking I clicked mirror to get it facing the other way. (I really didn't outline it until I put it on my page and you couldn't see the shape.

Now text - Make sure you change the foreground color to the text color of your choice. I used Comic Sans size 8 for small lettering and Comic Sans size 12. (I centered both) This is how it really looks.

Last step was go to Image - Special Effects - Buttonize. I set it at transparent - edge size 8.


