| DrawPrimitive |
Introduction
This article is divided into the following sub-sections:
At the end of this article I provide an MFC demo application (MSVC++ 5.0) with full source which demonstrates the techniques discussed in this tutorial.
DrawPrimitive Overview
DrawPrimitive is Microsoft's latest addition to the DirectX SDK and is supplied with version 5.0. Contrary to popular opinion, DrawPrimitive is not a wrapper for execute buffers. Although it still falls under the category of "Immediate Mode", it completely sidesteps execute buffers to provide a new way of directly accessing 3D accelerated hardware, and emulating it when not present. By eliminating the extra overhead of execute buffers, it is also slightly faster than the old method on many display cards. (I've heard rumors that a couple of vendors have supported DrawPrimitive in their drivers via their existing execute-buffer based code. IMHO, said vendors should be shot!).
DrawPrimitive currently allows you to render points, lines and triangles onto a DirectDraw surface. In order to render a scene you first select an appropriate device and set up a viewport. Primitives are then rendered by setting up an array of vertex structures and passing them in to the DrawPrimitive() or DrawIndexedPrimitive() function, along with information about what kind of primitives should be rendered and how.
Throughout this article I use numerous pointer variables. I use the C++ Microsoft Foundation Classes which are supplied with MSVC++ 5.0, so all pointers which must be saved for later use are prefixed with "m_" (for example, m_pPrimary is used to store a pointer to the primary surface). I show the variable declarations in the source code that follows, but keep in mind that any variable with the "m_" prefix should in fact be a member of the parent class, rather than a local variable.
Error Handling
Before going any further, let me discuss how I perform error handling and handle hardware acceleration problems. A given machine may or may not have hardware acceleration, but even when it is present you can still run into problems. Hardware devices can only perform acceleration when all surfaces reside in video memory, so if you create a hardware rendering device and then run out of VRAM when creating a surface then the device will not be able to use it (there are ways around this, but I'm keeping things simple here). Another problem can arise if your device performs software rendering and your surfaces wind up in VRAM. Video memory is typically much slower than system memory (particularly for reads) and VRAM surfaces can significantly degrade performance.
In the source code presented with this article I'll assume that all DirectX initialization is done in a single routine which accepts a boolean variable called bHardware. If bHardware is TRUE, then DirectX attempts to use a hardware accelerated device and VRAM surfaces, otherwise it tries to do everything in system memory. I call the inititalize routine once with bHardware set to TRUE. If it returns false due to an error then I clean everything up and try again, this time setting bHardware to FALSE.
Create DirectDraw Surfaces
Unlike OpenGL, DrawPrimitive renders to a DirectDraw surface rather than a device context. This is a good thing because it results in high performance and you can lock down the surface yourself to perform custom rendering if you want. This is also not such a good thing because it requires a bit more work to create a surface than to simply grab a window's device context.
First of all you need to create the main DirectDraw object. You'll also need a top-level window to set the cooperative level. In the first section of this demo I've decided to use 320x240x16bpp fullscreen mode, so the top level window must be created with the WS_POPUP style. If you're using MFC and a CFrameWnd based window then make sure you explicitly set the style to WS_POPUP, otherwise MFC will use the default style WS_OVERLAPPEDWINDOW. Here's the code I use:
#define SCREEN_WIDTH 320
#define SCREEN_HEIGHT 240
#define SCREEN_BITS 16
LPDIRECTDRAW m_pDD;
// Create main DirectDraw object
if (DirectDrawCreate(NULL, &m_pDD, NULL) != DD_OK)
 return FALSE;
if (m_pDD->SetCooperativeLevel(GetSafeHwnd(), DDSCL_FULLSCREEN | DDSCL_EXCLUSIVE | DDSCL_ALLOWMODEX) != DD_OK)
 return FALSE;
if (m_pDD->SetDisplayMode(SCREEN_WIDTH, SCREEN_HEIGHT, SCREEN_BITS))
 return FALSE;
The next step is to create the primary display surface and a back buffer on which to render. If you're familiar with DirectDraw then this should all be relatively straightforward. In order for DIrect3D to use a DirectDraw surface, the surface must be created with the DDSCAPS_3DDEVICE caps flag set. In the code that follows I create back buffer with this flag set, and then attach it to the primary surface with a call to AddAttachedSurface(). Once this is done we can can call the primary surface's Flip() member function to display the back buffer on screen.
I have a very fast display adapter, and I find I can simply blt the backbuffer to the primary surface without getting image tear. I also often switch between full-screen and windowed mode (particularly if I need to debug something), so I prefer to create a seperate back-buffer which I blt, rather than setting up a complex flippable surface. Which method you use is up to you, just remember that when you create the back-buffer you must specify the DDSCAPS_3DDEVICE cap bits in order for Direct3D to be able to use it. Here's my initialization code for creating the primary and offscreen surfaces, which are stored in the m_pPrimary and m_pBackBuffer member variables respectively (the code presented here uses the Flip function rather than my own method of Bltting):
LPDIRECTDRAWSURFACE m_pPrimary;
LPDIRECTDRAWSURFACE m_pBackBuffer;
// Get the primary display surface
TRACE("DrawPrim Demo: Creating the primary surface\n");
ZeroMemory(&ddsd, sizeof(ddsd));
ddsd.dwSize = sizeof(ddsd);
ddsd.dwFlags = DDSD_CAPS;
if (hardware)
 ddsd.ddsCaps.dwCaps = DDSCAPS_PRIMARYSURFACE;
else
 ddsd.ddsCaps.dwCaps = DDSCAPS_PRIMARYSURFACE | DDSCAPS_SYSTEMMEMORY;
if (m_pDD->CreateSurface(&ddsd, &m_pPrimary, NULL) != DD_OK)
 return FALSE;
// Create a back buffer and attach it to the primary display surface to make a flippable surface
TRACE("DrawPrim Demo: Creating the back buffer\n");
ZeroMemory(&ddsd, sizeof(ddsd));
ddsd.dwSize = sizeof(ddsd);
ddsd.dwFlags = DDSD_CAPS | DDSD_WIDTH | DDSD_HEIGHT;
ddsd.dwWidth = SCREEN_WIDTH;
ddsd.dwHeight = SCREEN_HEIGHT;
if (hardware)
 ddsd.ddsCaps.dwCaps = DDSCAPS_OFFSCREENPLAIN | DDSCAPS_3DDEVICE | DDSCAPS_VIDEOMEMORY;
else
 ddsd.ddsCaps.dwCaps = DDSCAPS_OFFSCREENPLAIN | DDSCAPS_3DDEVICE | DDSCAPS_SYSTEMMEMORY;
if (m_pDD->CreateSurface(&ddsd, &m_pBackBuffer, NULL) != DD_OK)
 return FALSE;
if (m_pPrimary->AddAttachedSurface(m_pBackBuffer) != DD_OK)
 return FALSE;
Very Important Point: In the first version of this article, I was always creating the primary display surface with only the DDSCAPS_PRIMARYSURFACE flag. While this works fine on some cards, it doesn't work on others (notably Matrox cards) when you're using the software renderer. If the hardware flag is set to FALSE, then you need to also specify the DDSCAPS_SYSTEMMEMORY flag when creating the primary surface. This modification has been included in the demo at the end of this article. (Thanks to Scott Cottrille for pointing this out to me).
To flip between the two surfaces we call the Flip() member function:
// Flip the back buffer to the primary surface
m_pPrimary->Flip(NULL,DDFLIP_WAIT);
BTW, in my clean up code I use the same RELEASE() macro defined in the DirectX sample applications:
#define RELEASE(x) if (x) {x->Release(); x=NULL;}
The Device
To start creating D3D objects we need to obtain a master IDirect3D object, kinda like the equivelent of DirectDraw's LPDIRECTDRAW object. We can do this by calling QueryInterface() on the DirectDraw object itself:
LPDIRECT3D2 m_pD3D;
if (m_pDD->QueryInterface(IID_IDirect3D2, (LPVOID *)&m_pD3D) != S_OK)
 return FALSE;
The next step is to find a compatible device we can used to render to the back buffer. A device is a bit like the D3D equivelent of a device context. It stores information for the current device doing the rendering (e.g. software renderer or hardware accelerated board) and maintains information about the current render state.
// Find a device we can use
D3DFINDDEVICESEARCH search;
D3DFINDDEVICERESULT result;
ZeroMemory(&search, sizeof(search));
search.dwSize = sizeof(search);
search.dwFlags = D3DFDS_HARDWARE;
search.bHardware = hardware;
ZeroMemory(&result, sizeof(result));
result.dwSize = sizeof(result);
if (m_pD3D->FindDevice(&search, &result) != D3D_OK)
 return FALSE;

// Create the D3D device
if (m_pD3D->CreateDevice(result.guid, m_pBackBuffer, &m_pDevice) != D3D_OK)
 return FALSE;
The Viewport
A viewport defines how the scene will be projected onto the screen. It does not not define the camera position, but it does include information about the camera's field of view (FOV) as well as front and back clipping planes.
The DirectX documentation provides more information on setting up a viewport, I use the following code which is supplied with one of the demos:
// Create a viewport
D3DVIEWPORT viewport;
ZeroMemory(&viewport, sizeof(viewport));
viewport.dwSize = sizeof(viewport);
viewport.dwWidth = SCREEN_WIDTH;
viewport.dwHeight = SCREEN_HEIGHT;
viewport.dvScaleX = SCREEN_WIDTH / 2.0f;
viewport.dvScaleY = SCREEN_HEIGHT / 2.0f;
viewport.dvMaxX = D3DVAL(1.0);
viewport.dvMaxY = D3DVAL(1.0);
if (m_pD3D->CreateViewport(&m_pViewport, NULL) != D3D_OK)
 return FALSE;
if (m_pDevice->AddViewport(m_pViewport) != D3D_OK)
 return FALSE;
if (m_pViewport->SetViewport(&viewport) != D3D_OK)
 return FALSE;
if (m_pDevice->SetCurrentViewport(m_pViewport) != D3D_OK)
 return FALSE;
Rendering A Scene
With the device and viewport created, we are now ready to render primitives. Before doing this though you'll probably want to clear the back buffer to black. The fact that DrawPrimitive doesn't do this for you is an advantage, because it allows you to perform custom rendering in the background first if you wish. Here's a code fragment to clear the back-buffer surface:
// Clear the back buffer
DDBLTFX bltfx;
ZeroMemory(&bltfx, sizeof(bltfx)); // Sets dwFillColor to 0 as well
bltfx.dwSize = sizeof(bltfx);
m_pBackBuffer->Blt(NULL,NULL,NULL,DDBLT_WAIT|DDBLT_COLORFILL,&bltfx);
To start rendering a D3D scene you call the BeginScene() member function:
m_pDevice->BeginScene();
When you are finished you call the EndScene() member function:
m_pDevice->EndScene();
Your rendering calls should be sandwhiched in between these two calls. Primitives are rendered with two functions: DrawPrimitive() and DrawIndexedPrimitive(). The main difference between these two is how vertices are passed in. With DrawPrimitive you pass in a pointer to an array of vertices. If you are rendering 4 triangles (say) then the array must have 4*3=12 elements, i.e. 3 discrete vertex structures for each triangle. DrawIndexedPrimitive is similar, but you instead pass in a pointer to a master vertex array, and each triangle is instead defined by 3 WORDs which are indices into that array. This is slightly faster, since duplicate vertices only have to go through the transformation/projection process once (well...that's the theory anyway. In practice it seldom works like that, for reason which we'll see later on). In this article I'll only be discussing DrawPrimitive(), since it's slightly easier to work with.
Primitive Types
The first parameter you pass into DrawPrimitive() is the type of primitive you wish to draw. There are currently 6 primitive types supported: points, lines, polylines, triangles, triangle strips and triangle fans.
Point lists are vertices rendered as single-pixels on the screen. Point lists are specified with the D3DPT_POINTLIST identifier.
Lines are defined by two endpoints, each is projected onto the screen and a stright line is drawn between them (passing in 4 vertices to DrawPrimitive will cause two lines to be drawn). Line lists are specified with the D3DPT_LINELIST identifier.
Polylines are similar to line lists, but instead of passing in pairs of endpoints you pass in the coordinates for a single long line. If you use this primitive to render unfilled polygons then don't forget to pass the first point in again at the end of the list, otherwise the last edge won't be drawn. Polylines are specified with the D3DPT_LINESTRIP identifier.
Triangle lists are specified with vertex triplets. If you want to render 10 triangles then you would pass in an array of 30 vertices. Note that all triangles in a single call are drawn with the same render state (shading method, fill texture etc). Triangle lists are specified with the D3DPT_TRIANGLELIST identifier.
Triangle strips are handy for rendering complex mesh models. To visualize how triangle strips are rendered, think of the vertex array as specifying a polyline. Now imagine that extra edges are formed between all the even numbered vertices (ie elements 0 and 2, 4 and 6, 8 and 10 etc) and also between all the odd numbered vertices (1 and 3, 5 and 7). The resulting triangles are what DrawPrimitive renders. Check the DirectX documentation for more information on this type. Triangle lists are specified with the D3DPT_TRIANGLESTRIP identifier.
Triangle fans are handy for rendering general convex polygons. You pass in the points of the polygon and DrawPrimitive breaks it down into triangles and renders each one seperately. Check the DirectX documentation for more information on this type. Triangle fans are specified with the D3DPT_TRIANGLEFAN identifier.
Vertex Types
The second parameter you pass into DrawPrimitive allows you to specify the type of structures in the vertex array. This in turn implies how DrawPrimitive should use them. DrawPrimitive currently accepts 3 types of vertex structures:
D3DVT_TLVERTEX: Specifies that the vertices are of type D3DTLVERTEX. This type allows you to pass in vertex coordinates in screen space. You pass in the screen coordinates relative to <0,0> in the upper left hand corner, as well as lighting information, texture coordinates and a few other things.
D3DVT_LVERTEX: Specifies that the vertices are of type D3DLVERTEX. This type allows you to pass in the vertex coordinates in world space. You still have to assign lighting to each point yourself, but DrawPrimitive will tranform the point by the world, view and projection matrices (see below for more details on this). Personally I find this type to be the most useful for most of the work I do. You specify the world coordinates, the lighting and the texture coordinates where appropriate.
D3DVT_VERTEX: Specifies that the vertices are of type D3DTLVERTEX. DrawPrimitive will both transform and light vertices of this type itself. You specify the world coordinates, the normal vector to use for lighting and the texture coordinates where appropriate.
Rendering a 2D Primitive
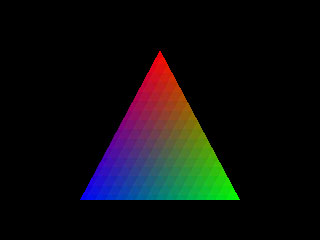
Let's start things off simple and draw a colored 2D triangle on the screen. I'll assume we've set up for 320x240 mode, the following code will render a single triangle between the coordinates <160,50>, <240,200> and <80,200>:
// Render a triangle
D3DTLVERTEX v[3];
v[0] = D3DTLVERTEX(D3DVECTOR(160, 50,0),1,D3DRGB(1,0,0),D3DRGB(0,0,0),0,0);
v[1] = D3DTLVERTEX(D3DVECTOR(240,200,0),1,D3DRGB(0,1,0),D3DRGB(0,0,0),0,0);
v[2] = D3DTLVERTEX(D3DVECTOR( 80,200,0),1,D3DRGB(0,0,1),D3DRGB(0,0,0),0,0);
m_pDevice->DrawPrimitive(D3DPT_TRIANGLELIST,D3DVT_TLVERTEX,(LPVOID)v,3,NULL);
Note: in order to use overloaded functions to create vertices "on-the-fly" like this you need to add the following line before including d3d.h:
#define D3D_OVERLOADS
Also notice that I'm lazy and don't bother casting my values to D3DVAL (which is type float), doing so makes the code longer and a bit more difficult to read anyway. In a commercial application you'd probably want to do this though, just to be safe.
The code starts off by declaring an array of 3 D3DTLVERTEX structures, thus the points we pass in will be treated as pre-lit pre-transformed vertices in screen space.
The first element, a D3DVECTOR, specifies the coordinates in screen-space. Note that the z component isn't used, so I set it to 0.
The second element is the rhw field. If you've pre-transformed and projected the points of a triangle and you wish to map a texture onto it then you still need to provide some depth-information so that the rasterization gets the perspective mapping correct (I'll be discussing this is detail further on). For this simple test we're rendering a gouraud-shaded triangle (the default), so depth information isn't used. Set this field to 1 for the time being.
The next field is the diffuse color component. The D3DRGB macro accepts 3 color components ranging from 0-1. As you can see, I've assigned each corner of the triangle a different primary color. DrawPrimitive will gouraud shade the pixels in between as it rasterizes.
The next field is the specular color component used for phong shading. This example uses gouraud shading, so this field isn't used. Even so, I set it to <0,0,0> just to be safe.
The last two elements specify the UV coordinates for texture mapping. I'll be going into detail about this later on, but for the time being I set them to 0.
That's all there is to it! If you've done everything properly then you should be getting something like this on the screen:
Matrices
Before continuing any further I suggest you brush up on my atricle on matrices. One important thing to keep in mind is that in my article I represent matrices opposite to the way Direct3D does, ie with the rows and collumns swapped around.
DrawPrimitive requires you to set three matrices: the world matrix, the view matrix and the projection matrix. The world matrix is used to position objects in 3D space, so you usually set it once for each object you render so as to move it into position. The view matrix represents the camera location, you typically set this once at the start of each frame to position the camera. The view matrix contains information about how points should be perspectively projected onto the screen, you usually only need to set this once right after creating the device (unless your camera has a zoom function, in which case you change it as you need to).
The DirectX help file provides a number of useful functions for creating and manipulating matrices. The code is spread across a few articles, but I've collected it all into one code segement which I'll show next. I've made a few minor modifications, e.g. inlined each function for the sake of speed. Most functions should be pretty self-explanatory, but here's a brief summary anyway:
You'll typically use the above functions to generate the world matrices, i.e. those that are used to move objects into position. The following functions are used to create DrawPrimitive's camera and view matrices:
Here is the matrix code:
inline D3DMATRIX IdentityMatrix()
{
return D3DMATRIX(1,0,0,0, 0,1,0,0, 0,0,1,0, 0,0,0,1);
}

inline D3DMATRIX ZeroMatrix(void) // initializes matrix to zero
{
D3DMATRIX ret;
for (int i=0; i<4; i++)
for (int j=0; j<4; j++)
ret(i, j) = 0.0f;
return ret;
} // end of ZeroMatrix()

// Multiplies two matrices.
inline D3DMATRIX MatrixMult(const D3DMATRIX a, const D3DMATRIX b)
{
D3DMATRIX ret = ZeroMatrix();
for (int i=0; i<4; i++)
for (int j=0; j<4; j++)
for (int k=0; k<4; k++)
ret(i, j) += a(k, j) * b(i, k);
return ret;
} // end of MatrixMult()

D3DMATRIX Translate(const float dx, const float dy, const float dz)
{
D3DMATRIX ret = IdentityMatrix();
ret(3, 0) = dx;
ret(3, 1) = dy;
ret(3, 2) = dz;
return ret;
} // end of Translate()

D3DMATRIX RotateX(const float rads)
{
float cosine, sine;

cosine = (float)cos(rads);
sine = (float)sin(rads);
D3DMATRIX ret = IdentityMatrix();
ret(1,1) = cosine;
ret(2,2) = cosine;
ret(1,2) = -sine;
ret(2,1) = sine;
return ret;
} // end of RotateX()

D3DMATRIX RotateY(const float rads)
{
float cosine, sine;

cosine = (float)cos(rads);
sine = (float)sin(rads);
D3DMATRIX ret = IdentityMatrix();
ret(0,0) = cosine;
ret(2,2) = cosine;
ret(0,2) = sine;
ret(2,0) = -sine;
return ret;
} // end of RotateY()

D3DMATRIX RotateZ(const float rads)
{
float cosine, sine;

cosine = (float)cos(rads);
sine = (float)sin(rads);
D3DMATRIX ret = IdentityMatrix();
ret(0,0) = cosine;
ret(1,1) = cosine;
ret(0,1) = -sine;
ret(1,0) = sine;
return ret;
} // end of RotateZ()

D3DMATRIX Scale(const float size)
{
D3DMATRIX ret = IdentityMatrix();
ret(0, 0) = size;
ret(1, 1) = size;
ret(2, 2) = size;
return ret;
} // end of Scale()

inline D3DMATRIX ViewMatrix(const D3DVECTOR from, // camera location
const D3DVECTOR at, // camera look-at target
const D3DVECTOR world_up, // world’s up, usually 0, 1, 0
const float roll) // clockwise roll around
// viewing direction,
// in radians
{
D3DMATRIX view = IdentityMatrix();
D3DVECTOR up, right, view_dir;

view_dir = Normalize(at - from);
right = CrossProduct(world_up, view_dir);
up = CrossProduct(view_dir, right);
right = Normalize(right);
up = Normalize(up);

view(0, 0) = right.x;
view(1, 0) = right.y;
view(2, 0) = right.z;
view(0, 1) = up.x;
view(1, 1) = up.y;
view(2, 1) = up.z;
view(0, 2) = view_dir.x;
view(1, 2) = view_dir.y;
view(2, 2) = view_dir.z;
view(3, 0) = -DotProduct(right, from);
view(3, 1) = -DotProduct(up, from);
view(3, 2) = -DotProduct(view_dir, from);

if (roll != 0.0f)
{
// MatrixMult function shown below
view = MatrixMult(RotateZ(-roll), view);
}

return view;
} // end of ViewMatrix()

inline D3DMATRIX ProjectionMatrix(const float near_plane, // distance to near clipping plane
const float far_plane, // distance to far clipping plane
const float fov) // field of view angle, in radians
{
float c, s, Q;

c = (float)cos(fov*0.5);
s = (float)sin(fov*0.5);
Q = s/(1.0f - near_plane/far_plane);
D3DMATRIX ret = ZeroMatrix();
ret(0, 0) = c;
ret(1, 1) = c;
ret(2, 2) = Q;
ret(3, 2) = -Q*near_plane;
ret(2, 3) = s;
return ret;
} // end of ProjectionMatrix()
So we need to call the appropriate functions to generate the three matrices mentioned above. In this example I'll assume that the world matrix is 0 (i.e. we'll be specifying where vertices actually are in 3D space), the camera is positioned at the origin and is looking towards z positive with no roll, and the projection matrix is set to a 60 degree FOV. Here is the code I use:
m_World = IdentityMatrix();
m_View = ViewMatrix(D3DVECTOR(0,0,0), D3DVECTOR(0,0,1), D3DVECTOR(0,1,0), 0);
m_Projection = ProjectionMatrix(1.0f, 1000.0f, (float)(60*PI/180)); // 60 degree FOV
Once you've created these matrices you should set them with calls to the SetTransform() function:
m_pDevice->SetTransform(D3DTRANSFORMSTATE_WORLD, &m_World);
m_pDevice->SetTransform(D3DTRANSFORMSTATE_VIEW, &m_View);
m_pDevice->SetTransform(D3DTRANSFORMSTATE_PROJECTION, &m_Projection);
Rendering a 3D Primitive
Rendering a 3D triangle is very similar to the 2D case, but you specify the triangle's coordinates in 3D world space rather than screen space. DrawPrimitive will transform the points by the world matrix to position them, then by the view matrix to find where they are relative to the camera, then by the projection matrix to project them onto the screen (actually D3D undoubtedly combines all three matrices into one and performs only one matrix transformation, but the net result is the same).
With the 3 matrices set above we can again call DrawPrimitive(), this time passing in an array of D3DLVERTEX instead:
D3DLVERTEX v[3];
v[0] = D3DLVERTEX(D3DVECTOR( 0, 2,10),D3DRGB(1,0,0),D3DRGB(1,0,0),0,0);
v[1] = D3DLVERTEX(D3DVECTOR( 2,-2,10),D3DRGB(0,1,0),D3DRGB(1,0,0),0,0);
v[2] = D3DLVERTEX(D3DVECTOR(-2,-2,10),D3DRGB(0,0,1),D3DRGB(1,0,0),0,0);
m_pDevice->DrawPrimitive(D3DPT_TRIANGLELIST,D3DVT_LVERTEX,(LPVOID)v,3,NULL);
Note that we are now in world space, so x is positive going right, y is positive going up and z is positive going into the screen. Also the origin point <0,0,0> is centered on the screen. This is all very important to remember, because DrawPrimitive by default performs counter-clockwise back-face culling. Get your axis' mixed up, and the triangle will be culled.
To construct the D3DLVVERTEX variables above we need to pass in 5 values: the coordinate in 3D world space, the diffuse color component, the specular color component and the UV texture coordinates (not used yet). The result you see on the screen at this point should look fairly similar to the 2D triangle, but try playing with the coordinate values above (particularly z) to move points around.
The Render State
The SetRenderState() function is used to modify various DrawPrimitive rendering parameters. You pass in the state variable you wish to render as well as the value you wish to set it to (dependent on the parameter you're setting). The DirectX documentation covers this function in detail, but here are a few of the more important parameters:
D3DRENDERSTATE_TEXTUREHANDLE: Sets the handle of the current texture used to map triangles. Set it to NULL to remove texture mapping.
D3DRENDERSTATE_TEXTUREPERSPECTIVE: Toggles perspective correct texture mapping. Set it to TRUE to enable perspective correction, and FALSE to disable it.
D3DRENDERSTATE_SUBPIXEL: When set to TRUE, this parameter enables subpixel accurate texture mapping. Leaving this disabled can result in a significant speed increase, but vertical texture lines "warble" up and down as the viewpoint changes. I hate the effect myself, and always enable this feature, but some people with slow machines may prefer you to at least give them the option.
D3DRENDERSTATE_FILLMODE: Specifies how triangles should be filled. You'll usually want to set this to D3DFILL_SOLID to fill in the triangle with a color or texture.
D3DRENDERSTATE_SHADEMODE: Allows you to specify flat, gouraud or phong shading. Pass in D3DSHADE_FLAT, D3DSHADE_GOURAUD or D3DSHADE_PHONG.
D3DRENDERSTATE_MONOENABLE: When set to TRUE, this enables the monochromatic lighting model. When monochromatic lighting is enabled the blue channel is used to interpolate the shade intensity across a face. Setting this parameter to FALSE enables RGB rendering in which each of the 3 RGB components is interpolated across the face and used to shade their respective color components in the texture. In software rendering RGB is significantly slower than monochromatic, so you'll usually want to set this parameter to TRUE.
D3DRENDERSTATE_SPECULARENABLE: Enables specular highlights. This tends to look somewhat more realistic but it's much slower to render, particularly during software rendering.
D3DRENDERSTATE_CULLMODE: Sets the backface culling mode. Passing in D3DCULL_NONE will cause triangles to always be rendered regardless of their orientation. D3DCULL_CW will cause triangles with clockwise vertices (after projection onto the screen) to be ignored. D3DCULL_CCW will cause triangles with counter-clockwise vertices to be ignored. Like most other apps, I define the vertices of my triangles in clockwise order, so I set D3DCULL_CCW (which also happens to be the default).
D3DRENDERSTATE_DITHERENABLE: Toggles dithering. Dithering doesn't seem to slow rendering down too much on my machine, but both the software renderer and my hardware accelerated card apparently use some kinf of Bayer dithering which results in a noticable (and annoying) dither pattern across the face of my triangles. I usually disable this.
The next three parameters allow you adjust how and if DrawPrimitive performs z-buffering. If you want to z-buffer your primitives then you must create a z-buffer surface and attach it to the surface you're rendering to. Providing control over how z-buffering is performed allows us to perform high-speed rendering of dynamic objects into a scene. Quake, for example, renders all it's static geometry at the start with no overdraw. During this rendering phase pixels depths are not compared, but it does write to the z-buffer as it goes along. When all static polygons have been rendered they are left with a scene of all the static objects along with a corresponding z-buffer image of the same scene. Full z-buffering is then enabled, and the dynamic objects are rendered into the scene. If we are also using a zero-overdraw algorithm to render the scene (e.g. portals) then we can apply the same technique by modifying the following parameters:
D3DRENDERSTATE_ZWRITEENABLE: Setting this to TRUE tells DrawPrimitive to fill the z-buffer with values as it renders primitives. (Unfortunately the format of the z-buffer itself varies from card to card, and DrawPrimitive has no functions to convert formats for you. This feature is one area in which OpenGL is superior).
D3DRENDERSTATE_ZENABLE: When set to TRUE, this parameter causes DrawPrimitive to test the z value of each pixel against the corresponding entry in the z-buffer. If the new pixel is closer then it is rendered over top. Note that the old z value will not be replaced with the new value unless the D3DRENDERSTATE_ZWRITEENABLE state is enabled.
D3DRENDERSTATE_ZFUNC: This state is used to specify how the comparison between z depths is performed. Typically you will want to leave this at it's default value of D3DCMP_LESSEQUAL.
The rule of thumb to remember when setting render states is that you should only set them when you absolutely have to. In general, states will not change until you change them yourself, and you can set them either inside or outside the BeginScene()/EndScene() sandwhich. States such as the view matrix will obviously have to be set once per frame. Others such as the world matrix and texture handle may have to be set numerous times in a given scene. Most however should be set right after you create the D3D device and then let be.
Applying a Texture
As mentioned in the preceding section, you set the current texture by calling SetRenderState() and passing in the D3DRENDERSTATE_TEXTUREHANDLE identifier with a handle to the texture. To get a handle to a texture you call the texture objects' GetHandle() member function. To get the texture itself you can do a QueryInterface() on a regular DirectDraw surface (note that the surface dimensions must be power-of-two).
The first step is thus creating a DirectDraw surface and bltting a bitmap image onto it. We can ask the surface for a device context and then use the regular GDI BitBlt() function to do the copy. The important thing to keep in mind here is that the source image must be a device-indepent bitmap. In my experience, most drivers seem to handle device-dependent bitmaps as well, but a few (notably those made by NumberNine) don't. If your bitmap is a linked resource then the safest bet is to use the LoadImageFunction() like the DirectX samples do.
Here's a very simple function written for MFC which loads a bitmap resource, creates a DirectDraw surface for it, performs the blt and then frees the bitmap. I threw this together pretty quickly, so it's messy and uses gotos (ack!) to handle errors. This is definately not the kind of code you'd want to use in a commercial application, but it'll do for this simple demo. The function accepts a string identifying the bitmap resource, and a boolean variable indicating whether the surface should be created in system memory or VRAM:
LPDIRECTDRAWSURFACE CMainFrame::CreateBitmapSurface(CString resname, BOOL hardware)
{
 LPDIRECTDRAWSURFACE pSurface = NULL;
 HBITMAP hbm = 0;
 BITMAP bminfo;
 DDSURFACEDESC ddsd;
 CBitmap bitmap, * oldbitmap;
 CDC surfacedc, bitmapdc;
 HDC dc;

 // Load the resource
 hbm = (HBITMAP)LoadImage(AfxGetResourceHandle(), resname, IMAGE_BITMAP, 0, 0, LR_CREATEDIBSECTION);
 if (!hbm)
  goto texture_error;
 bitmap.Attach(hbm);

 // Find out how large this bitmap is
 if (!GetObject(hbm, sizeof(bminfo), &bminfo))
  goto texture_error;

 // Create a surface for this bitmap
 ZeroMemory(&ddsd, sizeof(ddsd));
 ddsd.dwSize = sizeof(ddsd);
 ddsd.dwFlags = DDSD_CAPS | DDSD_WIDTH | DDSD_HEIGHT;
 ddsd.dwWidth = bminfo.bmWidth;
 ddsd.dwHeight = bminfo.bmHeight;
 if (hardware)
  ddsd.ddsCaps.dwCaps = DDSCAPS_TEXTURE | DDSCAPS_VIDEOMEMORY;
 else
  ddsd.ddsCaps.dwCaps = DDSCAPS_TEXTURE | DDSCAPS_SYSTEMMEMORY;
 if (m_pDD->CreateSurface(&ddsd, &pSurface, NULL) != DD_OK)
  goto texture_error;

 // Now copy the bitmap to the surface
 if (pSurface->GetDC(&dc) != DD_OK)
  goto texture_error;
 surfacedc.Attach(dc);
 bitmapdc.CreateCompatibleDC(&surfacedc);
 oldbitmap = bitmapdc.SelectObject(&bitmap);
 surfacedc.BitBlt(0,0,bminfo.bmWidth,bminfo.bmHeight,&bitmapdc,0,0,SRCCOPY);
 bitmapdc.SelectObject(oldbitmap);
 pSurface->ReleaseDC(surfacedc.Detach());

 // If we made it here then the function was a success
 DeleteObject(hbm);
 return pSurface;

texture_error:
 TRACE("Error creating texture\n");
 RELEASE(pSurface);
 if (hbm)
  DeleteObject(hbm);
 return NULL;
}
The next step is to query this surface to get a pointer to the IDirect3DTexture 2 object, and then call the GetHandle() member function to get a handle to pass into the SetRenderState() function. I'll assume the variable m_pTexture points to the surface, here's the code you need:
D3DTEXTUREHANDLE m_TextureHandle;
LPDIRECT3DTEXTURE2 texture;
if (m_pTexture->QueryInterface(IID_IDirect3DTexture2, (LPVOID *)&texture) != S_OK)
 return FALSE;
texture->GetHandle(m_pDevice, &m_TextureHandle);
With a handle to the texture we're now ready to draw a texture mapped 3D polygon. I'm going to modify the DrawPrimitive code slightly to draw a triangle strip. As you can see, I specify the 4 endpoints in the correct order so that two triangles are rendered forming a square. You'll also notice that I've set the light intensity of all components to maximum, and I've set the texture coordinates as well. Texture coordinates range from 0-1, and specifying values outside this range cause it to wrap around (handy for tiling textures).
// Set the current texture
m_pDevice->SetRenderState(D3DRENDERSTATE_TEXTUREHANDLE, m_TextureHandle);

// Render a texture mapped square
D3DLVERTEX v[4];
v[0] = D3DLVERTEX(D3DVECTOR(-2, 2,10),D3DRGB(1,1,1),D3DRGB(0,0,0),0,0);
v[1] = D3DLVERTEX(D3DVECTOR( 2, 2,10),D3DRGB(1,1,1),D3DRGB(0,0,0),1,0);
v[2] = D3DLVERTEX(D3DVECTOR(-2,-2,10),D3DRGB(1,1,1),D3DRGB(0,0,0),0,1);
v[3] = D3DLVERTEX(D3DVECTOR( 2,-2,10),D3DRGB(1,1,1),D3DRGB(0,0,0),1,1);
m_pDevice->DrawPrimitive(D3DPT_TRIANGLESTRIP,D3DVT_LVERTEX,(LPVOID)v,4,NULL);
The output of your program should look something like this:

(Note that the quality of this image is rather poor. This is due to a combination of my running the demo in 320x240 mode, and the fact that I can't draw textures to save myself!).
Motion
The next step is to add some kind of motion. One way of doing this is to have a fixed camera and spin the objects around, which is typically accomplished by adjusting the object's m_World matrix. Another way, and the way I'll preset here, is to keep the objects fixed and have the user control the camera, i.e. the m_View matrix.
In order to achieve smooth motion that has a consistent speed regardless of rendering rate you need some method of accurately measuring the time between successive frames. Probably the easiest way of doing this is by calling the multimedia function timeGetTime(). Under Win95, It's accurate to within 1 millisecond, more than enough for our needs.
In this demo I have the camera respond to keystrokes. To keep things simple I'm relying on the GetAsyncKeyState() function to determined which keys are pressed, rather than using DirectInput. The following define allows you to pass in a key's virtual key code and it returns 0 (FALSE) if the key is not pressed and 0x8000 (TRUE) if it is:
#define KeyPressed(key) (GetAsyncKeyState(key) & 0x8000)
Then for each frame I call the function UpdateCamera() which checks to see what keys are pressed and applies the appropriate transform to the camera matrix m_View. I also maintain a DWORD variable call m_LastTime which is used to calculate the elapsed time between frames. The transforms are scaled by this value to achieve a consistant animation speed.
Here is the code I use to update the camera. It doesn't use acceleration and resistance, so it's not the smoothest motion you'll find, but it'll do. Notice how I start off by getting the elapsed time and then doubling that if the user is holding the SHIFT key down. The left and right keys turn the camera left and right, unless the ALT key is pressed in which cases it causes the user to slide left and right. UP and DOWN keys move the user forward and back. PAGEUP and PAGEDOWN cause the user to tilt up and down. HOME and END cause the user to move up and down along the camera's y axis. INSERT and DELETE cause the user to swivel left and right about the camera's local z axis:
// Get current time, calculate elapsed time and update m_LastTime for the next frame
DWORD thistime = timeGetTime();
DWORD elapsed = thistime - m_LastTime;
m_LastTime = thistime;

// If the user is holding down the shift key then double the elapsed time, this effectively speeds up the motion
if (KeyPressed(VK_SHIFT)) elapsed *= 2;

// Check for depressed keys and update camera matrix accordingly

#define MOTION_SPEED 0.01f
#define TURN_SPEED   0.001f

if (KeyPressed(VK_UP))   m_View = MatrixMult(Translate(0,0,-MOTION_SPEED*elapsed), m_View);
if (KeyPressed(VK_DOWN)) m_View = MatrixMult(Translate(0,0, MOTION_SPEED*elapsed), m_View);
if (GetAsyncKeyState(VK_MENU) & 0x8000)
{
 if (KeyPressed(VK_LEFT))  m_View = MatrixMult(Translate( MOTION_SPEED*elapsed,0,0), m_View);
 if (KeyPressed(VK_RIGHT)) m_View = MatrixMult(Translate(-MOTION_SPEED*elapsed,0,0), m_View);
}
else
{
 if (KeyPressed(VK_LEFT))  m_View = MatrixMult(RotateY(-TURN_SPEED*elapsed), m_View);
 if (KeyPressed(VK_RIGHT)) m_View = MatrixMult(RotateY( TURN_SPEED*elapsed), m_View);
}
if (KeyPressed(VK_NEXT))   m_View = MatrixMult(RotateX( TURN_SPEED*elapsed), m_View);
if (KeyPressed(VK_PRIOR))  m_View = MatrixMult(RotateX(-TURN_SPEED*elapsed), m_View);
if (KeyPressed(VK_INSERT)) m_View = MatrixMult(RotateZ( TURN_SPEED*elapsed), m_View);
if (KeyPressed(VK_DELETE)) m_View = MatrixMult(RotateZ(-TURN_SPEED*elapsed), m_View);
if (KeyPressed(VK_HOME))   m_View = MatrixMult(Translate(0,-MOTION_SPEED*elapsed,0), m_View);
if (KeyPressed(VK_END))    m_View = MatrixMult(Translate(0, MOTION_SPEED*elapsed,0), m_View);

// We've made our changes, so set the new view matrix
m_pDevice->SetTransform(D3DTRANSFORMSTATE_VIEW, &m_View);
Now that we have motion, the artifacting that occurrs due to non-subpixel accurate texture mapping becomes a lot more apparent. In order to fix this we need to set the render state to enable both the D3DRENDERSTATE_TEXTUREPERSPECTIVE and D3DRENDERSTATE_SUBPIXEL parameters.
At this point we should also try and display something a bit more interesting than a single polygon. In the code that follows, I've written extra code to render the six sides of a cube, and it's here that we run into one of DrawPrimitive major short-comings: the texture coordinates for each vertex are in the same structure as the 3D world coordinates. If we have two vertices that share a common world coordinate but have different texture coordinates and/or lighting, then we have to add that vertex into the vertex list twice, once for each occurance. This is usually fine for polygonal mesh models which are mapped with the single continuous texture across many faces, but it's useless for things like a floor and two walls with different textures meeting at the same point. In this case the point has to go through the entire transformation/projection stage three times, once for each surface. This is a serious flaw IMHO, and one that I hope is fixed in the next DirectX release. In the mean time I've created the cube by calling DrawPrimitive 6 times, once for each face (In this particular demo I could have used a single triangle strip for 4 of the faces, but I'll keep things simple).
What follows now is my entire rendering code. It calls the routine to update the camera position, clears the back buffer, starts a scene, draws the cube and finishes up. Notice that I've also adjusted the lighting values for each vertex to add some contrast in the image:
// Update the camera position
UpdateCamera();

// Clear the back buffer
DDBLTFX bltfx;
ZeroMemory(&bltfx, sizeof(bltfx)); // Sets dwFillColor to 0 as well
bltfx.dwSize = sizeof(bltfx);
m_pBackBuffer->Blt(NULL,NULL,NULL,DDBLT_WAIT|DDBLT_COLORFILL,&bltfx);

// Start a DrawPrimitive scene
m_pDevice->BeginScene();

// Set the current texture
if (m_pDevice->SetRenderState(D3DRENDERSTATE_TEXTUREHANDLE, m_TextureHandle) != D3D_OK)
 m_pDevice->SetRenderState(D3DRENDERSTATE_TEXTUREHANDLE, NULL);

// Render a texture mapped square
D3DLVERTEX v[4];
v[0] = D3DLVERTEX(D3DVECTOR(-3, 3,10),D3DRGB(1.0,1.0,1.0),D3DRGB(0,0,0),0,0);
v[1] = D3DLVERTEX(D3DVECTOR( 3, 3,10),D3DRGB(1.0,1.0,1.0),D3DRGB(0,0,0),1,0);
v[2] = D3DLVERTEX(D3DVECTOR(-3,-3,10),D3DRGB(1.0,1.0,1.0),D3DRGB(0,0,0),0,1);
v[3] = D3DLVERTEX(D3DVECTOR( 3,-3,10),D3DRGB(1.0,1.0,1.0),D3DRGB(0,0,0),1,1);
m_pDevice->DrawPrimitive(D3DPT_TRIANGLESTRIP,D3DVT_LVERTEX,(LPVOID)v,4,NULL); // front face
v[0] = D3DLVERTEX(D3DVECTOR( 3, 3,10),D3DRGB(0.6,0.6,0.6),D3DRGB(0,0,0),0,0);
v[1] = D3DLVERTEX(D3DVECTOR( 3, 3,16),D3DRGB(0.6,0.6,0.6),D3DRGB(0,0,0),1,0);
v[2] = D3DLVERTEX(D3DVECTOR( 3,-3,10),D3DRGB(0.6,0.6,0.6),D3DRGB(0,0,0),0,1);
v[3] = D3DLVERTEX(D3DVECTOR( 3,-3,16),D3DRGB(0.6,0.6,0.6),D3DRGB(0,0,0),1,1);
m_pDevice->DrawPrimitive(D3DPT_TRIANGLESTRIP,D3DVT_LVERTEX,(LPVOID)v,4,NULL); // right face
v[0] = D3DLVERTEX(D3DVECTOR( 3, 3,16),D3DRGB(1.0,1.0,1.0),D3DRGB(0,0,0),0,0);
v[1] = D3DLVERTEX(D3DVECTOR(-3, 3,16),D3DRGB(1.0,1.0,1.0),D3DRGB(0,0,0),1,0);
v[2] = D3DLVERTEX(D3DVECTOR( 3,-3,16),D3DRGB(1.0,1.0,1.0),D3DRGB(0,0,0),0,1);
v[3] = D3DLVERTEX(D3DVECTOR(-3,-3,16),D3DRGB(1.0,1.0,1.0),D3DRGB(0,0,0),1,1);
m_pDevice->DrawPrimitive(D3DPT_TRIANGLESTRIP,D3DVT_LVERTEX,(LPVOID)v,4,NULL); // back face
v[0] = D3DLVERTEX(D3DVECTOR(-3, 3,16),D3DRGB(0.6,0.6,0.6),D3DRGB(0,0,0),0,0);
v[1] = D3DLVERTEX(D3DVECTOR(-3, 3,10),D3DRGB(0.6,0.6,0.6),D3DRGB(0,0,0),1,0);
v[2] = D3DLVERTEX(D3DVECTOR(-3,-3,16),D3DRGB(0.6,0.6,0.6),D3DRGB(0,0,0),0,1);
v[3] = D3DLVERTEX(D3DVECTOR(-3,-3,10),D3DRGB(0.6,0.6,0.6),D3DRGB(0,0,0),1,1);
m_pDevice->DrawPrimitive(D3DPT_TRIANGLESTRIP,D3DVT_LVERTEX,(LPVOID)v,4,NULL); // left face
v[0] = D3DLVERTEX(D3DVECTOR(-3, 3,16),D3DRGB(0.2,0.2,0.2),D3DRGB(0,0,0),0,0);
v[1] = D3DLVERTEX(D3DVECTOR( 3, 3,16),D3DRGB(0.2,0.2,0.2),D3DRGB(0,0,0),1,0);
v[2] = D3DLVERTEX(D3DVECTOR(-3, 3,10),D3DRGB(0.2,0.2,0.2),D3DRGB(0,0,0),0,1);
v[3] = D3DLVERTEX(D3DVECTOR( 3, 3,10),D3DRGB(0.2,0.2,0.2),D3DRGB(0,0,0),1,1);
m_pDevice->DrawPrimitive(D3DPT_TRIANGLESTRIP,D3DVT_LVERTEX,(LPVOID)v,4,NULL); // top face
v[0] = D3DLVERTEX(D3DVECTOR(-3,-3,10),D3DRGB(0.2,0.2,0.2),D3DRGB(0,0,0),0,0);
v[1] = D3DLVERTEX(D3DVECTOR( 3,-3,10),D3DRGB(0.2,0.2,0.2),D3DRGB(0,0,0),1,0);
v[2] = D3DLVERTEX(D3DVECTOR(-3,-3,16),D3DRGB(0.2,0.2,0.2),D3DRGB(0,0,0),0,1);
v[3] = D3DLVERTEX(D3DVECTOR( 3,-3,16),D3DRGB(0.2,0.2,0.2),D3DRGB(0,0,0),1,1);
m_pDevice->DrawPrimitive(D3DPT_TRIANGLESTRIP,D3DVT_LVERTEX,(LPVOID)v,4,NULL); // bottom face

// Done rendering
m_pDevice->EndScene();
The demo application supplied at the end of this article shows the application at this point, although I've also bumped up the resolution to 640x480x16bpp. If you run it move around a bit you should see something like this:

Z-Buffering
Z-buffering is a technique used to perform hidden surface removal, and is often implemented in hardware by the display card. Before a pixel in rendered, it's z-distance from the viewpoint is calculated and compared against a table of z values for all pixels on the screen, i.e. the "z-buffer". If the distance is closer, then the new pixel is plotted and it's corresponding value in the z-buffer is replaced with the new value.
One very important thing to keep in mind is that quite often drivers use integer or fixed-point variables to store the z-values. If the distance between the front and back clipping planes is too large then the range of z values have to be spread out too far in order to cover the entire z range possible. They don't have enough resolution to properly z-buffer objects, and you start getting some really strange looking artifacting. Try and keep the front and back planes as close as you can when you create the projection matrix. In this demo I use values of z=0.1 for the front plane and z=1000.0 for the back.
The first step to implementing a z-buffer is to create the z-buffer itself, and it's here that many people run into problems. The resolution of the z-values (i.e. the number of bits used to store each one) varies between drivers. In order to determine which z-depths are supported we must query the driver to find out which depths it supports. However, in order for z-buffering to work the z-buffer must already exist and be attached to the backbuffer at the time the Direct3D driver object is created.
Fortunately, we only need to make a few minor adjustments to the demo at this point in order to create each object in the correct order. Right after we create the back buffer we should call FindDevice() to get the guid for the device we can use. The D3DFINDDEVICERESULT variable we passed into FindDevice() contains the information for each driver (hardware and software) including the bit depths it supports. Once we've selected a supported bit depth we can create the z-buffer, attach to the back buffer and then go ahead and create the Direct3DDevice2 object.
The D3DDEVICEDESC structures initialized by FindDevice() contain a member called dwDeviceZBufferBitDepth. We determine the bit depths supported by the driver by masking this value with predefined constants, e.g. DDBD_16 for 16 bits per z-value. Current supported bit depths are 8, 16, 24 and 32. I've never tried an 8-bit driver, but my guess is it would look pretty bad for scenes of any complexity, so I choose to make it the last choice. Here's the code I use to select a bit depth (result is the D3DDEVICEDESC structure we passed into the FindDevice function) :
DWORD depths = hardware ? result.ddHwDesc.dwDeviceZBufferBitDepth :
result.ddSwDesc.dwDeviceZBufferBitDepth;
DWORD bitdepth;
if (depths & DDBD_16) bitdepth=16;
else if (depths & DDBD_24) bitdepth=24;
else if (depths & DDBD_32) bitdepth=32;
else if (depths & DDBD_8) bitdepth=8;
else return FALSE;
The next step is to create the z-buffer itself. This is similar to creating the back-buffer, but we pass in the DDSCAPS_ZBUFFER caps flags instead of DDSCAPS_OFFSCREENPLAIN and DDSCAPS_3DDEVICE. We also need to initialize the appropriate member with the z-buffer bit depth:
// Create a z-buffer and attach it to the backbuffer
TRACE("DrawPrim Demo: Creating z-buffer\n");
ZeroMemory(&ddsd, sizeof(ddsd));
ddsd.dwSize = sizeof(ddsd);
ddsd.dwFlags = DDSD_CAPS | DDSD_WIDTH | DDSD_HEIGHT | DDSD_ZBUFFERBITDEPTH;
ddsd.dwWidth = SCREEN_WIDTH;
ddsd.dwHeight = SCREEN_HEIGHT;
ddsd.dwZBufferBitDepth = bitdepth;
if (hardware)
 ddsd.ddsCaps.dwCaps = DDSCAPS_ZBUFFER | DDSCAPS_VIDEOMEMORY;
else
 ddsd.ddsCaps.dwCaps = DDSCAPS_ZBUFFER | DDSCAPS_SYSTEMMEMORY;
if (m_pDD->CreateSurface(&ddsd, &m_pZBuffer, NULL) != DD_OK)
 return FALSE;
if (m_pBackBuffer->AddAttachedSurface(m_pZBuffer) != DD_OK)
 return FALSE;
Next, we need to enable z-buffering by changing the appropriate driver states:
m_pDevice->SetRenderState(D3DRENDERSTATE_ZENABLE,TRUE);
m_pDevice->SetRenderState(D3DRENDERSTATE_ZWRITEENABLE,TRUE);
Enabling the first state causes DrawPrimitive to calculate the z-value for each pixel and compare it to the z-buffer table. The second state tells it to write the new z-value if the pixel is in fact rendered. Having seperate control over each state like this allows us to do the neat little trick that games like Quake do for hidden surface removal. Often the static objects in a scene (walls, floors etc) can be rendered with an efficient zero-overdraw technique such as portals. If we set the ZENABLE state to FALSE and the ZWRITEENABLE state to TRUE then DrawPrimitive will always render it's pixels and create a corresponding z-buffer for us, but won't bother wasting time comparing the z-values with those already in the table. Once finished, we'll have a z-buffer corresponding to the scene rendered so far. We can then reenable full z-buffering and render all dynamic objects into the scene.
Don't forget to clear
the z-buffer once at the start of each frame, in order to set all
values to the maximum. This can be done right after clearing the
backbuffer with code such as the following:
// Clear the z-buffer
D3DRECT rect;
rect.x1 = 0;
rect.y1 = 0;
rect.x2 = SCREEN_WIDTH;
rect.y2 = SCREEN_HEIGHT;
m_pViewport->Clear(1, &rect, D3DCLEAR_ZBUFFER);
Finally you might want to render another cube behind the first so as to make sure that z-buffering is working. The demo uses the same code used to render the first cube, but with 20.0 added to all the z world components.
Z-buffering also works well when rendering D3DTLVERTEX vertices. To do this, set up for z-buffering as you would normally but be sure to also set the z component of each screen pixel, ranging from 0 at the front plane to 1 (not inclusive) at the back plane.
Summary
That's it for this version of the tutorial. I've only covered some of more basic DrawPrimitive features here, but it should be enough to get started. In future versions I hope to cover some of the other commonly used features, e.g. lights and materials. So far I've found DrawPrimitive and DirectX 5 as a whole to be a substantial improvement over previous versions. I still think OpenGL is a superior product (not to mention somewhat easier to understand), although I haven't had have nearly as many problems getting DrawPrimitive to actually work than I did for both MS OpenGL 1.1 and CosmoGL. In short, it's a very worthwhile addition to the DirectX Game SDK.
Click here to download the full demo and source code (~260K).
Copyright (c) 1997 Mark Feldman (pcgpe@oocities.com) - All Rights Reserved
This article is part of The Win95 Game Programmer's Encyclopedia
Please retain this footer if you distribute this file.