
I get so many emails asking me how I did my titles, and Font displays. Though they are all different,most of them are beveled. In starting these tutorials I wanted to keep it to Native photoshop filters ,so I am going to show you how to bevel text without 3rd party filters. If you are using Photoshop 5, you can now simply type your text, right click on the "T" in the layers pallet, choose effects, and choose the bevel and emboss tab. If you are using 4 keep reading. It isnt hard, but I will tell you that the way I do it, and the easiest way is with a filter. I use Eye Candy 3, by Alien Skin, And Extensis Photobevel, which is part of phototools plugin, and you can download it as freeware!! I would really recommend getting either eye candy or Extensis Phototools, because the time and work they save you is well worth the cost..They do more than bevels, they do dropshadow, glows, and more. I would be glad to go into the differences in the 2 plugins , if you are interested, email me. You can download a demo of Eye Candy 3 or Extensis Phototools 2 to let you see what they do before you buy them...OK, now on to the tutorial.
1. Create a new image, 400 X 200 pixels RGB.
2. Set colors to default, and Type your text in black on a white background. Flatten the image (layer/flatten image)
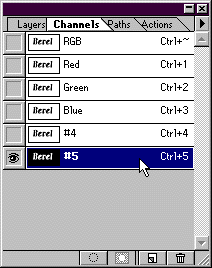
3. click on the channels tab, and drag the blue channel (or any other) to the new channel icon to create channel 4.

4. now drag channel 4 to the new channels icon to create channel 5.
5. now invert channel 5 (image /adjust /invert or ctrl-i) and load it by holding ctrl and clicking on it. you should now have a black image with white text, and a marquee surrounding the text.

6. invert the selection so the background is selected..(click on select/ inverse) and feather the selection 4 to 6 pixels depending on the width and size of your text. for the text image at the top of the page, I used 4.
7. press delete on the keyboard to make a soft gray/black outline inside the text. (you may need to press delete 2 or 3 times, depending on the text width. wider text needs more black. If your image doesnt look like you want it to, try pressing delete more or less times til it looks right) Then deselect and click on RGB to return to the composite channel.
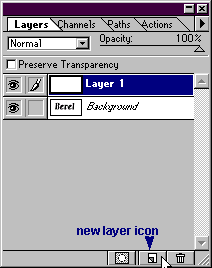
8.Click on the layers tab. create a new layer by clicking on the new layer icon at the bottom of the layers pallet.

9. Choose a color, texture, gradient, whatever to fill this layer with and fill it all.
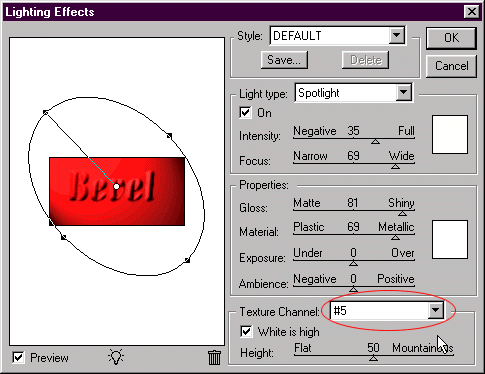
10. Now, click filter render lighting effects. try the settings in the illustration below, or tweak them until the effect suits you. be sure to set the texture channel to #5, or the effect wont work at all.

11. Now the effect is almost complete. Load channel 4, (select, load selection, channel4) and invert it. Fill it with the background color or pattern of your web page, (I filled the background with white ) or the color you have chosen for transparency...If you like you can add a drop shadow or glow.

Back | Home |Tutorials| email | next tip