
Stamped text.
This tutorial was written for Photoshop 4, but directions have been added for version 5 users also. There may be slight differences in channel naming, etc., but all of the basic directions are there. Email me with any questions.
1. start with a new file, 400X150 pixels RGB.
2. Click on the black and white swatch thumbnails to switch to default colors (black foreground, white background.)
3. fill the background with black.
4. Click the arrow above the color swatches to swap background and foreground colors and type your text in white.
* Photoshop 5 users only: after you type the text, go to the layers Pallet and right click on the 'T' . click render layer from the menu that appears.
5 Use the magic wand tool to select the text and save the selection as a channel . select>save selection>new channel .It will be named alpha 1 in version 5 or channel 4 in version 4
*Tip: The easiest way to select text, or anything else that is on it's own layer is to use select>load selection>layer 1 transparency. In Photoshop 5, it might be called 'stamp' transparency, or whatever text you are using. Version 5 names text layers whatever the text is.
6. Flatten the image. Layer>flatten image .
7. Again, switch to the default colors by clicking on the color swatch thumbnail.
8 Make sure nothing is selected select>deselect (or select>none in version 4). Then apply the plaster filter. Filter>sketch>plaster with these settings: light direction top-left, Image balance 20 smoothness 2.
9 now to colorize the image, with the wand selector, select all of the black. (Be sure to select the small spots inside the image by holding the shift key) then invert the selection. Select>inverse Set the foreground color to the color you would like the text to be.
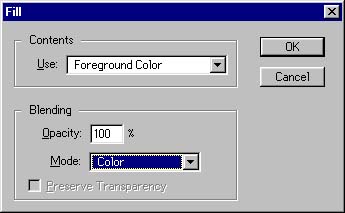
10. Fill the image with the color in color mode. (If you use normal mode for the fill, you will loose the shadows and texture). Choose edit>fill>foreground color then click the drop down arrow and switch the mode to color as shown in the illustration below. Leave opacity at 100%
11. Load alpha 1 channel ( or channel 4 in version 4)select>load selection>alpha 1 as new channel. Select>modify>contract 1 pixel.
12. Use the tool that looks like an eye dropper and click in the text to pick up a dark part of the color you used for the foreground color. Then choose edit>stroke, 2 pixels center as shown in the illustration below. This will give the text the stamped look. To see if you like the result before excepting it, choose view>hide edges.

13. When the image is satisfactory, click select>deselect. (Select>none in version 4). Delete the extra channel by dragging it to the trash icon on the bottom of the channels pallet, and save the image in the format of your choice. The image at the top was colored with masks and stuff for one of my Photoshop classes. This one (below) was just colored with "pink" and rose to make it look like a stitched satin pillow or something . I used both here to show you some of the variation that is possible.

Back | Home | Tutorials | email |next tip