|
|


Round Beveled Buttons
|
|
This is similar to the rectangular buttons technique using a new channel and lighting effects. In order to achieve the type bevel that you want, you can tweak the lighting effects. These work best with Dark Colors. This technique uses only native Photoshop filters. I have the eye candy filters, and many others that will create round beveled buttons, but you have more control over the final out put if you use Photoshop itself to create buttons and bevels.
1. Create a
new file (File/New RGB 100X100 pixels) 
2. With the elliptical marquee tool, make a round selection. Be careful not to make it too big, or it will touch the edge of the file and be distorted.
3 set the background
color to the color you want the button to be. (I
started with dark green)
4. Press delete. This will fill the circle with the background color.
5. Click Select/save selection (as new channel) this will be channel 4.

6. Click Select/modify/contract 6 pixels...and save this as new channel (Select/save selection/ new channel . this will be 5)
7 Click Select/Load Selection Channel 4. The whole green circle is once again selected.
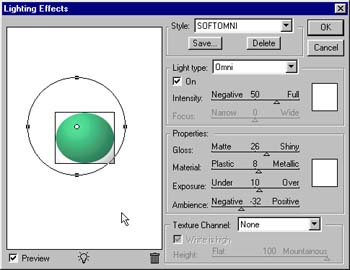
8 Click Filter/Render/Lighting effects..try the settings shown in the illustration..(You may have to tweak the lighting effects to get it to look like a sphere, this is the desired result of this lighting effect)
9. When you get the lighting effects to your satisfaction, click ok, and leave the circle selected. Then load Channel five (Select/Load Selection click the drop down arrow to 5 and click the radio button beside subtract from selection.)

your
selection should now look something like this:
10. Save this as Channel 6 (Click Select/Save selection/new channel)
11. Select, load selection channel 4 so that the circle is once again selected.
12 Click on the Channels tab. Click your mouse on channel 6 to make it active. (you will notice everything looks like it is in grayscale)

13 Apply Filter Blur/Gaussian Blur 2..click ok, then click on RGB in The channel palette to return to the composite channel.
14 With the circle still selected, apply filter render, lighting effects,and set the texture channel to 6. You can try the settings on the illustration below or use the default setting and adjust it from there to look the way you want it to. (If you change light settings, don't forget to reset the texture channel back to 6..it will revert to none) When you are happy with the result, click OK.


The
final result has a rim around a beveled button. I don't like the
rim myself, so I do this one final step to get the button as you see
it in the examples at the top of the page.
15.
Select modify contract 3 pixels. edit/copy , file new, edit paste.
(the new file will be the right size for the object copied to the clipboard.
Photoshop is pretty smart that way. :) .. now add text, or whatever.
I added the eye dingbat. Delete the added channels and save as jpg, or gif.
I have a whole page of these buttons on my web site that I made from 1 green
button, (Using Image adjust hue/saturation and making different colors) You
can see them here.
Since this technique has a lot of steps, I recorded it in the actions pallet.you can download the action file here. You can record your own actions for any of these buttons, but it is more difficult when gradients are involved because you have to stop the action to apply the gradient. If you want to know more about using and recording actions, and where to get some, go to the What are actions? Page.

Back | Home | Photoshop | Tutorials | email |next tip