To do Chinese painting student needs to learn some technical terms and some
preliminary studies of the technique of using the brush.
Holding the brush
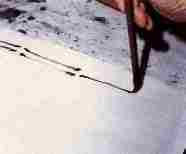
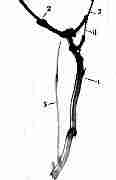
You must hold the brush perpendicular to the paper.
In doing a large painting the wrist and the elbow are raised above the paper, while
doing a small painting one may rest the wrist lightly on the table as shown in the
diagram.
 For
small painting, rest the wrist lightly on the table
For
small painting, rest the wrist lightly on the table
 For
large painting, the wrist and elbow are raised above the paper
For
large painting, the wrist and elbow are raised above the paper
The
vertical stroke technique
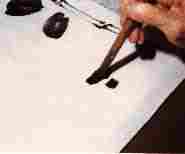
To employ the
vertical stroke, the student must hold the brush steady and
erect, with
the core always at the middle of the brushstroke.
It is generally used
for defining outline or executing dots and flips.
Hold the brush steady and erect with the core always at the middle of the
brushstroke
The
slanted-stroke technique
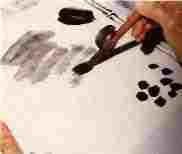
The slanted-stroke
is employed when the handle of the brush slants on one side
and the brush-point
lies on the brim of the brush-stroke.
It is generally used
for the technique for wrinkling, daubing and washing.
The core and the side
of the brush, however, are jointly used in most cases to
express the nature and
form of various subjects.

Hold
the brush and let the handle of the brush slants on one side and the brush-point
lies on
the brim
of the brush-stroke
Big slanted-stroke can be
applied by holding the handle farther more from the brush
Putting
down, closing up, lifting, pressing and breaking
Putting down
the brushstroke on the paper requires technique as well as closing up
It may be light or heavy.
In drawing a line the
painter may half-lift the brush with only the tip touching the
paper to make a swift
and thin line. He may, as the nature of the subject requires,
press the tip of the
brush on the paper to make a thick, heavy line.
In some other cases
he stops a moment and changes the direction of the line, to
make a break in the
brush-stroke. A line therefore, may look smooth or rugged
or may even leave out
some blank spaces in it, deliberately made by not dipping
enough ink in the brush-tip.
Various brush-strokes
suggest different texture of the subjects.
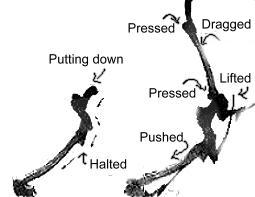

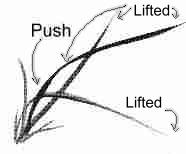
Directing, Dragging and pushing
The painter directs
his brush to draw a line at his discretion from left to right, from
top to bottom, or vice
versa.
He may drag the brush-tip
to go ahead like pulling a string or push it foreward
like moving a stone.
Different ways of using
the brush call for different qualities of the brushstrokes,
e.g. lightness, weight,
fullness, tenacity, ruggedness, and gracefulness.
Student must learn to
observe the various qualities of the brushstroke.
 The dragged-stroke
 The pushed-stroke
The contour method
A small pointed brush is employed in doing the contour method.
Though thinly drawn, the tenacious lines do not only delineate the contour of things,
but also suggest texture, anatomy or structure.
The contour method may be applied before or after colour washes.

The
non-outlining method
The non-outlining
method is to express forms and structures with soggy
brushstrokes without
employing contour outlinings.
First soak the
brush with water, and then dip the tip of the brush into ink. Now
paint a brushstroke
on the paper and at once there is gradation of shade in it owing
to the intermingling
of water and ink. The right gradation of shades can be
adjusted
by soaking the brush with water and ink to the correct proportion, and
the length
and rhythm of the stroke can be achieved by the dextrous manipulation
of the brush..
Click for Lesson 1 2 3 4 5 6 7 8 9 10 11 12 13 14 15
