Click on a thumbnail for a larger version.
|
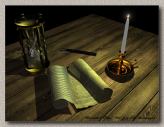
Recorded Time The scroll and its map texture can be found at WorldFordge web site. The table photo map is actually the inside of a bucket model found at the same site. Creative license allows for the use of textures elsewhere than what it was intended. The photo textures on the scroll and table had to be turned to fit the object. This is done by selecting the texture transformation palette and rotating the texture on its X,Y, or Z axis. Change the zero degrees to another number to get the desired rotated effect. The glowing flame of the candle is an applied lens flare filter (with color dodge) found in Adobe PhotoShop. |
|
The penguins in this piece were taken from the Zygote Animal CD. The animals have poseable body parts which can give the art piece movement. Textures are included for each animal and can be applied to give that realistic effect. |
|
This is an exercise using simple geometric shapes and highly reflective surfaces. Various sources of back lighting enhances visibility and depth. |
|
The light beams are cones narrowed and stretched with a light texture effect added. I chose a white cone and added a fuzzy factor to it; then I turned up the transparency to get the illusion of a light beam. Positioning the various cones required I use the top, left, right, and front camera views to move the cones into position. |
|
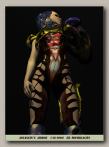
Transparent people are easy to create; using Poser created the male and female models. First, create a male model; save the model in solid form and as a skeleton. I imported the dxf models; first the solid; I selected a color to apply to the model. Turn up the transparency to about 80. Using the attributes of the solid; I imported the skeleton into the solid and gave it a chrome texture (model within a model). |
|
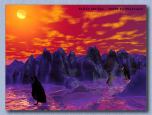
The eagle models and their textures were purchased from Zygote. I moved (posable parts) some areas a bit to obtain a more exaggerated pose. I selected a reddish sky to project how serious eagles might take their fun of being the splendor of the sky. |
|
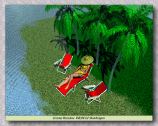
I was able to get interesting grass and sand using a technique I found on the web. This allowed me to produce near realistic grass effect, and I used the same technique in an abbreviated form to produce the sandy beach. If you want the instructions to this technique, please email me. |
|
The underwater scene was achieved by moving the objects and main camera below the horizon line. The camera was then pointed up to get the correct camera angle. The portion that took the longest to get right was the selection of the water surface. You may need select several water textures to get the correct surface reflection. Turning up the bump height helped achieve more reflection. |
|
The train was a highly detailed model but grouped into one object, which made it impossible to assign different colors and textures to the various parts. I was able to create two colors and textures by duplicating the train and making the duplicate slightly larger and with different color and texture. I found I had to increase the Y axis by 500ths at a time to get the two tone desired effect. The rails were created in the terrain editor. Starting with a black and white end shot of a railroad rail. Then, stretching the rail to the desired length. |
|
The Poser model and its props were downloaded from DH-Designs web site. |
|
The ship was taken from the CD of Bryce models by Zygote. Some post rendering work was accomplished using Photoshop to enhance the total image. The palm tree came from the Bryce 2 CD of free included models. |
This page hosted by ![]() Get your own Free Home Page
Get your own Free Home Page