Marlies' Creative Universe
 |
It has been a long time since I have done some serious sewing. Then yesterday
when I was looking through all my sewing patterns I came across baby clothes
patterns and a light bulb went on in my head.
Now that I have a scanner I can reduce the size of just about any pattern
I have to any size I want, even doll size. Also "Pouting Dolls" are big
right now, but I am not interested in the big sized version, for some
reason miniatures appeal more to me.
So I settled down and scanned the pattern for a sleeper with a hood at
100%. Then I shrank it in my graphics program to 50% and 25% of its original
size and printed the pieces. Once the pattern pieces were cut out and
glued together I went on a fabric hunt in my accumulated storage boxes.
Reducing the original pattern by 50% created a 15" tall doll, a 40% reduction
a 12" doll and a 25% reduction an 8" doll.
I cut the fabric with about 1/8" seam allowance added.
Creating the dolls I discovered that the sleeves should be made quite
a bit longer than the pattern (for the 50% doll about 2 inches and for
the 25% doll about one inch).
Materials:
- fabric
- bottle (for larger dolls in tummy)
- 2 pieces of dowel or plastic sticks for legs
- styrofoam ball for head
- quilt batting
- fiberfill
Instructions
- I started by sewing the sleeper together with ½" seam allowance for
the 15" doll and ¼" for the other two. I left the front open so that
I coul stuff the doll.
- Now I had to figure out how to give this doll stability. So I went
hunting for goodies all over the house and came up with a variety of
possibilities depending on the size of the doll.
- For the tummy of the 15" doll I used a half-pint bottle for bottled
water. I filled it to the top with "old" lentils from the pantry and
glued the cap tight to the bottle. For the tumy of the 12" doll I used
an old vitamin pill bottle filled with "old" chickpeas. For the tummy
of the 8" doll I used a 3" piece of bamboo from an old bead curtain.
- For the legs of the 15" doll I found some ¾" plastic tubing. I cut
2 pieces about 4½" long. I attached the tubing to the bottle with glue
and duct tape. For the 12" doll I found two ¾" square pieces of wood
just about the right size and attached those with duct tape to the filled
vitamin pill bottle. For the 8" doll I used 2 3" pieces of bamboo from
an old bead curtain. At the bottom of each leg I put a marble, to make
the doll bottom heavy. I used a big marble for the 15" and 12" dolls
and regular ones for the 8"). Again I attached them with duct tape.
I also used a plastic stick from either a new shoe or balloons. The
stick was around 9 inches long and I folded it in half and attached
a regular sized marble at each end with duct tape. This spreads the
legs more apart in the doll and give more stability.
- Now I covered the whole skeleton with strips of quilt batting.
- For the head I used a 4" styrofoam ball for the 15" doll and for
the 12" doll I used a 4-inch square piece of foam with the corners cut
off. I inserted that into the foot part of a cotton sock and then covered
that with the bottom of an acrylic sock. (Keep the cuff part of the
socks they make great cuffs for just about anything you can sew that
needs cuffs. I have used them on tops for sleeves, or ankle cuffs for
jogging pants for kids and adults alike).
- I didn't cut off the foot part of the sock as I could cover almost
the whole length of the bottle with it. Tie a piece of string around
the bottle where the cap is to give the doll a neck.
- Insert cardboard sole into feet then stuff the feet.
- Now insert skeleton into sleeper and add stuffing around it rounding
it to give it a body shape. Put some extra in the back to create a cute
bottom. For the small doll I did not fill the sleeves. For the larger
dolls I used a double layer of quilt batting the width of the sleeve.
- Now sew tummy shut.
- And sew arms to face.
January 2002 I just finished making a micro pouty
doll.
Anybody interested in buying the pattern for a "mini pouty doll"
just contact me by email.
|
Fotos
updated April 2001

15" doll


12" doll
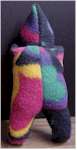 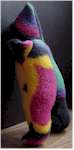
8" dolls

Face view of 8" doll
This doll was the first one before I realized that I had to make the sleeves
longer to cover the face.

Now I learnt and made the sleeves longer |