
The rumour filtered down from the local branch of the British Car Club that there was a TR7 that had to be sold by the end of June. Of course, being the sucker that I am I just had to have a look. Well, I liked what I saw. The price was right, and the job did not seem to be too daunting.
The long and short is that the machine has been stored for at least 4 years. The owner, Richard Mair seemed to have changed his priority from cars to scuba, and his brother was loosing the tenancy on the house where it was stored. It seems to be mainly in need of some TLC rather than a lot of cold hard cash. There is some body work to be done, and of course a complete checkup to make sure that there will not be too many surprises.
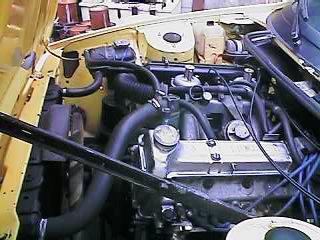
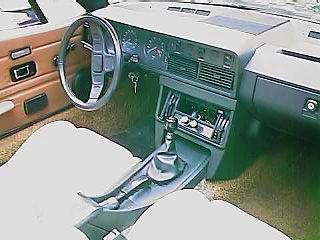
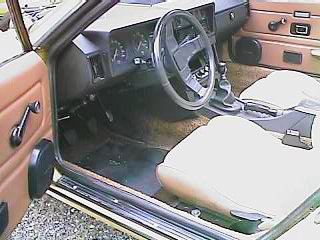
A check of the registration and all the sources confirm it is a 1980, manufactured in May of 1979. Being within the last 2 years of the production line I figure that it will not suffer many of the ills that the early ones did. The seats, a poor point with the car, have been replaced with seats out of a GM "sporty type" car (the make will remain nameless), so the interior is in pretty decent shape. The fuel pump has been converted to electric, which may or may not be good. A complete change out of hoses and belts will be the first order of business. A compression check will determine if the head is ok. Being an all aluminum engine one has to be extremely careful not to overheat the thing. That results in blown head gaskets, warped heads and all sorts of grief. Wish me luck on this one!
OK, so much rambling. This webpage will chronicle the return of this unit to the road, and may be of some use to others returning a similar machine to operation. It is not the first one I have done, and I expect it certainly will not be the last! Following are some words of help for those of you wanting to get a car back on the road. As well, a diary of what I find on this one...
Body work is usually first. Other than surface rust, here are a few things for this car;
The first and foremost thing to do now is find a place for it. Don't laugh, it could be in one spot for a long time. So unless you have a garage plan where you are going to put it. I live in a rainy climate, so under cover is essential.
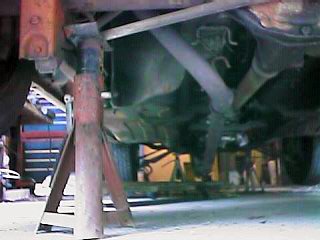
If you don't own em, get some stands. The first thing you should do is get it up on stands. It will make it easier to work on, and allow you to do the things you need to do without constantly moving it or jacking it up!
The mechanicals are the first thing to check. Starting with the engine, then work your way back to the rear axles... Resist the temptation to charge up the battery and turn it over. If the engine is not seized you can go right into checkouts. If it is seized you have to do some detective work. Check to see if the car has been abused. An engine that has "blown" is usually fairly easy to spot. Water in the oil, is the first indication. I always take the valve rocker cover off first anyway. So look for moisture here too. The usual reason for a decent motor to be seized is rust inside the cylinder seizing the rings. If there is enough moisture in the engine to cause this, there is usually a reason. Take out the plugs and try to rock the engine crank to free it. You can often do this by having a chum hold one back wheel and you turn the other (in gear of course). If gentle pressures will not free it, I would recommend the heads be taken off, and the problem found and cured properly.
Next with the valve cover off, and plugs out turn the engine over by hand. Usually tugging on the fan belt will do it now. Pay particular attention to the valves, and specifically the clearances. This engine has valves that are driven directly by tappets from the cam shaft. Be sure that they follow the cam. A valve that is stuck will not follow the cam, and if it is hit by a piston it will surely be bent and permanently damaged. If a valve starts to show signs of being stuck, use a plastic hammer and tap the follower to attempt to release it. If it cannot be released, do not continue to turn the engine. You will need to have all the valves working smooth before you can continue testing.
Once you have assured yourself that the valves are free you can think about turning the engine over to test it. But before you do you have a few preliminary things to do. Locate the distributor and remove the low tension wire between it and the coil. This is necessary in case the points are stuck, or you are going to test the car with the key on. Stuck points, or leaving the key in run position can burn out the coil. By this point I have usually already removed the high tension wires and distributor cap. But, be sure you have all the wires clearly labeled. I know of so many folk that hook up the spark plug wires wrong when re-assembling (I admit to having done this myself..)
If the oil is ok, you can keep it for testing. If there are any signs of moisture, etc. change it (and the filter). If the top of the valves are dry, get some oil and lubricate everything. Now, put the valve cover back on finger tight (to prevent oil from getting out and messing up everything). You can now hook up the battery.
BUT.... when hooking up the battery pay attention to a few things! Hopefully you have remembered to turn everything off and close the doors. Touch the battery post to the battery and watch for sparks! It goes without saying, large sparks mean problems. Little sparks mean something is turned on. There is a lamp in the trunk, so if the boot is open the lamp could be trying to light. Any sparks at this point usually result in a car that will always suffer from a flat battery. There should not be any at this time. But, a small spark does not mean you can't go ahead and test the engine compression. This stage is often referred to as "smoke testing". And believe it or not, on a British car it is exactly that. The first time you connect the battery you should check the entire vehicle, inside and out for signs of shorted wires! If you have an electric fuel pump I would recommend disconnecting it. If you have carb problems you will wind up with a lot of gasoline everywhere...
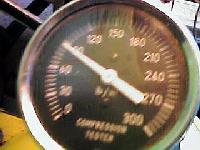
If you are happy at this stage, the next is a compression check. I won't go into the technique of doing a compression check, as if you do not know how to do so, honestly you should not be at this point. Find a chum who does, and ask him/her to show you how! The actual compression of an engine is not as important as you might think. As you do the compression test, be very conscious of leaking gasoline. Your fuel pump will try to feed the carbs, and if there is any problems you will get spilled gas. You might even want to take off the fuel line at the carbs and plug it. Then you also won't be sucking stale gas into the carbs.
What is important is that all the cylinders should have a similar compression reading. If they are all similar congratulations, you have a good starting point for the restoration. If they are not you have some work to do. There are usually 3 reasons for low compression. Worn rings, stuck/worn valves and blown head gaskets. You can check for worn rings. Add about 4 tablespoons of oil to the cylinder that is low. Redo the compression check and watch for a higher reading. If it goes up, the problem is worn rings. If not it is usually worn valves. No compression means a really serious problem, and always results in taking off the heads for a proper look. If the compression is reasonable you can then go on to firing the beast up.
The compression is fine, and all seems good. You can commit to trying the engine. First thing to do is make sure the oil is OK. I actually would have changed the oil at this point. But, sometimes the oil just looks so good you know you can proceed. So, go ahead and hook up the battery. But, don't hook up the ignition. You want to turn the engine over to get the oil circulated. I take the valve cover off, then turn the engine over by battery (with no spark plugs of course) and watch to see signs of oil pumping. Sometimes this can be real impressive with oil going everywhere. Put the cover back on loosely, and watch the gauges (if equipped). You should be able to see some oil pressure on the gauges. If all is fine you can check the fuel system. Hopefully at this point you have not had gasoline piddling out everywhere. I would recommend that you drain the gas tank and put in fresh fuel. Our modern unleaded gasoline does not last a season in storage. If you have a car you can pour the old gasoline in the tank. But, never more than 50% should be old gas, and if you have fuel injection you should never use the old gas. Take it to the recycler and let them worry about getting rid of it!.
Change the in line fuel filter if there is one.
Now, you can check the carbs. Side draft carbs have a damper well of oil. Unscrew the knob and take out the assembly. Don't mix em up on multi carb engines... Take off the air cleaners. Now, carefully reach inside the carb and locate the bottom of the piston. There is a pin often to allow you to raise the piston, but it is not good for this test. You may actually need a screwdriver at this point. Carefully raise the piston and see if it moves free. When you let go it should lower, and often you can hear a little click as it drops to the bottom. Be sure the pistons are free to raise before attempting to start the car. If not, you will have to service the carbs before going any further. If they run free make sure they have about 13mm of 30 weight, light oil in the top dashpot. If so, put the caps back on.
On most cars the coolant levels can merely be checked to make
sure they are up. But on TR7's the system is particularly screwy. The filler
is not the highest part of the system. It
is actually lower than the thermostat housing. This means that you
have to be particularly careful that you get the coolant all the way into
it. I prefer to unmount the coolant reserve tank and raise it up high.
Then fill it up and keep squeezing the top hose to burp it. If you have
an earlier model you actually have a screw
cap on the top of the housing you can undo to bleed the system (mine
doesn't). It is important that you make sure that the coolant has completely
filled this area.
You are now ready to hook up the ignition. First, we all assume that the timing was right when we start an engine. But, usually assume nothing. A stored car could have been partially assembled to keep all the parts together. So, do a thorough visual check for signs that the distributor is mis installed. Failure to check this could result in a fire, and the total destruction of you and the car! Hopefully as part of getting the car on the road you got a copy of a service manual. If not, you just might want to go to the library or a chums and borrow one. A check of timing is pretty good insurance. Follow the instructions in the manual. If you are pretty sure it looks ok, but don't have manuals look for places where the dirt does not match up with where the bolts or clamps would normally line up. If they are OK, then go ahead. Otherwise, err on the side of good judgment and check it out.
Suffice it to say, if you have now put the ignition back and gassed the beast up you might be ready to fire it up. If you have an electric fuel pump, make sure it is hooked up. Turning on the ignition should cause the pump to start and the gas to fill up the carbs. At this point, watch for leaking gasoline. The pump should stop when pressured up. Some cars have mechanical prime levers on the fuel pump to allow you to pressurize the system. Otherwise you are just going to have to turn the engine over to get fuel pressure.
Well, go ahead and try and start it now. This is what you got the car for wasn't it.
But... more cautions. It may be necessary to prime the engine to get it to fire. For this I recommend the universal starting fluid, WD40 (about the only thing I will actually use that shit for!!!!). It will either be congratulations or you now have to do some serious engine restoration. For that I really recommend that you get a manual and/or a chum to help. After all, if you were an experienced car restorer you would not be reading this article would you... If you have it running now, congratulations, you have probably made a really good investment in the hobby.
With TR7's it is especially important that you keep an eye on the
cooling system. So, needless to say the first test run had my eyes
glued to the temperature guage. And, true to my luck, it rose steadily.
So, time to head it for home! Parked it, and there was the trail
of coolant. Thank goodness for Practical Classics magazine.
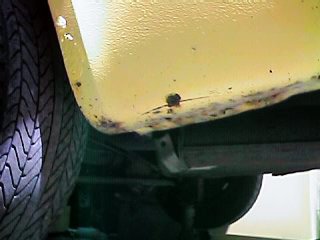
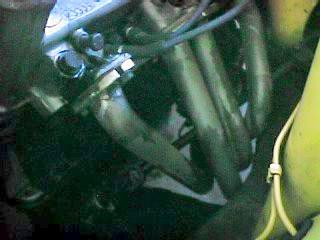
A publication I cannot recommend too highly. The usual telltale for
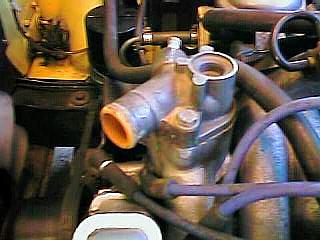
a bad waterpump is a leak on the side of the block. My finger in the photo at the side points to the hole that the pump vents
from. The other picture shows the hole at my finger. Any water leaking
from here is from the water pump, not the block. I found a wad of paper
plugging mine, so I suspect that it has leaked for a while. It is not a
bad replacement according to the books. I will have further words on this
later, but suffice it to say the intake manifold has to come off, so a
good check of the carbs will probably happen then too. But, meantime here
is a link to the appropriate section.
My finger in the photo at the side points to the hole that the pump vents
from. The other picture shows the hole at my finger. Any water leaking
from here is from the water pump, not the block. I found a wad of paper
plugging mine, so I suspect that it has leaked for a while. It is not a
bad replacement according to the books. I will have further words on this
later, but suffice it to say the intake manifold has to come off, so a
good check of the carbs will probably happen then too. But, meantime here
is a link to the appropriate section.

Meantime I will get to the body work while the parts come in. The unit is back on the stands awaiting parts.
This vehicle is no exception. But the first one to check is the fuel pump. It it has been removed check that it has not been tightened too far. That results in a warped backing and a terrible oil leak. As an electric fuel pump is now fitted there is a plate over the old mounting hole now.
Loose Mirrors? There are two screws under the mirror head. The middle one takes off the head. The one closest to the pivot tightens the head. Just give it a twist and the mirror should snug up.
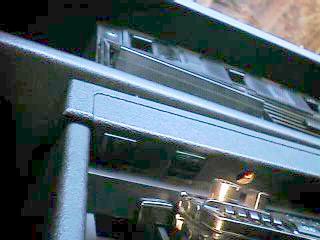
Center console heater lights. The small panel just above the heater contains 4 lights. The panel is removed to replace them. But, do not take out the 2 scews. You will find them under the panel, (I tried to highlight the left hole) Loosen the Philips head screws a couple of turns and pull the panel straight off. BTW, it is a Philips 12829 lamp. Probably not in stock at your auto store. The lamps and holders unclip.
Stay tuned for more. Or how about a visit to my main cars website?