Threading is divided into two categories: internal for mounting screws etc. and external for special screws or fixtures. Although threading can be accomplished on some lathes, most jobs can be accomplished with standard taps for internal and dies for external. These are made from very hard, brittle steel and, especially with taps, require extreme care to avoid breakage.
Taps, dies and bits are available for all screws commonly used in modelling.
ASME: 00-90, 0-80, 1-72, 2-56, 3-48, 4-40.
Metric: 1.0 x 0.25, 1.2 x 0.25, 1.4 x 0.3, 1.7 x 0.35, 2.0 x 0.4, 2.6 x 0.45, 3.0 x 0.5.
In ASME, below these are very expensive instrument screw sizes starting at 00000, while above sizes range into many inches for pipe threading. Frequently single size tap sets are sold including both tap and clearance dill bits.
Unfortunately diameters vary, requiring many different holders, particularly with dies. Fortunately almost all applications require only taps, which can be chucked in pinvises for general work.
Taps come in three styles: Taper or starting, taper chamfered back 10 threads; plug, chamfered back 5 threads and bottoming, chamfered 1 thread. Tapers provide much easier starting and hand alignment. Plugs are then used to finish incomplete threads. Except for critical work, plugs are generally used for both steps and are the ones supplied to hobbyists. However in some shallow blind holes, it is desirable to run threads close to the bottom for better purchase. A bottoming tap can easily be made from a plug by carefully grinding 4 threads from the end and re-chamfering 1 thread. Avoid too much heat, which may soften and ruin.
Dies are normally taper chamfered back 3 or 4 threads at one face for easier starting and alignment. For close shoulder threading, the die is flipped for final threads. While the simplest are solid one piece, some are split for small squeeze sizing. Some larger dies use special stocks for two to four piece cutters. In modeling sizes almost all are one piece, but shape may vary from the common round. In addition, there seems to be a conspiracy to avoid a standard outside diameter necessitating too many stocks. Adding to the mess some may be square or hexagonal. At best most stocks are large and difficult to align.
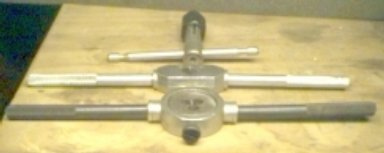
Morris has developed a excellent hand holder for both taps and their special dies for #00-#2, but no other brand dies fit. Some taps have been replaced in the set shown, but dies have lasted 30 years with light careful usage. The thicker hollow handle stores collets for those who do not choose case.

Note: Adjust brightness and contrast for optimum viewing.
MORRIS SET
HOLLOW STORAGE HANDLE ABOVE SOLID SET HANDLE
from front DIES, TAPS (BOTTOMING IN EXTRA LEFT HOLES),
ALLEN WRENCH, COLLETS, HANDLE SLOT.
Moody offers a quick change tap set with their standard screw driver shanks and handle, including #0-80, 1-72, 2-56, 3-48 & 4-40. The only problem seems to be individual replacement.

Note: Adjust brightness and contrast for optimum viewing.
MOODY SET
For smaller metric and others, a good pinvise will serve, but for larger taps, two types of wrenches are normally used. Since tapping requires high torque, both form TEE handles with long extensions. Frequently center drilled for tailstock center, the TEE shaped chuck type is very useful for accurate tapping on lathe as well as freehand tapping. The second type has fixed and handle screw tightened jaws that lock on a square, shank tap end. Die stocks are similar, but with a circular recess to match die outside diameter. The latter two are awkward and difficult to align.
Note: Adjust brightness and contrast for optimum viewing.
TEE TAP WRENCH WITH center ALIGNMENT HOLE
JAW TYPE TAP WRENCH
STANDARD HAND DIE STOCK
Hobby sized, metric dies frequently fit standard ASME stocks.
Unfortunately finding die stocks to match dies is difficult, especially machine chuck-able; prompting many designs from apprentices as a basic turning lesson.

BOB SHIN HAND OR LATHE DIE STOCK
This combination die stock was designed and made by the late Bob Shin, Master Machinist, of FAA Technical center repute, to whom I am indebted for a multitude of tips and wisdom in metal working and the use of screw machines.
Before threading, some setup is required. The correct size hole or rod must be prepared by chamfering . Tap and clearance bit sizes for common model screws may be found on General 's model railroad scale. Many index cases list them. Handbooks list many more including metric.
For most uses, tap drill diameters are:
ASME: nominal diameter minus 1/pitch
metric: nominal diameter minus pitch.
This produces the commonly recommended 75 % thread depth which is only 5 % weaker than full depth and permits far easier tapping.
A good lubricant is an absolute necessity to help remove heat and chips. Either may jam tap, resulting in breakage. For most plastics and softer metals bees wax is excellent. For harder metals and steel (except cast iron), tapping solutions such as Tapfree are the choice. Use enough, at the risk of being sloppy. Anything is better than a broken tap. Standard drill bits will not touch them, so the normal solution is to try and chip them out. This usually ruins hole and either requires filling, if possible, or replacement of work piece.
Clamping the work is highly recommended, since tapping torque may be extremely high. Enter tap squarely and take about 2 or 3 turns. Check with machinists square, removing holder if necessary. Any misalignment will at least create uneven threads and may jam and break tap in deeper holes.
Backout tap a turn or two, every two or three turns to break chips and avoid jams. Repeat until threads are complete. In deeper holes or bottom tapping, it is wise to completely backout occasionally to remove chips. Extreme care must be exercised in feeling the bottom, ramming the tap will surely break it. Some cleanup of burs around rim may be necessary. Finally, check with screw.
Outside threading is similar. Clamp rod securely and start die squarely with fingers for two or three turns using tapered side, then check for true square. A die started crooked will continue to cut crooked, producing the weaker, proverbial "drunken" thread. Back up a turn every 2 to 3 turns to break chips. Flip die for close shoulder threads. Check with nut or intended hole. If too tight, split dies may be tightened and rerun.
For odd or large, internal and external threads; lathes are commonly used with thread chasers or longitudinal feeds with backhead change gear sets.
BACK TO METHODS INDEX
