A sport endurance model that uses a pretty serious chunk of rubber for a model of it's size. It has a unique wing structure that turns out to build quite normally, and a "Y" tail that uses a small rudder hanging from below. While the kit claims that the plane should use a de-thermalizer (DT), it doesn't include any parts in the kit to make one, or show any details on the plan. Since a fuse type DT utilizes fire, I am guessing that it was a legal move to omit those parts from the kit (if they were ever included).
The kit sat on my shelf for some time until I read about another builder on the FFML with one. He was attempting to use the "Ten Steps Method" for trimming his plane, and not having great luck. Other posters mentioned that it wasn't a great flyer, though one comment refering to use of the Mini-maxer in P30 competition caught my attention. Though I have never competed, I'd like to build planes that might put me in a position to do so someday. Having seen other P30 designs I wondered how the Mini-maxer could possibly fit in. More on that later. I was at a point in my building career where I realized that I just needed to get some kits out of the way to increase my skills, so I accepted the challenge.
Building the plane
To save weight I started by sanding all the sheets to 1/2-2/3 of their original thickness. That single step made a significant weight savings.The wood was actually pretty good (from my novice builder perspective). The die cutting is not the greatest, requiring that I chase every line with an knife before pulling parts out. I started with the horizontal stabilizer (actually more of a "v" tail arrangement) to get used to building the curved top spar. Due to the crude die-cutting, I built the plan forms on the board, then pulled them off and sanded the two halves to a perfectly symmetrical shape by pinning them together. Then I could pin the shapes back to the plan before adding ribs with confidence of building a uniform flying surface. I sanded the ribs to a uniform shape by a similar method.
The fuselage is basically a three sided box (sides and bottom) with 1/16" stick wood bracing the top side. I pondered cutting big "lightening holes" in the sheet sides, or even building all new stick built sides by laminating the outlines from basswood. But I like to build kits pretty much as they come, noting that if it was really that bad I could make a second fuselage if needed. I made a temporary jig on my building board to cut all the top braces to a uniform length.
My plane has flown and crashed (full stall over pavement when my kid launched it), and I've made a modification to the nose that I highly recommend: Replace the small front cross brace with a piece of sheet balsa clear back to the next cross brace. I also wrapped the nose with a single layer of split Tyvek for added strength. A sort of lamination using wood glue, it lays right down. With the nose re-covered one has to look closely to see that it was ever in a wreck, and I now feel much better about crash durability. Without the sheeted nose, it will likely ingest the nose block on it's first hard landing.
covering
In other reviews (even of high quality kits) people often state "tissue was junk, tossed it out". Not knowing any better I did the same thing, using some of my japanese tissue reserve. While building from a plan at a later date I needed some small scraps of white. I figured that such a small quantity of less than excellent tissue would be okay. Upon close inspection I found the tissue is in fact quality japanese stuff. I began the job of covering with my standard white glue and water method, but looking at all that sheeted area on the fuselage got me to try the glue stick method. I haven't looked back since. I sprayed two coats of thinned Sig Low Shrink dope on it.
After covering the wing, you are supposed to sand some V-notches in some stock provided to make a wing platform. I failed at my first attempt, and came up with an easier solution in the end. I merely glued 4 pieces of 3/16" wood, two on either side of center. I then put a piece of sticky back sand paper on my building board, and by supporting the wing tips on a pair of uniform rails I sanded the blocks so that they left a perfectly flat platform to sit on the fuselage.
Final assembly was no major problem, assuming you spend time to get things straight. The plans have you build the entire plane and balance it with motor and prop in place by sliding the wing back and forth to achieve balance. The idea of course is to balance the plane without additional weight. While the idea sounds great, this would have you install the wing very far aft. This will cause pitch stability problems. I installed the dowels to locate the wing perhaps 1/4" behind the location shown on the plans. I was a little dissapointed to have to give up two pennies located on the nose to achieve balance (I built a stack of two pennies with RTV silicone and then stuck them on the belly of the plane just behind the nose block with the same stuff. I replaced the grey/black rubber, using some Tan II. The plans call for a 20" loop of 1/4" rubber, so I braided up a piece that size.
Back to the P30 reference. The rules turn out to be very simple: no dimension larger than 30", basic airframe weight must be more than 40 grams, uses a motor of no more than 10 grams, and in the real world you have your choice of two props (the Peck 9-1/2" or the famed Czech P30 unit). The Mini-maxer is safely within the size requirements. My plane (minus rubber) weighs 41.5 grams including the two pennies. My motor weighs something like 9.5 grams. The stock prop is a red plastic 7" unit, the only thing that would omit it from being "legal". After I get some flights in, I'll try a legal prop. My plane does not have a DT, though I could easily add one if I ever understand how they work.
So how does it fly?
My first time out it was very windy, and the grass at the local school was swampy. I put 75 turns in it and launched it gently into the wind over pavement. I was pleasantly surprised to see it float about with the prop barely ticking over, requiring only a small folded strip of newspaper under the rear of the stab for "up" trim. After two more similar flights I let my 5 year old launch the plane, which he did exactly like I told him to. The plane departed upwards, but with trivial turns in the rubber it didn't have the power to make it over the top. The wind carried it behind us where it stalled, hitting the pavement, eating the nose block.
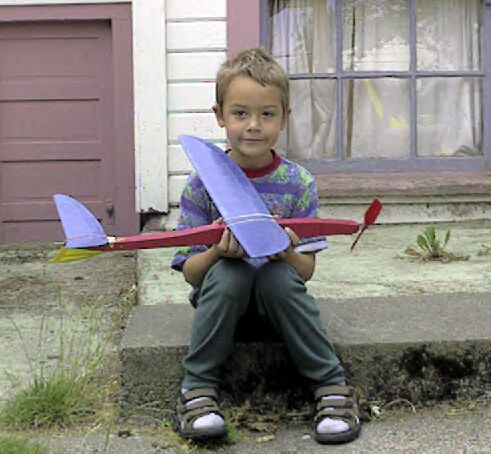
After the repairs mentioned above I flew it again, starting with about 200 turns. Lesson number one was to check the rudder tab (hinged with bread tie wire) to see if it's hard left from being in the car trunk. A left death spiral over pavement under power brought no damage at all, because 'ole Abe (the two pennies) took it on the chin for me. Re-trimmed with slight right rudder took the plane to about 150' (shown here on it's way up) on 500 turns in dead calm air. The plane did not rocket to altitude, but merely circled up for a brief cruise and it circled back down for a landing about 30 feet from where I launched it. Time (and more turns on the winder) will tell if it's a good flyer or not, but for now I'm quite happy. As for faults, I'd say it should be built with the nose modification I've outlined. Also, what may make it difficult for some people to trim is it's use of rubber bands to hold on the primary control surfaces, which means you need to check the alignment before each launch.
Update: I have taken the plane flying on two more occasions. I consistently get 1-1/2 minutes with my two older kids launching it. The most recent flight was at a large field with a light breeze blowing. At one point I thought it was a gonner, but it landed just inside the field. Since I have not tested a motor to destruction, I'm not sure how long it is capable of flying. It seems it can withstand more turns than my feeble winder can put into it. The plane flies consistently left/left even with a touch of right rudder. I can't fully explain this, as the plane is very straight, with the exception of a slight wash-in to the left wing.
One design concern I had was the small fin/rudder hanging from below. I was concerned it would get creamed off on landing, and considered reinforcing the structure (I didn't because I hate to add tail weight). As it turns out, the plane flairs perfectly in ground effect and makes very gentle landings.
This page hosted by  Get your own Free Home Page