Case Preparation and Cartridge Reloading Procedure
I have documented the steps that I take when I prepare my rifle cases for reloading, and my reloading procedure for your information. These steps are fairly simple for those familiar with reloading and for the most part can be accomplished fairly quickly. The more advanced steps (require more time, expertise, and/or expensive equipment) are listed at the end of this page.
I have also taken this page a little past case preparation, and continued on to include tips to include reloading procedures. These tips are intended for reloaders with intermediate to advanced skills. I intentionally did not address the very basics, as this would simply re-hash the already excellent information available in just about ALL of the reloading manuals, and many web sites. Instead, I discuss things I've learned along the way that are NOT necessarily readily available - to build upon the basic knowledge and techniques. Here's a couple good sites for beginners:
PROCEDURE
Please wear eye protection when performing these steps - especially when you are 'machining' the brass (either by hand or using power tools - it makes no difference), or working with primers or gun powder. One other thing I do is clean my tools when I am done using them, as I go. This ensures that I will always have clean tools to work with, and it saves me the tedium of cleaning a whole bunch of tools at once. Doing so would tempt me to do a less than adequate job - just to 'get done'.
- The first thing to do is to clean the brass. I tumble my cases before resizing. My reasons are: (1) clean cases are easier to resize, (2) it is easier on the dies (no grit to wear them), (3) tumbling may dent up the case mouths, but they are straightened out by the resizing die, (4) if you clean after sizing, you will have to poke the media grains out of the flash holes and primer pockets. I still have to clean the primer pockets after depriming.
However, a case can be made to deprime with a universal depriming die. These dies typicaly cost about $10. They don't get dirty, as the only part of the case that they touch is the primer when they decap the case. Some people decap first, then tumble, then resize. The main reason for this is to let your tumbler clean the primer pockets. I have found that this is adds an extra step with no real benefits, as the tumbler does not clean the primer pockets to my satisfacton using a treated corncob / walnut mix.


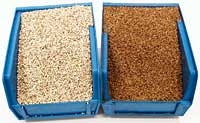
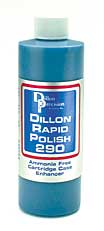
Vibratory tumblers clean faster that rotary ones. There are a few good vibratory tumblers on the market. Dillon Precision, Midway, and Lyman immediately come to mind. I have a Dillon CV-500. I mix walnut hull and corncob media (50/50), and add a good polish, such as Dillon's polish. Midway also has their version, but I find the Dillon gets the job done quicker. Also - the more you fill up the tumbler (with media and/or brass), the better it seems to work. One more thing - as soon as you have room for it and can afford one (they're only about $30 - $35), get a ROTARY media/case separator. These are basically 'baskets on a pole' that spin over a 'catch tub'. They quickly separate ALL the media from your cases. I like the ROTARY ones (I have a Dillon) better than the 'sifters' because the rotary separators gently knock the brass about, clearing out ALL media - even most of the media that gets stuck inside the cases.
Hint : You can buy walnut hulls and ground corncob A LOT cheaper from pet supply stores or even supermarkets. Just be careful NOT to use 'large diameter' media when tumbling small mouthed cases, as the media can pack and jam inside the case, making it a CHORE to remove - even with a media/case separator.
For really filthy cases, I use a water/vinegar case cleaning solution to get most of the crud off. I then let them dry, and tumble as usual. This solution tends to turn the brass to a slight pink hue. Polishing in your tumbler will remove this hue, restoring the 'brass shine'.
After a while, the inside of your tumbler will get dirty. You will see brown/gray deposits along the rim and at the base of the "central cone". Some people quarter a paper towel, and put it in with their brass. They say it works great. I've tried it, and it works 'OK'. However, every so often, after emptying my tumbler, I take a good strong cleaner (I like Brownell's D'Solve, but any good household cleaner - like 'Fantastic' or even 'Windex' - should work fine), spray it in, and clean it out with a paper towel.
Whatever deposits or staining on the brass that the tumbler does not remove (if anything), may be polished off with fine steel wool (000) or a polish that does NOT contain amonia. Ammonia reacts chemically with [dissolves] brass - severely weakening it!
- Next, check the case exterior for damage. Examine the case - especially the neck - for cracks and toss out cases with any cracks no matter how minor. This is much easier to do on polished, shiny, clean cases than on cases that are clean, but not shiny.
- Now check the inside of the case for thinned out brass (separation) at the expansion ring just above the case head. A stiff piece of wire (a coat hanger works well) about 6" long with one end sharpened at about a 45 degree angle. It's important to sharpen the 'feeler' end to increase sensistivity. If the end is blunt, it won't 'fall into' the separation ring. Then, bend about 1/8" to 1/4" of this sharpened end to a 90 degree angle with a pair of pliers. Bend the other end (your handle) into a loop that will fit 2 or 3 fingers to make the tool easier to handle. A stiff wire works better than a soft wire because it transmits feeling to your hand much better. Gently pull the wire back and forth near the case head to feel inside the case with this tool, rotating the case as you probe up and down so you check the entire inside circumference. This should only take a few seconds per case. It will be very noticeable to you when a case is experiencing separation. Discard the case if you feel any indication of separation. A blown case is just NOT WORTH the trouble it can cause.
- The next step is to polish the INSIDE of the case neck. I learned a neat trick from
Varmint Al. He uses a simple home-made tool that holds stainless steel wool which he attaches to a drill. With this tool, he polishes the edge of the case neck to remove all tiny burrs. I used this idea to polish the inside of my case necks. All I do is take an old, worn-out bore brush, and wind stainless steel wool on it. I chuck it in my drill press (set at about 430 RPM), and run the cases over the brush. This procedure accomplishes three things - it keeps your resizing die fairly clean, makes it easier to resize, and smooths the inside neck, which I believe improves accuracy by providing a more consistent bullet release. This step is mainly for the sake of my dies, as I do this again later for bullet release.
- Use a flash hole deburring tool to clean burrs out of the flash hole INSIDE the case. These burrs have been blamed for uneven powder ignition. The tools cost about $15-20, and the operation can be done fairly quickly by hand. A few twists per case, and you're done. This tool can also be chucked into a drill press, and run at slow speed it works great. One thing you should do is to ease the brass in and out of the flash hole once or twice to clear any brass chips to prevent clogging, binding, or damage to the cutting edge of the tool. This only needs to be done once to each case.
- Uniform the primer pocket with a (you guessed it) primer pocket uniformer tool. They cost $25-35. Once again, the operation can be done quickly by hand. A few twists per case, and you're done, and you've also just cleaned your primer pocket of excess residue. This tool can also be chucked into a drill press, and run at slow speed it works great. Ease the tool squarely into the primer pocket, easing the brass in and out a few times to clear any brass chips to prevent clogging, binding, or damage to the cutting edge of the tool.
I do this every time I reload the brass. After the first time, it functions mainly as a primer pocket cleaner. However, I have found that brass does indeed flow into the primer pockets of my brass at each firing (and my loads are not hot). I usually take a little brass out with the primer residue each time.
- Brush your case necks with an inside case neck lube brush (with mica dry lube), or simply dip them into the dry mica.
- If the case was NOT fired in the rifle you are loading for, full-length size the brass. However, if the fired cases are to be fired again in the same bolt-action rifle (they were fire-formed), 'neck size only' your brass. This works great for bolt action rifles. If you 'neck size only', your finished cartridges may not feed / chamber properly in your autoloading or lever-action rifle. I use the Redding neck sizer die for this operation. If you full-length size the brass, lubricate the brass, run it through your sizing die, and then wipe or tumble them clean.
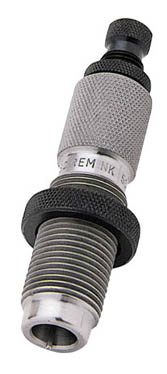
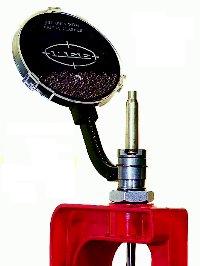
- Trim the brass. I use a LEE trimmer. I chuck the cutter / pilot in my drill press at about 430 RPM, and carefully run all the brass through. Make sure you line the case up STRAIGHT, or it may BIND on the pilot. If you're having trouble with binding, lightly lube the insides of the necks with mica.


LOCKSTUD , CUTTER , SHELL HOLDER , CASELENGTH GAUGE (above)
- Deburr / Chamfer the case mouths. I chuck the INSIDE deburring tool in the drill press (again) at about 430 RPM. This is quick and easy, and the tool self-centers. I now also deburr the OUTSIDES on my drill press as well, because the new RCBS deburring tool that I bought has a shaft that keeps the cases from jumping around and keeps the cases pretty much centered on the tool. Do this just enough to remove burrs - a 'touch or two' on the deburring tool is adequate. Do not 'sharpen' your case mouths.
- Polish the INSIDE of the case neck again (see above) with steel wool.
- Always make sure your dies are CLEAN - a little WD-40, Kroil, CRC, on a cotton swab (like a Q-Tip) works well. I clean every die thouroughly when I get them new (they are usually coated to protect them from corrosion) and a quick cleaning of every die after every use.
Loading Procedure and Tips ...
 Prime your cases. I use the LEE AutoPrime II. This tool mounts in my RCBS press. I found that I must jiggle it every once in a while for the primers to feed down the tube properly. It works great until I get down to the last 15 or so primers. Then I use a small screwdriver to carefully push them along. (For rifles, benchrest primers will probably make a very positive difference in shrinking your group size.). I also bought a LEE hand-held auto-priming tool (the AutoPrime), as it is both portable and you tend to get a much better 'feel' for primer seating with this type of tool. The handheld tool is somewhat finicky regarding the brands of primers it will seat, and LEE's instructions explicitly state which type of primers (only) you should use with this tool. Pay attention to the amount of force required to seat the primer. If excessive force is required (you may have a crimped primer pocket), you will probably deform the primer (or worse -- BANG!) when seating. If the primer seats very easily, the pocket is too loose. When this happens to me, I mark the head with a marker or grease pencil, and discard the case after the next firing.
SAFETY - Remember - no matter WHAT tool you use for priming your cases - PLEASE keep your face away from the case mouth! There is an inherent curiosity to watch the primer seat. What happens if it goes off?!
ALSO - When I prime cases, I only take out the primers I will be USING right then and there. All others are PUT AWAY. The primer brand, type and LOT# are recorded in my book, and the empty sleeve is put in the 'MTM' ammo box with the loaded rounds.
- Charge your cases with powder. A good quality powder measure is a MUST for medium to high volume shooting. In my opinion, if I'm going to load more than about 20 cartridges at a time, I would DEFINITIELY use a power measure. I use an RCBS Uniflow with stand. Other high-quality powder measures are available from most reloading manufacturers. Also - some really SERIOUS (and expensive) benchrest powder measures are available. Ball, flattened ball, and flake powders tend to measure very consistently through powder measures. Extruded (cyclindrical) powders tend not to be as good, although Hodgdon's 'short cut' works much better than standard extruded powders. When 'throwing' extruded powders, I do the following to ensure accurate and consistent loads:
- after every adjustment to the powder throw, I throw 2 charges to 'settle it in'
- when I throw a charge, I give a brisk 'throw' motion, then a brisk 'return', followed by 2 short 'raps'

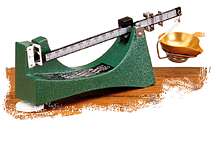
The 'raps' help settle the powder, and eliminate "powder bridging" when using extruded powders. Think of powder bridging as a "mini log-jam" in the drop tube. When using extruded powders for 'super accurate' loads, I will throw a slightly underweight load onto my powder scale, and then bring it up to 'perfect' weight with my powder trickler. This is mostly not necessary, as using the 'short cut' powders or the method described above produce very consistent charges. Here are a few tips regarding using and caring for powder balances and electronic scales - Balances and Electronic Scales - Anomolies and their Causes.
One thing worth mentioning - Once you are set up, the same person should throw all the charges. Why? Believe it or not, with the same setting, two different people will often throw different amounts of powder. This is due to technique - the speed at which one operates the handle, the amount of force one uses to 'throw' the powder, or 'rap-tap' the handle. I have found this phenomenon to be more dramatic with flake powders than with ball or extruded powders, possibly due to flake powder's much higher compressability, but it does happen with them all.
I prefer to charge my cases 5 or 10 at a time, and then carefully check for a uniform powder level, and seat the bullet. I do this because in case I get called away for any reason, I don't leave a tray full of charged cases open on my reloading bench. It is not good to leave powder out where (1) 'curious fingers' may find it, (2) the cases could somehow get knocked over, (3) powder may become contaminated by moisture in the air, or (4) contaminated by any other type of foreign matter. This way, they're "buttoned up".
SAFETY - I only have ONE CONTAINER of propellant out on my reloading bench at a time. This way, I DO NOT become confused as to which powder I'm using, and I don't put the unused powder from the powder throw and/or trickler into the WRONG container. If you ever put gun powder in the wrong container -- DISPOSE OF IT (sprinkle it lightly in your garden - the plants will love the nitrogen). The consequences (a blown up gun and injured person) are just not worth the risk. Also, I ALWAYS put the cap back on the powder container when I am not actually POURING powder. This keeps moisture OUT, prevents a SPILL if the container is accidentally knocked over, and keeps other foreign matter OUT.
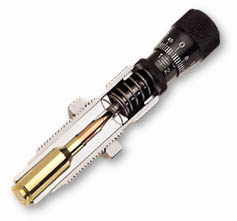
- Seat your bullets. I use the Redding Competition Seating Die. A good seating
die can make a BIG difference, as proper bullet alignment is assured. I think the importance of a GOOD seating die is probably underestimated by a lot of shooters.
- Pay CLOSE attention to bullet seating depth. Bullet distance off the rifle's lands is CRITICAL to accuracy! Your rifle barrel is sensitive to harmonics. When a bullet travels down the bore, the forces at work actualy "whip" the barrel. Think of your barrel as a pendulum, moving the fastest in the middle of an arc, and moving the slowest on the ends, when the barrel motion changes direction. The trick is to match the instant of bullet departure from your barrel to either "node". This gives the best chance to release the bullets at a consistent barrel position, and the best chance at optimum accuracy.
It is important to note that the seating depth of the bullet, as measured from the OGIVE is the important measurement - NOT from he bullet tip. Bullet tips are often deformed and often not even manufactured 'perfectly' to begin with. (See Procedure for 'Working up a Load' for your firearm on this site.)
Determine a good starting point for your cartridge overall length (OAL) using the 'wooden dowel' method like this (from Arnold Arms).
- Exactly what load should I use in my handgun or rifle?
SOME MORE ADVANCED TECHNIQUES ...
There are also some more advanced steps that one can take to prepare even more uniform, high-quality cases. They require a little more work, but once your groups stop shrinking, you may want to try one or more of these techniques:
- Weigh and separate your cases. Some reloaders prefer to do this AFTER preparing their cases (before priming!) to assure 'final-prep' consistency. Others to this before preparing their cases, because they do not want to waste time and effort prep'ing cases that they will end up discarding. It's up to you. I prepare (machine) my cases first, as you never know how much 'flash' material you may remove. You will want an electronic scale to perform this operation. Using a balance is so slow and time-consuming that it may drive you crazy. I like to separate my brass into "1/2 grain" lots (eg. 167.5-167.9 ; 168.0-168.4 ; 168.5-169.0 ...).
- Outside neck turn your case necks for uniform case neck thickness. These tools are fairly expensive, and some are mounted to a bench-mounted trimming tool. Benchrest shooters claim that this makes a BIG DIFFERENCE in proper bullet-to-bore alignment in tight-necked chambers. The value of neck turning for use in standard factory chambers is debatable, from what I've heard and read. Varmint Al does a good job describing ALL ABOUT Case Neck Turning for Factory Chambers.
I don't outside neck turn, as I have all factory chambers. I can certainly see the importance of outside neck turning if you are necking brass down to a smaller caliber - for example, .308 Win to .243 Win . For the common calibers, unless you inherit or save a great deal of money on the brass, you can easily purchase the brass you need in this case. However, in the case of hard to find or wildcat brass, neck turning is certainly justified.
- One way to get around weighing and neck turning the case necks is to buy high-quality match brass like Lapua or Lake City. These cases are so consistent that weighing and turning are not necessary.
- Consider moly coating your bullets. I do this only for my rifles, but some shooters have reported a substantial increase in cleaning ease for their handguns as well.
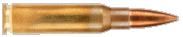
 One more thing you may want to try is case neck annealing. In the photo, the case on the left was NOT annealed, while the case on the right WAS. Notice the color difference in the neck / shoulder area (dull brown/copper). When you fire and resize your brass, it gets work hardened. This will ultimately make your brass brittle, which will result in split necks. I anneal my bottleneck rifle brass every 5th loading. Varmint Al does a nice job of explaining this process (and he also has a lot of good reloading tips), so I won't repeat it here.
However, there is one thing that I do differently - how I hold the cases. I tried making a stick like Varmint Al did, but I didn't have control over the case that I wanted, so I do the following:
- For long cases, like the .30-06 family and longer, I hold the case in my hand, rotating it in the flame until it is heated properly and evenly. Then I drop it in my 3lb coffee can of cold water. By holding the case in my hand, I find it difficult to heat the case too much because it would burn my fingers. Warmth from the case alerts me that it's almost done.
- For shorter cases, I hold the case with a pair of pliers, rotating the case in the flame until it is heated properly and evenly. Then I drop it in my can of cold water.
Be VERY CAREFUL - especially with small cases, as it can be easy to heat the case too much. If you see RED, you heated it too much, cooking the zinc out. You may have also done damage to the case by softening the web. Heat the case neck as quickly as possible with a propane torch (I hold it in the blue cone of the flame) and just until you see a "heat line" move down the neck to the shoulder of the case. Also - check the temperature of the water from time to time. If it is not at least cool, stop what you're doing and change it.
Varmint Al, John Lazzeroni, and Backpack Hunter also cover the steps I have described above. They're worthwhile reading. Check out:
for some more valuable, useful reloading tips. Other excellent sources of information are the various 'reloading' FORUMS on the WWW - check them out!
I hope this write-up proves useful to you. Good shooting from the
Spirit of '76 Gun Page
Spirit of '76 Reloading Page
Last updated : 07 March 2006
