|
here it is, the long awaited workshop with hints to create your
own textures. i try to describe it the easiest and fastest way,
hope the pics will help you. (the size of the pics aren´t
the original size used in the game). basic information of how
to use photoshop is a must.
- the original image (90 degrees turned for better use)
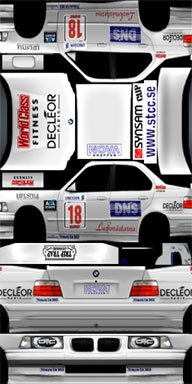
- first of all you have to delete the ad´s (or use a clean
texture instead). use the brush or stamp to clean up the texture.
sometimes you have to draw a line to fullfill the grafix. the
best way to get good light ist to snip them from a photo and resize
it ´till it fits in the texture. use transform in photoshop
to do so. simply copy and mirror the light for the other one.

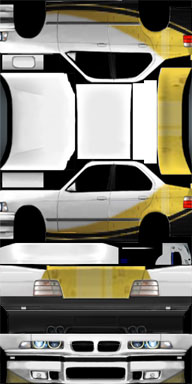
- the m-company stands for tuning-parts for bmw. taking pictures
of a well tuned car and snip the parts you want to use from the
photo for your texture. make sure they are plain captured, so
you can use it without probs of transforming. i used the complete
tuning-set for this car and resized it ´til it fits in my
texture, so you have to do, also. the transfom-tool will help
you once again. hint: the sideview
need only to be done once, if it´s done, simply copy, mirror
and put it over the other (old) one.

- now you have to fix the coloration. use a simple color like
white, it´s the easiest way to change the color of the whole
car later on. use contrast and coloring to do. you have to select
all areas wich you wanna change, later all colored parts of the
car have to be added, so you can change the color of the whole
car. save the selection in one channel, so you can use it as many
times as you want to by reselect. make sure your car isn´t
black ´cause you want see the cars silouette very well.
i also added shock-absorber on the sides to complete the set.
it has to look this way.

- so we got a good base-skin to tune on. i modified several parts.
every red mark stands for a change. as you can see, there are
the lights from the 5-bmw-series, also. (copy and paste from the
original like on top).

- well, change color or paint your be-loved one. you also can
paint over the lights and glasses, but make sure your selection
is saved in one channel, select it and invert the selection as
you now have all the things selected wich get no coloration, simply
delete the color by pressing "del" on your keyboard.
make sure you painted on another level, otherwise you delete the
real lights and so on. select a "see-through"-mode for
this level to still see the silouette from the car.
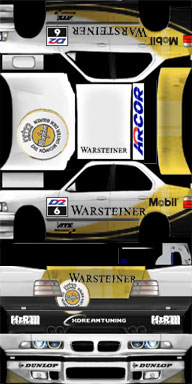
- the only thing missing are the advertises and company-logos, you´ll
get them on the internetsites. you won´t have much work with
these files. simply plug them on your car and don´t forget
your own. at the end you have to copy, mirror and paste the side-view
over the old-one on top (in my grafix a changed them anytime, you´ll
only have to do it at the end).
- done! to use your new texture in the game you have to do the
following steps: flip 90 degrees and save as tga-file (with 24bit/pixel),
copy it into your textures-dir and rename it to the original filename
from the car you edit. (ps: on my pics are no rims, the game will
load them from another file so there don´t have to be rims.)

- this is how the car looks in the game, i used different rims,
you can read how to change them in my "rims-list". you´ll
find them in the "hints"-section. you can get the carskin
without any logos in the "stuff"-area. (a photoshop-file
with the selection for coloration in one channel)
..and now, well painting!
XDT - higher level textures -
XDT
|