Jeep Lift Tech. / How-To
Jeep Comanche Lift tech information:
- A do it yourself spring over axle conversion for the rear suspension. (below)
- A budget lift for the front suspension using poly coil spring spacers. (coming soon)
- Opinions about curing steering woes including the dreaded "death wobble". (coming soon)
Welcome to my web page.
Here's what you'll find:
Jeep Stuff:
My Wicked Jeep Comanche
Jeep Comanche lift tech
Dresser, WI 4x4 fun fest pics
Photo Album
Submitted Photos
Photo Fun
Iron Range Entertainment:
Margie's Roosevelt
Sleeve's Sportsman's
Snicker's Bar and Pizza
Eggy's Red Garter
Hoagie's Bar
Just for Fun:
Web tender (mixed drinks)
Favorite links
Disclaimer: I, in no way, gaurentee the modifications outlined within this document. Any modifications performed should be handled by a profesional designer, engineer and fabricator. Try these modifications at your own risk.

This is my 1989 Jeep Comanche shown with a 3.5 inch rear add-a-leaf, longer front coils and 32x11.5 AT tires. This lift gave fair off road capabilities but the front tires rubbed the fenders at full lock. Suspension articulation was ok but as the front axle articulated the tires would really dig into the fenders, threatening to rip off the stock fender flares
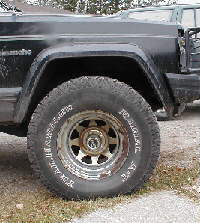
1989 Jeep Comanche with S.O.A. and poly spacer suspension lift
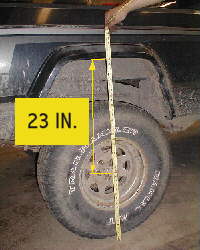
This is my Comanche with the before and after pics of the spring over axle and front coil spacer conversion. Note that I had to remove the add-a-leaf from the rear spring pack so the lift at the frontend wouldn't require to much lift. Check out the hub to fender flare dimensions. The truck now has a slight rake (unlevel). I intend to cure this by adding a new taller coil sping at the front suspension.


AFTER spring-over
BEFORE spring-over
The rear suspension: Spring Over Axle conversion
Parts required: new spring perches, bevel shims, longer ubolts, stock cherokee ubolt plate.
Tools required: Regular hand tools,measuring tape, cutting torch, welder and supplies.
Opening Note: Now is a good time to inspect all existing components like the drive shaft, u-joints, shocks, spring leaves, brake lines, cables and brake hardware. Replace anything that is worn. it will save you time later, especially on the trail. Also it is a good idea to have some help with this project as the rearend can be a bit heavy and awkward to move around on your own. If you are not a skilled welder, hire, bribe, blackmail or seduce one (beer and pizza usually work fine for this). If a novice tries to weld the rear spring perches on and burns thru the axle tube, you have an entirely new project on your hands.The dessciption outlined below may seem simple but expect to spend several hours doing this project. Many things may not go as planned. Seized up brake lines, broken bolts and trips to the hardware/parts store are just a few of the delays you can expect. Finally, I want to express that I use my truck mainly off road. I cannot gaurentee that this modification will hold up to daily abuse on or off road. Try this project at your own risk. This is the set-up that I choose to use for my truck only. Remember to have fun and ...... A.B.C. (Always Be Careful)
How-To:
1. Soak all components to be removed or loosened.
2. Block front wheels, jack and support rear of vehicle.
3. Remove rear wheels. Support rear axle with jack stands.
4. Remove drive shaft. Unhook both shocks at rear lower mount. Remove u-bolts.
5. Disasemble shock mount.
6. Cut or grind off portion of shock mount indicated in photos below.
Special Note: The original mounts are to be modified then reused at the top side of the axle tube.
7. Slip axle out from on top of leaf springs.
8. Reposition axle on 1 or 2 floor jacks.
9. Locate new spring perches on the axle tube directly over (180 degrees) the existing perches.
10. Weld spring perches onto axle (measure twice, weld once).
11. Raise axle back into position.
12. Sandwich the modified shock mount between new perch & leaf spring.
13. Use the longer ubolts to connect the new ubolt plates.
14. Reattach drive shaft.
15. Put wheels back on.
16. Check drive shaft angle with suspension loaded and at full droop.
17. Adjust drive shaft angle with beveled spring shims as required.
18. After drive shaft is adjusted torque down all bolts.
Note A: Carefully reroute brake lines and emergency brake cable.
Note B: Periodically recheck torque on bolts and inspect weld at spring perch for cracks.
Modifications to the original rear shock mounts

Left: Torch or grind off the shaded area of the mount. Do this on both sides of the mount so it clears the axle.
Right: The new spring over axle steup with modified mount in place. Fab or buy a new ubolt spring plate to replace the one i have shown here. A stock Cherokee plate from a junk yard may work.
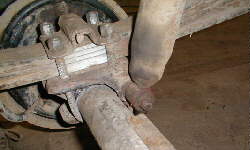


This is Jeff Zadra getting ready to tack weld the new spring perches on the top side of the axle. We chose to tip the differential up a couple degrees instead of using the bevel shim plates. This made adjustments harder so I reccomend using the shims instead.
Check out shop dog Bosley supervising the weld procedures
e-mail me to find out more about Jeff Zadra's mechanical services
Upon doing final measurments I discovered that the rear drive shaft seemed too short. On a shoestring budget and with time running out for a 4X4 Rally in Dresser, Wisconsin, I had a driveshaft lengthened to meet my requirements. The driveshaft needed to be lengthened by about 1 1/2" on my Comnache. Rusty's Offroad offers an extra long driveshaft yoke for about $60. Its splined area is about 1 inch longer than stock. This fix may have worked except that time constraints made it impossible to get it in time for the rally.
DEATH WOBBLE
Opinions and observations on the condition know as "death wobble".
A condition commonly found on lifted MJs and XJs
Rusty's Offroad supplied the new rear spring perches, front coil spacers, extended lower control arms, sway-bar quick disconnects and lengthened trac-bar. These components are crutial to correct steering geometry and handling
