- Pedal Box & Master Cylinder
- Pipe work
- Compensator
- Rear Drums & Shoes
- Front Discs and Pads.
- Hand Brake
- Bleeding
Pedal Box & Master Cylinder - This was pretty straight forward job. The box drops in-between the uprights on the top of the chassis. A bit of jiggling around and it drops into place. The master cylinder needed to be freed from the servo unit, again an easy job. It was then a case of lining things up and drilling the mounting holes. I fitted a small ally blanking plate to cover in the hole below the master cylinder… the thinking being, this gap would be tricky to blank off with a cover at a later date.
Pipe work: The kit comes with some pre-cut, pre terminated pipes. The pipes are copper which is fine but if you look under the skin of any modern car you will find alloy pipe work. The reason being is that copper pipe is susceptible to work hardening, and when that happens it fractures. I went down to my local motor factors and got a roll of Kunifer pipe for about 20 quid…not a lot for piece of mind. The other advantage of Kunifer pipe is that it is much better to work with, it doesn't collapse as easily as copper. Another essential purchase was a pipe bending tool from Machine Mart. Another advantage of going with Kunifer is that I now had plenty of spare copper pipe to play with, this meant it could trial a pipe in copper, then once happy with the shape bend a copy of it in Kunifier on the bench. This method worked a treat, the result was some pretty neat pipe work (even if he does say so himself).
Not using the supplied pipe meant I had to flare and fit the end unions. Luckily I managed to borrow a professional tool to do the job
(don't lend him anything - he broke this as well). Looking at some of the lengths of the supplied copper pipe, I think some shortening and re-flaring would have needed to be done anyway.Fitting a Zetec to a CAT needs some careful consideration regarding the brake set up. The induction and exhaust are the opposite way round on a Zetec engine. This means that the carburettor and brake master cylinder compete for the same space. The options are:
- fit a floor mounted brake pedal thus moving the master cylinder out of the way.
- Offsetting the engine and carefully routing the brake lines to avoid the clash
I opted for the cheaper number 2 option. During the pipe work stage I was careful to route the pipes away from the area directly underneath the master cylinder as much as I could. More on this can be read in the Engine section.
Compensator: The compensator is the strange cylinder with one end narrow than the other that is needed from the donor Sierra (understand which bit from his description?). Its function is to prevent the rear brakes locking up as mass is transferred to the front of the vehicle under heavy braking. The little device sits in line with the pipe going to the rear brakes. It needs to be fitted at approximately 30deg to the horizontal with it's narrow end pointing to the front of the vehicle. I fitted it to the inside of the engine bay on the little triangular panel chassis member in front of the drivers footwell, although many people have fitted it at the rear above the diff on one of the chassis members.
Rear Drums & Shoes: I hate automatic adjusting brake mechanisms! What was wrong with the adjuster screw type device fitted to a lot of vehicles?
I stripped down the rear drums and cleaned everything up. Not knowing the history of the system I opted for replacement. I replaced the brake cylinders (just a couple of pounds each) and new shoes (again, didn't break the bank). The drums looked in reasonable shape so I kept them and gave them a lick of paint. The next job was the tricky one. Fitting the shoes back on was a git of a job. I have done this on plenty of other vehicles and never had any trouble, the reason this one was a pain was I was fighting the auto adjust system - too many springs!
Front Discs, callipers and Pads: This was no problem, exchange callipers, new discs and new pads all from the auto factors. The low cost meant overhauling the old stuff just wasn't worth contemplating and I also end up with brakes I have plenty of faith in.
Fitting was done after the front suspension had been set up, as this left the front hubs lighter to play with. Fitting was easy, the parts slot together and bolt on without a problem. You just need to remember that the bleed nipple goes to the top.
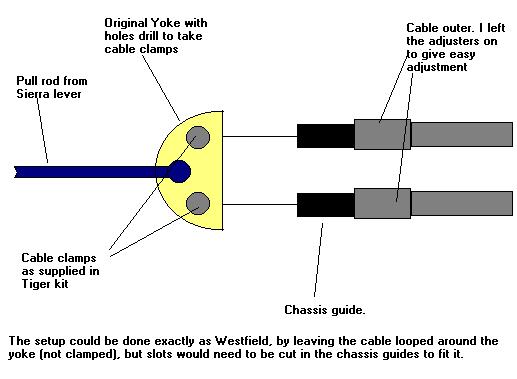
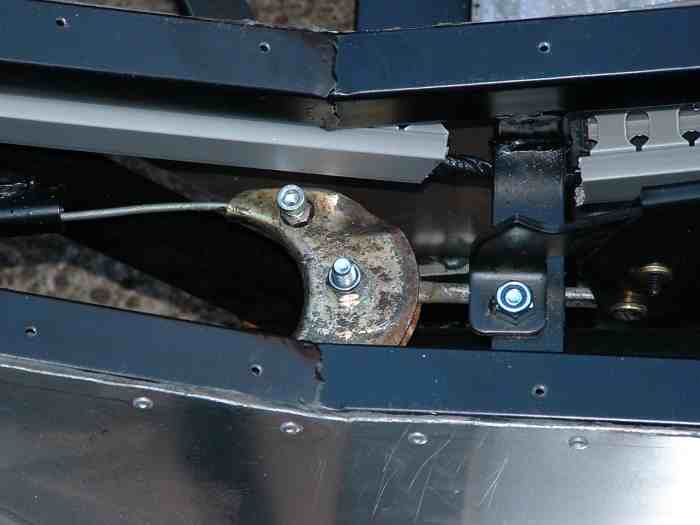
Hand Brake: The Tiger uses the Sierra handbrake but modified. The modification shown in the manual looked poor to me and other builders reported inefficient handbrake operation. I looked in the Westfield manual and saw how they did it and now wonder why Tiger didn't follow suit.
The Tiger method is to make up a balance bar to join the 2 incoming rear brake cables to a short third cable which links to the short metal handbrake pull rod. Adding another cable just means more stretch, the Westfield technique uses the standard Sierra balance yoke and bolts it straight to the handbrake pull rod. As I had already cut the handbrake cable I had to adapt this method slightly but the diagram and photo explains.
I had left fitting the front brake flexi pipes until now... I wish I had fitted them much earlier. Bolting them through the panel was tricky as access was now less than ideal, but after half an hour scrabbling around under the front end we had done it.
Filling and bleeding the system was uneventful. The only leak was a union at the brake bias valve which wasn't tightened up enough. After bleeding each corner about 3 times we had a pretty solid pedal...I can stop as well as go!