Cloudy Sky Plaque
by DWhiteStar

**This tuorial was written
using PSP7 but should also work in earlier versions!**
What
you will need:
PSP7
or earlier
A
sense of adventure!
open
a new image 300 x 300, transparent background, 16.7 million colors
Add
a new layer and name it "sky"
flood
fill  it with a dark medium
blue, I chose to use #5D80F3. it with a dark medium
blue, I chose to use #5D80F3.
Now
with your selection tool  set on rectangle, select about half of the window

Flood
fill the selected area
with a lighter blue color. I chose to use #C6D2FA. Deselect
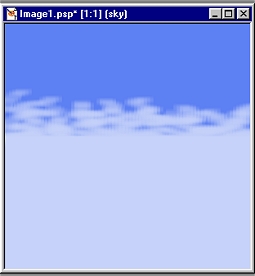
You
should now have something that looks like this:

Now
comes the fun!! Are you ready to paint?? Lets begin!
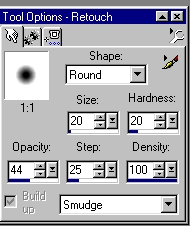
On
your tool bar click on your retouch Tool  and set it to the following

now
to your image, what you want to do is "push" some of the light blue color
into the dark blue color. While you are pusing up vertically also
make sure to mover your mouse in a back and forth manner.
you
should produce something like this
Now
do the same thing but in the opposite direction pulling some of the dark
color in to the light blue

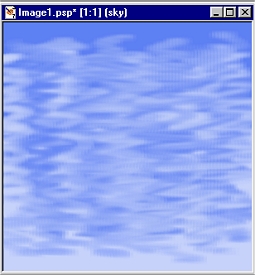
Now
what you want to do is think like a painter and keep moving that "paint"
alternating between moving the dark paint down and the light paint
up. Try and grab some of the "mixed" color as well and push it up
or down. What we are trying to achieve is a "mottled effect" like
this:
Also
try and make sure that you leave some of the dark color at the top and
some of the light color at the bottom completly untouched. But not
strait across, you want the solid color to have a good jagged edge to it.
Now,
still on your retouch tool
change the settings to the following
Now
we want to smudge that paint around and lose some of those "diffined" lines
within each color.
What
you want to do is first starting right at the top of the image, pull the
smudge tool right to the bottom, then start at the top again and keep smudging
DOWN working your way across the image until you reach the end

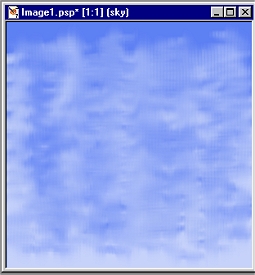
As
you can see by the image above, we have succeeded in "smudging the paint.
Now using the same effect work from the bottom up.
Then
you want to use the same effect working from left to right across the the
entire image and then right to left across the entire image until you have
an effect like this

You
can already see our sky coming to life! Make sure not to smudge too
much or you will wind up with an image which looks like blue mud :)
Trust me, I learned that the hard way! Try not to "smudge" more then
ten times in any of the directions, you will need to space yourself out
a bit because we have alot more smudging to do!!
Now
go to Effects>Blur>Gaussian Blur>Raduis 4

Now
repeat the entire smudging process over again trying to give the "clouds"a
nice whispy effect to them. If you want you can also experiment with
short curving, diagonal, or circular smudges...this is art! What
ever looks good to you works! If it is a sunny day peek out your windows
at the sky for inspiration!
Once
you have your blending to a point you are happy with:

We
are ready to add the foreground clouds!
 Next Next
All
Graphics were designed and created by DWhiteStar
No
part of this page may be copied including graphics and text
without
permission. Thank you.
copyright
2001
|