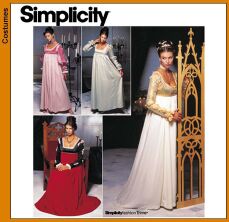
 This pattern is another one of the
reasonable costumes put out by Simplicity in the late
1990s to cash in on historical films. This pattern is
based on the film Ever After. The film was set in the mid
16th century French court, however, for some reason the
characters wore Venetian fashions from around the turn of
the 16th century. Ignoring the film's inaccuracies the
costume is better than most of the others put out by the
major pattern companies but it still needs work to make
it really look accurate. This pattern is another one of the
reasonable costumes put out by Simplicity in the late
1990s to cash in on historical films. This pattern is
based on the film Ever After. The film was set in the mid
16th century French court, however, for some reason the
characters wore Venetian fashions from around the turn of
the 16th century. Ignoring the film's inaccuracies the
costume is better than most of the others put out by the
major pattern companies but it still needs work to make
it really look accurate.The major problem with this pattern is the way the layers are constructed. The designer has cheated and faked 3 layers in one dress. Before you start I'd strongly recommend spending some time looking at Annabella Wake's analysis of this style as well as her collection of artwork from this period. Camicia The first thing to do is make a chemise or camicia, you can use Annabella Wake's instructions based on an extant garment or Jen Thompson's slightly easier version to achieve a similar look. The camica should ideally be made of handkerchief linen however a lightweight cotton, such as lawn, is a reasonable substitute if you can't find linen in an appropriate weight. Under-Dress The next layer is the under-dress, or Zupa, which looks similar to the dress in the bottom right corner of the photo (view B). This is the version of the pattern I have used (with a closed skirt). This is the layer that supports your bust. The best fabric options for this layer are linen and wool, as both of these fabrics have enough flexibility to support your bust without compromising comfort or movement. Silk is the other fabric that could have been easily obtained in early 16th century Italy, however it doesn't have the same flexibility as linen or wool and you may find it harder to achieve the support you want. If you want silk for the outer fabric using linen or wool as a lining may make it a little easier to achieve the right support.
I added an extra seam allowance onto the side seams and cut it out. Then, taking inspiration from Robin Netherton's concept of the Gothic fitted dress; I pinned the bodice until it fitted so firmly beneath my bust that it supports my bust without a bra. I then used this fitted bodice as the pattern to cut my outer fabric and used the original as the lining. Remember to trace your new fitted pattern onto another piece of paper before you sew your bodice together so you don't have to repeat the whole process again next time you want to make the same style of dress. Although for most people this is probably pointing out the obvious I'm still going to mention it, don't use a zipper. I fastened my dress with lacing, although hooks and eyes or buttons are also a period option lacing is more accommodating of shape or size changes. This ability to adjust is especially important in a bust-supporting gown because as your body warms the fabric it will stretch slightly. Once the fabric has stretched it won't do a good job of supporting your bust. This means you will probably need to tighten it a few minutes after you have put it on. I made the mistake of using a non-adjustable fastening. I tried buttons because I didn't have time to sew the eyelets I later found that when the fabric warmed up it stretched and didn't support well, but when the fabric was cold one of my buttons popped off simply because I took a deep breath in. |
|
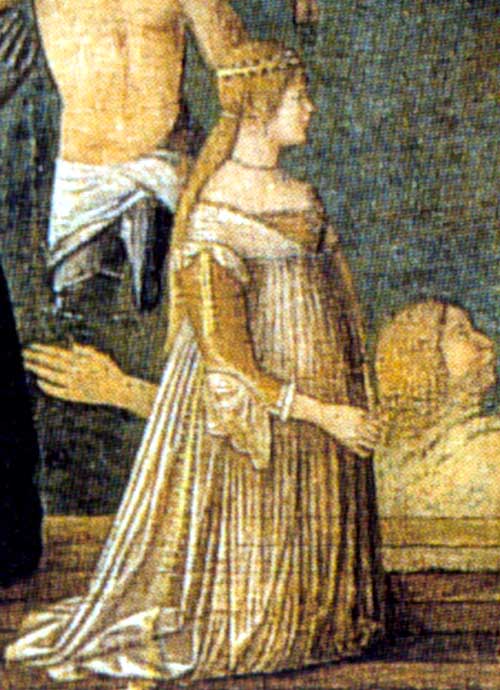
| If you want to
wear this off the shoulder, as you can see in Durer's
drawing, (right) you could start from the pattern for the
V necked gown (view A). Trace it onto another piece of
paper and fill in the neckline to make it follow a
straight line across your body, as you can see in the
drawing. Alternatively you could start from the
under-dress pattern (view B) and widen the angle of the
straps until they sit off the shoulder. In both cases you
will still need to remove the darts as I suggested above.
Without actually having tried to make an off the shoulder
gown I assume that adapting view A would be simpler. I
would personally not choose an off the shoulder gown as
it restricts your ability to lift your arms, however, if
this is the look you prefer, there is pictorial evidence
that the off the shoulder style was popular during this
period. Over-Dress This is the point at which this article becomes conjectural, I have not yet actually made an over-dress. Anabella Wake's analysis of this style shows several styles of over-dress. However I will concentrate mainly on the popular V necked style, as imitated by view A. For this over-dress I would suggest altering the neckline of your underdress pattern to make it a V neck. I would also make the distance between the lowest point of the neckline and the waist at the centre front no longer than two inches so it can be made easily front fastening with one or two hook and eye pairs or some sort of decorative clasp. The bodice for view C without the centre front panel actually looks surprisingly similar to the over-dress worn by the woman in blue (right), however it is a slightly different style with set in sleeves. Sleeves The over-sleeves
(called gauntlets in the pattern) for view A are the only
ones I can find evidence for in the art of this period.
The sleeves for view B appear to be very loosely based on
the later 16th century Venetian fashion for large puffed
sleeves. |
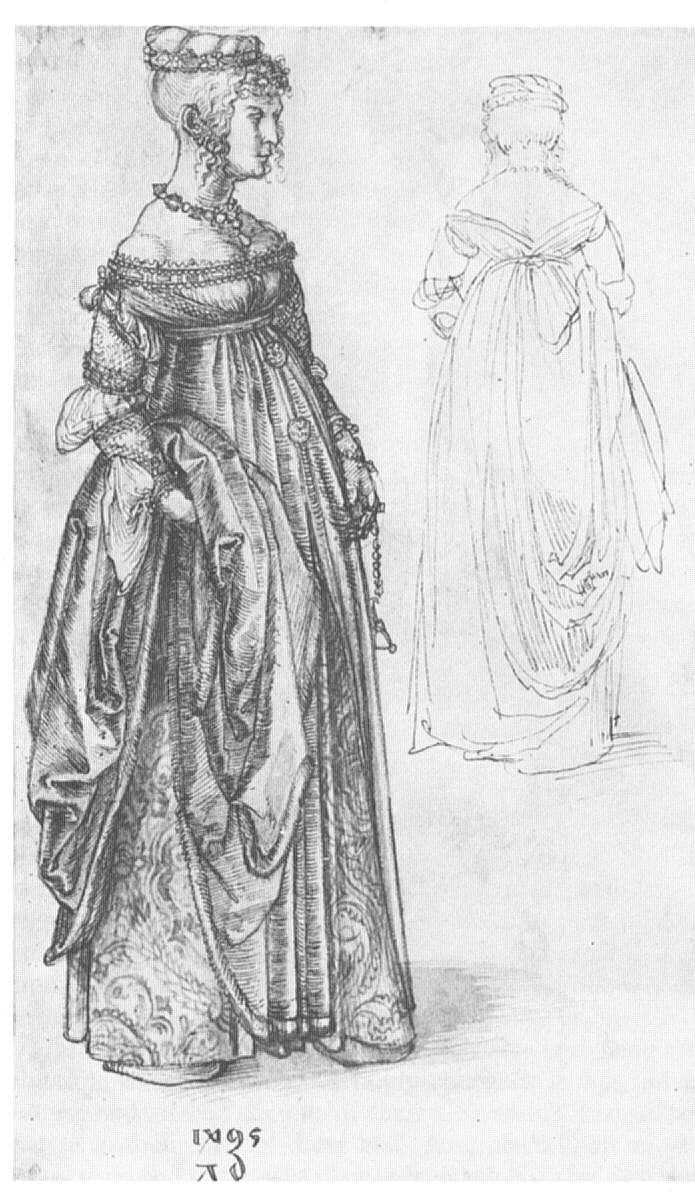 Durer, 1495, sketch of a Venetian woman
|
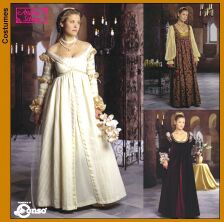
Other patterns Two other patterns in this style have been put out since I bought this pattern. However since McCall 2806 (which actually had a separate over-dress) has been discontinued Simplicity 9531 is the only alternative. I don't have any experience with these patterns, but based on the information on Simplicity's website 9531 appears to be somewhat better in the way it deals with the layers of an early 16th century Venetian outfit.
Cons: The chemise is a raglan sleeved version rather than an authentic rectangular cut. There is no over-dress included (though a chemise and Zupa appears to have been acceptable for informal wear within one's own home). The bodice has the same darts as 8735 so you will still need to modify the bodice in the same way as I suggested above. The skirt does not match the bodice, as far as I can determine this is not accurate. The skirt looks OK as it is but it would be improved by the addition of some more fabric to make it even more full. A train will look pretty, but think about where you will be wearing it, sweeping a dusty floor with your creation may not be your idea of fun. Conclusion: compared to 8735's treatment of the layers this one wins hands down. If I were given a choice of this one or 8735, without modifying either pattern at all, I would much rather have an outfit made from this pattern than 8735. |
|
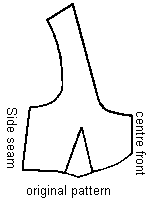
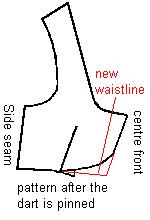 The original pattern looks
something like the picture to the left. I pinned the dart
closed so it looked something like the picture to the
right then traced around the pattern. You also need to
get rid of the curve up between the breasts it's not
authentic and it means your pleating has to be precise in
order to match on either side of the centre front. A
straight line allows you to fudge the pleating or
gathering a little to either side of the centre without
it being noticeable.
The original pattern looks
something like the picture to the left. I pinned the dart
closed so it looked something like the picture to the
right then traced around the pattern. You also need to
get rid of the curve up between the breasts it's not
authentic and it means your pleating has to be precise in
order to match on either side of the centre front. A
straight line allows you to fudge the pleating or
gathering a little to either side of the centre without
it being noticeable.