
|
Upgrade |
When I purchased "Early Light" she had the stock Sabre Yachts DC electrical system comprised of two Group 27 Deep Cycle wet cell batteries and the standard "1-2-Both-Off" switch. The alternator was the stock 50 Amp Mitsubishi alternator that came with the Westerbeke 27 diesel and has it's own internal regulator. There was no battery charger that could be used while connected to shore power. I can only assume that this was because "Early Light" had been kept on a mooring most of her life.
The first thing I did prior to making the trip from Maine to Maryland was to purchase 2 new Group 27 Deep Cycle wet cell batteries (since I didn't know the age or condition of the installed batteries) as well as a Charles 3 stage shore power charger. These were connected in the original configuration using the "1-2-Both-Off" switch for the first season of use.
The time has now come to upgrade the system
with four major items:
1. A high output Balmar model 70-80 alternator (from Jack Rabbit Marine). This is a dual internally-fanned 70-Series alternator which combines the high-output and superior low cut-in characteristics and has sealed construction
that meets international ISO and SAE standards, as well as USCG standards for
ignition protection. It is a dual-foot unit with 3.15" spacing of the saddle-style mounts and comes with a 2.5" diameter single deep vee pulley.
2. A Heart Interface In-Charge smart three stage alternator regulator which provides bulk, absorption, and float charge automatically. Absorption time, absorption and float voltages are manually adjustable and the unit is simple to install with a pre-wired harness. This should speed up the charging process and extend the life of the batteries.
3. A Heart Interface Link 10 battery monitor system will read the battery like a fuel gauge, with a bar graph display that displays charge level at a
glance. It will display volts, amp hours consumed or replaced, amps, and time remaining before recharging is necessary for the house bank. Installation of this unit only requires the connection of 5 wires total.
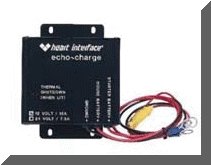
4. A Heart Interface ECHO Charger will handle charge distribution. This unit will charge the dedicated starter battery from the house bank using
an �echo� of the charger�s program. Any charge source applied to the house bank will also charge the start battery. ECHO Charge allows up to 15 amps to flow in one direction only. Installation is simple with only 3 wires.
For the time being, I intend to parallel the two Group 27 Deep Cycle wet cell batteries to form my house bank with a total capacity of 220 Amp Hours. I will then purchase a Group 24 dedicated starting battery which will not share any of the house load. It will be reserved for engine starting only. Unfortunately, a Group 24 is the largest battery I can possibly squeeze into the tight space remaining in the battery locker.
At some future date (when the two Group 27 deep cycle batteries reach end of life) I intend to replace the house bank with 6 volt golf cart batteries.
You can learn more than you EVER wanted to know about Batteries and DC systems at the following web sites. If you are serious about upgrading your DC system, this is highly recommended reading.
Jack
Rabbit Marine
Ample
Power
Cruising
Equipment Co.
Power Tap
The original "1-2-Both-Off" switch will be removed and 3 simple ON/OFF switches will be used (one to connect the house bank, one to connect the starter battery and one for an emergency parallel switch) eliminating lots of confusion as well as the possibility of draining the starting battery by accident.
I will fabricate all new battery cables using
tinned marine grade battery cable (AWG 2).
Tools required
1. 3/8 in electric drill
2. Assorted drill bits
3. Sabre saw
4. 7/8 in. and 2 in. hole saw
5. Heavy duty crimp tool (for battery cables)
6. Hammer
7. Ratcheting crimp tool for smaller lugs
8. Wire strippers
9. Digital volt-ohm meter
10. Screwdriver assortment
11. Wire cutters
12. 1/4 in. drive socket wrench set (SAE and Metric)
13. 3/8 in. drive socket wrench set (SAE and Metric)
14. 1/4 in. drift punch
15. Wire ty-wrap tool
Supplies required and sources
1. 750 CCA Group 24 cranking battery ($55.00 from Battery Warehouse)
2. Battery box for cranking battery ($7.99 at West Marine)
3. 85 Amp alternator ($369.00 from Jack Rabbit Marine)
4. Heart Interface In-Charge External Alternator Regulator ($195.00 from Hamilton Marine)
5. Heart Interface Echo-Charger ($125.00 from Hamilton Marine)
6. Heart Interface Link 10 Monitor System ($199.00 from West Marine)
7. 24 feet Ancor Red AWG #2 battery cable (69.36 from Hamilton Marine)
8. 12 feet Ancor Black AWG #2 battery cable ($34.68 from Hamilton Marine)
9. 6 feet Ancor Red AWG #6 cable ($11.34 from Hamilton Marine)
10. 16 each 3/8 inch AWG #2 lugs ($39.92 from West Marine)
11. 16 each 5/16 inch AWG #2 lugs ($39.92 from West Marine)
12. 2 each 5/16 inch AWG #6 lugs ($2.29 from West Marine)
13. 2 each 5/16 inch AWG #8 lugs ($2.29 from West Marine)
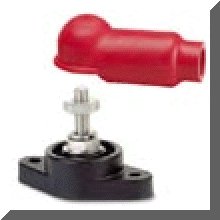
14. 2 each Blue Sea distribution terminal posts ($12.98 from SailNet)
15. 3 each Blue Seas ON/OFF battery switches ($65.97 from West Marine)
16. Misc. cable ties (On hand in my electrical kit)
17. Misc. stainless steel screws (On hand)
18. 1 each Zap-Stop Alternator Protector ($10.95 from West Marine)
19. 1/2 inch teak plywood to fabricate panel for battery switches (On hand)
20. Teak molding to trim battery switch panel (On hand)
Total cost of this project: $1240.70


Selecting locations for all the new equipment
Wednesday Feb 20, 2002
1. I decided to try to squeeze the Group 24 starting battery into the same battery compartment under the quarter berth with the 2 house batteries. It will fit if it is slid all the way forward in the compartment but it is a real tight squeeze.
Click HERE for page 2 of DC Upgrade
Copyright 2001-2009 No duplication of any portion of this website without express permission.
Permission may be obtained by e-mailing the webmaster at
earlylight160@yahoo.com.