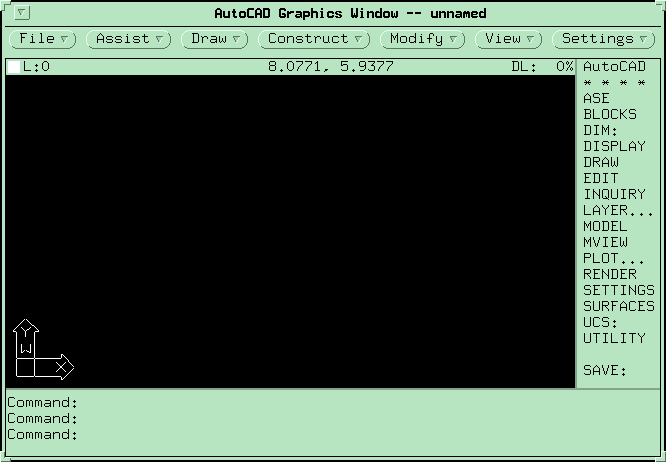
Figure 1 Layout of the AutoCAD Screen on the SUN SparcStations.
Figure 1 Layout of the AutoCAD Screen on the SUN SparcStations.
When creating or editing a drawing, a very simple, cyclical process is followed. In the most general
case, this involves first forcing AutoCAD into a state where it can accept a command (referred to as
command mode):
check that AutoCAD is in Command mode (signified by the prompt "Command:" on the
left) - if not, hold down the Ctrl key on the keyboard and press C to cancel the current
operation and go back to command;
enter a command - either by typing in the command word or selecting from a menu as
explained later;
this activates Data Entry mode - AutoCAD will prompt for information needed to complete
the command;
enter data required by AutoCAD;
AutoCAD will carry out the operation required by the command, update the displayed
drawing and return to Command mode.
Note that some of the commands have the particular feature that they can be executed during the
data entry mode of other commands (as well as at the command prompt). These are referred to as
transparent commands. They can be used whenever AutoCAD is expecting non-text input and are
entered by prefixing the command name with an apostrophe (').
The next section deals briefly with the characteristics of the graphics workstations that are used to run
AutoCAD in this course. The two subsequent sections discuss the general principles of command
entry and data entry respectively. The final two sections of this chapter are concerned with specific
procedures to be followed for two types of data entry, namely object snapping and object selection.
Features of the graphics workstations.
The workstations used for this course consist of a CPU (to do all the hard work!), a graphic screen
device (through which the computer communicates with you, the user), a keyboard and a hand-held
pointing device called a mouse (both of which enable you to "talk" back to the computer). These
machines run an operating system called UNIX. This is a program which always runs (while the
CPU is turned on) and manages all the operations of the computer, including communication with each
of the other machines in the laboratory. In conjunction with UNIX, these machines also run a program
called OpenLook. This is what is known as a windowing system, permitting you, the user, to open up
different windows on the screen. In each window, you are able to execute a different program, thus
allowing you to have the computer carry out many different tasks simultaneously (this is called
multi-tasking: it actually shares its computing power between each of the windows that you open).
When you run AutoCAD under OpenLook, it actually opens up 2 new windows (more about that
later) and operates AutoCAD within them. It is possible, of course, to go back to OpenLook without
"closing" the AutoCAD windows and to start up AutoCAD a second time in a different pair of
windows: you won't have any need to do that, but it is important that you appreciate how the system
operates.
Thus, it is important to understand that while you are using AutoCAD, at least three programs are
operating on the computer: in the background, UNIX is generally managing the overall operation of the
machine; in front of that, OpenLook is managing the placement of windows on the screen and the
functions that are occurring within those windows; and, in the foreground, one or more applications
(such as AutoCAD) are operating. Generally, you will only be concerned with your foreground
application, AutoCAD.
The two windows that are opened for AutoCAD are used to display textual and graphics information
respectively: predictably, these are known as the text window and the graphics window. When
AutoCAD needs to display text information (such as prompting the user or providing a list of
information), then it uses the text window. The drawing editor screen (described above) is displayed in
the graphics window (it also includes a small 3-line text area at the base of the window that is used
to display text information). You will become more familiar with these windows when you begin to use
AutoCAD.
The keyboard in AutoCAD is used primarily for typing in command words and data as described in
the last section. Notice that across the top of the keyboard, is a row of function keys labelled F1 to
F10 (F11 & F12 are not used). These are used by AutoCAD to allow you to perform specific
operations. For example, the key labelled "F1" is used to switch between the graphics and text
windows as discussed in the previous paragraph. This is important to remember because some
AutoCAD commands automatically switch to the text window in order to display text data and you
need to know how to get back to the graphics window in order to keep drawing.
The mouse pointing device that is attached to the keyboard is used for pointing to things on the screen.
It is used in both OpenLook and AutoCAD: you will notice that it behaves slightly differently in these
two contexts, but you will quickly get the hang of it! As you move the mouse around on the silvered
mouse pad, a pointer (known generally as a cursor) will be moved on the screen: you use that cursor
to point to things. Note that it is important that the mouse pad is properly oriented: one of the long
edges of the pad should "face" your forearm as you manipulate the mouse, otherwise you will find that
the cursor does not seem to behave properly.
Notice finally that the mouse has three buttons on it. These are used in a very specific way. The most
commonly used button (in both AutoCAD and OpenLook) is the pick button: this corresponds to the
left-most button. To pick something, simply move the cursor so that it points to the item and briefly
press the left button (this process is often called "clicking on to something"). The middle mouse
button is equivalent to pressing the Enter key on the keyboard. The right mouse button is used in two
different ways: these will be explained in context later in the notes.
Command entry
There are a large number of commands (over 200 ??) which provide access to the facilities of the
Drawing Editor. These are generally entered when the "Command:" prompt is displayed at the bottom
of the command entry region. Many of these commands are very specific and rarely used: these notes
cover most of the commonly-used ones. There are a number of ways of entering a command.
Typing on the keyboard.
Simply type in the command word and press the space bar or the RETURN key. If a mistake is made,
use the delete key to delete characters already typed or press Ctrl X (hold down Ctrl key and press
X) to clear the whole entry.
To simplify command entry through the keyboard, AutoCAD permits the user to establish aliases,
which are used most commonly as abbreviated forms of major commands. This is a customisation
option which is set up outside AutoCAD and is therefore installation-specific. AutoCAD, as shipped
from the vendor, has a number of aliases defined in this way in order to illustrate the concept. We
make no attempt in these notes to identify the aliases, but examples will "crop up" in the tutorials
section.
Using the screen menu.
The screen menu is displayed on the right side of the AutoCAD graphics window. This is more than
just a list of available commands from which to choose. It actually represents a range of available
operations that can be picked by the user (as will be explained shortly). You should also note that this
screen menu (the one that you see when you use AutoCAD in this course) is the one set up by
Autodesk: users can, and generally do, customise the menu to suit their own needs or preferences. For
the moment, we are talking about the standard AutoCAD menu.
To pick an item from the screen menu, simply move the mouse until the required item is highlighted
(displayed in reverse video), and then press the pick (left) button.
There are three types of items included in the screen menu (see Figure 5.1 again):
pointers to sub-menus - these are displayed in all uppercase characters (not terminated by a
colon ":") and cause a corresponding sub-menu to be called up;
command words - these are displayed in uppercase characters terminated by ":" and cause the
corresponding command to be entered at the "Command:" prompt as if it had been typed
(including the RETURN key);
command options - these are displayed in lower or mixed case and only appear when specific
commands have been selected - they represent command options (relevant to that command)
that can be picked rather than typed at the keyboard - command option menus are often
displayed automatically when a command is issued from some other source.
The best way to gain confidence in the use of AutoCAD is to explore the screen menus and
experiment with the menu items. Feel free to do that when you get onto the machine: don't worry, you
cannot do any harm by experimenting (I don't think...!!)
Using the pull-down menus.
These provide a second, alternative way to access the facilities of AutoCAD. In general, they are only
used as a short-cut to command selection. They are generally not used to display command options in
the way screen menus are. Pull-down menus tend to be implemented in different ways, depending on
the kind of computer and workstation being used. Some systems will not even support this kind of
menu.
To activate pull-down menus on a DOS-based PC system, move the cursor to the status line at the top
of the graphics window (noting that the pull-down menus then appear in place of the status line) and
highlight the menu that you wish to pull down. When you press the pick button, that menu will appear
on the screen. The menu items are either commands or pointers to further sub- menus. Move the
pointing device again until the desired item is highlighted and again press the pick button. Once a
command is selected, it is entered into the Command line and executed. To remove a pull-down menu
(without selecting an item), move the cursor away from the menu and click the left mouse button.
Under OpenLook, the pull-down menus are permanently displayed as a row of buttons above the
status line in the AutoCAD graphics window. These are designed to function in exactly the same way
as any other OpenLook menus, which may be confusing to first-time users because it involves using
the mouse buttons in a different way to the rest of AutoCAD. To pull down an OpenLook menu,
simply click it with the right mouse button. Items which are actually pointers to sub-menus are
identified by a small arrow (triangle) pointing towards the right of the item. Clicking these items (again
with the right mouse button) will open the sub-menu. Any command item in either the main menus or
sub-menus can be selected by clicking (this time with either the left or right button, but normally the
left). A nice feature of OpenLook menus is that they can be fixed semi-permanently to the screen and
positioned anywhere that the user wishes. This is useful where you plan to re-use a menu frequently
during some phase of a drawing task. To fix the menu in this way, first open it, then click (with the left
button) on the "pin" displayed in the top left corner of the menu. The "pin" will change to appear as if it
has been pinned into the screen. If you then position the cursor near the top of the pinned menu and
hold down the left mouse button, you will be able to drag the menu to any part of the screen. Pinned
menus can be removed by clicking (left button) on the pin. AutoCAD automatically removes pinned
menus itself under various circumstances which can be a source of frustration to the user.
A final comment about OpenLook menus which can cause some confusion: if you click on a
menu or sub-menu name with the left mouse button, then a default item (usually the first) in that
menu is automatically selected and executed. This can be very useful, but can also be very
disconcerting and annoying. The only solution to this is to be aware of it. There is at least one
case (which you will encounter in the tutorials) where this feature is very useful!!
Using the icon menus.
Using a tablet menu.
None of the workstations used in this course are equipped with digitising tablets. Therefore, this
sub-section is for your general information only!!
Where workstations are equipped with digitising tablets, there will be a tablet overlay attached to the
tablet on which are printed a wide range of menu items. Each of those items represent some kind of
operation involving one or more AutoCAD commands.
To select an item, simply move the hand-held puck until its cross-hairs (in its perspex viewing window)
are positioned over the required item, and then press the pick button (on the puck).
One final comment on command entry: the last command entered (by whatever means) can always be
recalled very simply by pressing either the space bar or the RETURN key in response to the
"Command:" prompt.
Data entry
Most AutoCAD commands require that some data be entered before or during command execution.
For example, if the LINE command (to draw a series of straight lines) is issued, then the end-point
coordinates of each line segment in the series must be specified.
AutoCAD will always prompt for the data that it requires. In general, your response will be either a
piece of information (eg. coordinates of a point, a distance or a string of text to be inserted into the
drawing), or one choice out of a range of options associated with the command selected. For example,
in response to the GRID command, AutoCAD should display the prompt...
This prompt is an attempt by AutoCAD to tell you what it needs to know in order to carry out the
GRID command. It means that you can enter either a numeric value representing the grid spacing (X)
or one of the four option keywords (separated by slashes "/"). The angle brackets ("<...>") are used
to signify the default that AutoCAD will assume if only the RETURN key is pressed: in this case, the
default is a grid spacing of 0.25 units. Note that option keywords, when entered, may be abbreviated
to only those letters shown in uppercase: thus, if you wished to select the Snap option in the above
example, you would simply type s and then press the RETURN key.
All AutoCAD data entry prompts follow a similar pattern. Once that pattern becomes familiar, it
is possible to almost guess your way through the system.
The following sub-sections explain briefly how to enter the most common types of data required by
AutoCAD.
Cartesian coordinates.
These are most "easily" entered by moving the mouse until the cross-hair cursor is positioned at the
required point on the drawing and pressing the pick button. The difficulty with that, of course, is that
it is impossible to accurately pick a point in that way. Therefore, AutoCAD supports a number of
techniques designed to enable you to lock onto precise positions on your drawing. These generally
revolve around snapping onto positions relative to existing graphic entities (such as snapping to the end
or middle of a line) or snapping to an invisible (or visible) grid.
The technique which involves locking onto positions relative to existing graphic entities is called object
snapping and is often used in conjunction with what are known as X/Y/Z point filters to make them
even more powerful. These techniques are discussed later in this Chapter. Snap grids and other
devices that aid in accurate pointing are set up using commands that are described in Chapter 3 of
these notes.
As an alternative to pointing and to provide absolute accuracy, AutoCAD allows the user to type in
the coordinates as numbers. There are three types of values that can be entered this way:
absolute coordinates - simply type two (or three) numbers separated by a comma (viz.
345.6,-234);
relative coordinates - these represent offset distances in X, Y and Z (if required) relative to
the last point entered - simply type "@" followed by the numbers separated by a comma (viz.
@25,-34.5);
polar coordinates - these represent an angular distance from the last point entered - type "@"
followed a number specifying distance, followed by "<" and a number specifying an angle about
the Z axis in degrees (viz. @234.7<45 - by default, zero degrees is taken as directly to the right
of the starting point and angles increase in an anti-clockwise direction).
Distances and numeric values.
These are generally entered as numbers typed on the keyboard. They can be entered with decimal
points, minus signs and/or in scientific notation (eg. 2.345E+5).
Distances can also be specified by pointing with the cross-hairs. If the starting point (or anchor point)
is obvious (such as when entering the radius of a circle once the centre is known), then one pointing
operation is required. Otherwise, two pointing operations must be performed in order to specify the
distance.
Angles.
Angles are specified in decimal degrees and are generally typed through the keyboard.
Alternatively, AutoCAD can be "shown" the angle by pointing with the screen cross-hairs. To do this,
first identify an anchor point and then show the end of a vector that defines the required angle. The
angle is then measured by AutoCAD in an anti-clockwise direction between an imaginary line pointing
towards the right from the user's anchor point and the defined vector.
Displacements.
This is where AutoCAD needs to know how far to move both horizontally and vertically. The easiest
way is to point to a base point and an end point. Alternatively, type in a distance for X and a distance
for Y separated by a comma (if AutoCAD then prompts for a second point, simply press RETURN).
Dialogue boxes.
One of the new features of Release 12 are dialogue boxes. These pop up in response to several
commands, allowing you to select various options (using the mouse and the keyboard) that are
appropriate to that command. These generally circumvent the normal prompting process that was
described in the previous section, making the use of many commands much more intuitive. The
techniques for using dialogue boxes are very straightforward, particularly if you are already familiar
with general window-based applications.
Object snap techniques.
In order to facilitate accurate pointing operations, AutoCAD provides a set of object snap modes
(listed below) that can be activated whenever the user wishes to specify a point on the drawing. This
was mentioned briefly in the last section. A mode is activated simply by typing its name (first three
letters only is required) followed by space bar or RETURN prior to pointing with the screen
cross-hairs. These modes can be used in any combination simply by listing the required modes
separated by commas prior to pressing space bar or RETURN.
Object snap modes can also be selected from a menu by pressing the right mouse button and then
selecting from the pull-down menu subsequently displayed. The right mouse button in AutoCAD is
therefore known as the object snap button. Note that, under OpenLook, the pull-down menu
displayed in this way is automatically "pinned" (refer to earlier discussion) to the screen and will
remain until dismissed and can be positioned anywhere the user wishes.
At the risk of confusing you, these snap modes can also be activated by selecting them from the Tools
pull-down menu or by clicking on the row of asterisks (********) that always appears at the top of
every screen menu. Generally however, it is easier to type the name of the snap mode or use the
object snap button on the mouse.
The available object snap modes are:
NEArest - snaps to the nearest point on a line, arc or circle (unless that arc or circle is part of
a block that has been unequally scaled in the X, Y or Z direction, as described earlier);
ENDpoint - snaps to the closest endpoint of a line or arc;
MIDpoint - snaps to the midpoint of a line or arc;
CENtre - snaps to the centre of an arc or circle (selected by pointing to its circumference);
NODe - snaps to the nearest point entity (created using the POINT command);
QUAdrant - snaps to nearest quadrant point on an arc or circle (selected by pointing to its
circumference) - quadrant points are at "12, 3, 6 & 9 o'clock" on the circle as originally drawn;
INTersection - snaps to the intersection of two line, arc or circle entities (in any combination)
or to the corners of solids (filled polygon areas);
INSert - snaps to the insertion point of a text entity or a block;
PERpendicular - snaps to the point on a line, circle or arc that would form a normal to that
entity with respect to the last point entered (does not work for circles and arcs that are part of
an unequally scaled block);
TANgent - snaps to the point on a circle or arc that, when connected to the last point entered,
forms a tangent to that entity (does not work for circles and arcs that are part of an unequally
scaled block);
QUIck - used in conjunction with other snaps modes to effect a faster, but less thorough, snap
operation (I've never had occasion to use this one!!);
NONe - disables the effect of any snap mode set up by the OSNAP command for the current
pointing operation. (The OSNAP command is described in Chapter 3 of these notes: essentially,
it can be used to set any combination of the above snap modes to be automatically employed
whenever a point is being entered ... this can be used to avoid the need to enter the snap mode
every time.)
X/Y/Z point filtering.
Point filters can be used whenever you are attempting to point to a location on your drawing and need
to be able to identify that point in stages. For example, suppose you wish to begin a new line at a point
whose x-value lines up with the end of one existing line, while its y-value needs to line up with some
other point. To do that, you would type .x RETURN and then pick the end of the first existing line
(using ENDpoint snapping). AutoCAD would note the x-value of that point and then prompt you again
to enter the y-value. To specify the y-value, simply use object snapping to select the second point:
AutoCAD will ignore the x-value of that second point and use only its y-value to "construct" the
starting coordinate of your new line.
The point filters can be used to enter any 2D or 3D point. The general form is a dot followed by any
combination of 1 or 2 of the letters x, y or z (followed then by a SPACE or RETURN). For example,
".xz" tells AutoCAD to take x- and z-values from the next point selected and then prompt for a
y-value.
Making selections of objects from a drawing
Many AutoCAD operations require that one or more objects be selected from the displayed drawing.
As an example, consider the ERASE command: it requires that all the items to be deleted are indicated
before they are actually removed. To do that, the user points to each item in turn (ie. selects each
item) to form what is called a selection set. As each item is selected, it is highlighted by AutoCAD
(that is, its colour changes to show that AutoCAD has included it in the selection set). When the user
indicates that the selection set is complete (we'll explain how to do that in a moment), AutoCAD
completes the operation by removing the selected items.
AutoCAD normally prompts you to create the selection set when it is actually required by a particular
command. Thus, the normal process is to first issue the command and then select the objects to be
effected by that command. However, under Release 12 of AutoCAD, you may choose to select the
objects before issuing a command. The techniques for doing that will be explained later, but for the
moment we will concentrate on the normal way of setting up selection sets after a command has been
issued.
Once a command has been issued and AutoCAD requires the user to specify a selection set, it issues
the prompt "Select objects:" and replaces the cross- hairs with a small box called the object selection
target. A number of techniques (explained below) can then be used to select objects. Once those
objects have been identified and highlighted, the prompt is re-issued and the process repeated until a
solitary space bar or RETURN is pressed (in response to the prompt) to indicate that no more
selections are required. At that point AutoCAD continues with the command that initiated the
selection process.
The available techniques for selecting objects are as follows:
object pointing - merely point to an individual object (it should then change colour);
multiple object pointing - press m followed by space bar or RETURN - AutoCAD then
allows the user to point to a number of objects until the space bar or RETURN is pressed again
- at that point, AutoCAD searches for and highlights the selected objects before issuing the
prompt again;
window selection - press w followed by space bar or RETURN - AutoCAD then requires
that the opposite corners of a rectangle be specified and it selects all the objects that lie wholly
within that window;
window polygon selection - press wp followed by space bar or RETURN - AutoCAD then
requires that a series of points are entered that define a closed polygon and selects all the
objects that lie wholly within that polygon;
crossing selection - press c followed by space bar or RETURN - AutoCAD again requires
that a rectangle be defined - this time, all objects that lie partially or wholly within the rectangle
are selected;
crossing polygon selection - press cp followed by space bar or RETURN - AutoCAD again
requires that a polygon rectangle be defined - this time, all objects that lie partially or wholly
within that polygon are selected;
fence selection - press f followed by space bar or RETURN - AutoCAD allows you to pick
any number of points to create a fence and any objects that intersect the fence are selected;
last object - press l followed by space bar or RETURN to select the last object created (and
still visible);
previous selection set - press p followed by space bar or RETURN to re-select the last
selection set that was constructed;
undo - press u followed by space bar or RETURN to de-select the group of objects most
recently added to the selection set - may be used repeatedly to step back through the selection
process;
remove mode - press r followed by space bar or RETURN to switch to "remove mode" such
that further selections are removed from the current selection set;
add mode - press a followed by space bar or RETURN to revert back to "add mode" after
being in "remove mode";
cancel - press Ctrl C to cancel the selection process (and the current command as well).
Conclusion
That completes our discussion of the principal concepts and procedures that are embodied in the
AutoCAD system. The next chapter will begin to outline the major commands that you will meet as
part of this course.