
![]()
![]()
![]()
![]()
![]()
|
|
Racing The Traxxas Nitro 4 TEC
|
Front Shock Default Location |
Rear Shock Position : 2 |
Front Camber : -0 to -1.0 deg |
Front Toe-In : -1.0 deg |
1 is inside Hole |
2 is outside hole |
Front Shock Lower Mount: 2 |
Rear Shock Lower Mount: 1 |
Bulk Head tie-rod : 3 |
Hub Carrier tie-rod : 1 |
Suspension Pin Hub : 5 |
Rear toe-in : -1.5 Deg |
Rear Camber : -1 to -2 deg |
I've been testing this setup for a while. Fine tuning it little by little, finding what works a lap at a time. This is a pretty general setup. It works well in cement and also gets the job done in rough asphalt. Something that you have to take into consideration are tire temps and warm-up time. What I like about this setup is that the car sticks the moment you put in the track. I can go full steam into the straight-a-way with cold tires and know it will stick just like that 15 minutes latter.
This setup works so well that I tested the same setup on another chassis and had similar positive results. I actually alternated between two vehicles in the qualifiers and the main difference was in the engine department. Handling, traction and overall stability where very similar.
Chassis:Nitro 4-TEC
Engine:TRX15-Turbo
Track Surface:Cement Parking Lot
Version:
1.0
Camber:
F
-1.0
R
-1.0
Caster
F
MIN
Toe-in
F
-1.0
R
-1.5
Ride-Height
F
4 mm
R
5 mm
Droop
R
40.5 mm
R
39 mm
Piston
F
2-hole
R
2-hole
Shock Oil
F
80 wt
R
30 wt
Springs
F
Black HPI Prog
R
Yellow HPI Prog
Roll Bars
F
Black Pos. 2
R
Black Pos. 2
Tires
F
H13 LP
R
Take-off A-25B
Inserts
F
Top Firm 24 mm
R
Yokomo Firm 26 mm
Fuel
Wildcat 15% Nitro
18% Oil
Glow Plug
Traxxas Hot
Engine Temp
250 F
Spur Gears
Optional 45T
Optional 41T
Clutch Gears
Optional 15T
Optional 19T
Note: Roll bars 1=softest 4=hardest.
Modified HPI Progressive springs have had (2) widest coils cut off.
Let us talk more of the setup. The front tires are non belted and the rear tires are belted. This means that as you peg the throttle the front tire diameter is going to be slightly larger than the rear. This translates into increased front traction as the front will tend to pull the car around a corner (This is calles overdrive) -Yet even when you slam the brakes the rear end will not go out on you because of the sticky rear tire compound. If you go smooth into the turns the car will remain nimble The best part of this set up is corner speed as you accelerate smoothly in the middle of the turn you will start to cut your turning radius. This translates into fast lap times.
On the race course most cars tend to go wide at the end of a turn. This is precisely where you want to make the pass. You will be able to pass then going into and exiting the corners because of your tight turning radius when under power. If you get too trigger happy you'll either slide wide on the corners or you can get the car into a controlled 4WD drift. This is actually not a bad thing as long as you keep your forward speed but don't go too deep in the turns or you'll end up with more time on the brakes than on the throttle- not the fast ticket. As your driving skill improves you can lightly feather the brakes to transfer more weight to the front tires, this enhances front traction even more. As you get better and better you'll be able to vary all aspects of forward to rear traction by using the brakes and the trottle. Remember if you need to break hard do it while your car is going straigth. This will limit the possibility of spinning the rear end arround.

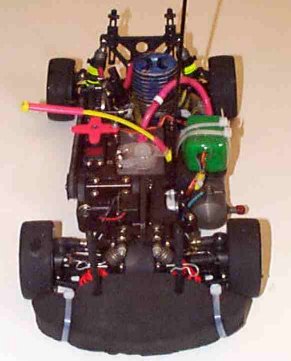
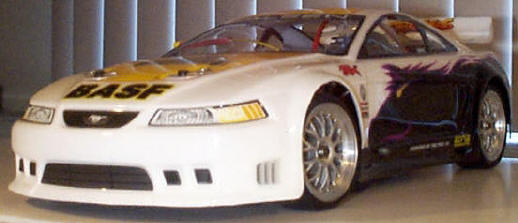
Intro
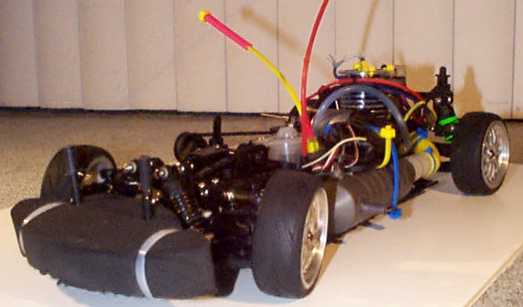
On the top we have a fully decked out Nitro-4-TEC. Note there are no extra eye-candy graphite parts or trick aluminum components.
1-2. Tires and rims: The perfect tire is one that gives you the perfect amount of traction and last forever. If you find one let me know ;) On concrete I like the HPI B1540 with the soft round inset in the back and the hard insert in the front. I also like H13 with Yokomo hard insert in the back and top hard inserts in the front. I've also tried the Belted-A Takeoffs with good results. You can't really win if your tires are too hard(no traction) or if your traction rolling in every corner(too much traction). I always check with the guys who are winning -at least it's a good start. As you notice you will always need a tire with same or less traction up front than in the back, never the other way around. This is especially true of the N-4-T which has a lot of steering to begin with.
3. The foam bumper has two wire ties installed to help keep it level with the plastic bumper. It's also a good idea to glue a strip of foam between the body and the bumper. This does (2) things. First it helps keep the body from deforming at high speeds and second it minimizes damage to the lexan shell when you examine the boards up close -real close.
4-5 Shock /Dampers: The shocks in the stock kit have too much up travel. This will cause the car to roll a lot in the corners and hook at the end of a turn. Basically when you straighten up after a turn, the shocks will release the spring's stored energy and upset the balance of the chassis. You can limit the up travel by installing one or more 2 mm plastic spacers inside the shock body (between the piston and the bottom of the shock body). This will prevent the shock from over extending. If you add too many spacers the car's ride height will be too low and you'll scrape the bottom of the chassis. As you also noticed the shock caps have been upgraded to the aluminum set. I only had one shock bust in almost a year of racing. Shortly after the incident I upgraded the shocks. Shock oil is typically thicker up front so is the spring stiffness. I use HPI springs on my cars, normally they are too long to be used effectively. To have them fit the Nitro 4-Tec you'll need to cut (2) or (3) of the spring coils -This basically makes the springs shorter. You will also need to get Associated or HPI type spring cup retainers. While you here also grind off the step on the plastic ring that used to fit inside on top of the traxxas shocks. This way you can still use the plastic spring clips that came with your kit. As a starting point run red springs upfront and yellow springs in the rear. I run 40 to 80 wt Shock oil with the 2-hole piston in the shock body. Run the thicker oil up front and thinner in the back. To help cancel out front traction the anti-sway bar set from the Pro kit is an excellent addition to tune your suspension. Normally the rear is run without an anti-roll bar unless you have problems with traction rolls.
6 Gas Tank: Follow the directions from past tip of the month to help you shorten pit stop times.
7. Spur Gears: It's no secret that the N-4-T is over geared. Do yourself a favor and get the after market spur gear set. At $3.00 a gear it will be the best $6.00 that you ever invested. removal and re-installatoin of the c-ring clips can be a bit challenging if you don't have the right tools. The best things is to go to Autozone and get you a $12.00 pair of C-clip pliers. I took an old set of needle nose pliers and sharpened the tips to a thin point. Use your dremel or a needle file to grind a groove around the tip. This groove will make easier for your custom made tool to grab hold of the large C-clips that need to be removed and re-installed to change the spur gears.
8.Cltuch: Follow the directions from last month's tip to get the clutch tuned. If you race on tight electric touring car tracks it may be worth wile to get a new clutch bell and fit it with the after market clutch gears. By having an extra clutch bell you can interchange them depending on track size and/or available traction.
9. Fuel System: The $4.00 for the fuel filter will let you sleep at night... I use an airplane type see-through filter that lets me know when it's getting clogged up. The fact that it cost less than a shinny aluminum one makes me happy :) I'm sure you're wondering what that weird canister is doing in my exhaust pressure line. That is a special one-way valve for use with glo-fuels. It basically prevents the pipe from sucking fuel. It also helps to regulates the pressure coming from the tuned pipe. This way you don't need to have a large coil of fuel line on top of the tank. The valve cost less than $5.00 its simple design is quite reliable.
10. Engine: If you can't keep your engine running for at least 15 min for the main event, you need to focus on the essentials. Learn how to tune it. You better not have a bunch of aluminum junk if you don't have a temp gun. Getting the right things first makes a lot of sense. You can also modify your TRX-15 Pro or purchase a 1 HP jobby. I think More power if applied with intelligence will help you in most circumstance... or you'll crash harder. It really depends on your skill. If you are a board slapper stay away from high performance engines. You might need to invest your money more wisely.
11. Servos: The servos supplied with the standard Traxxas radios are too slow. You will notice the car is more nimble with a budget Futaba servo or even better with a mid prized ball bearing model. Don't go overkill and get a super FET turbo servo or you can make the car twitchy and hard to control. If you have exponential curb control in your radio then go for it.
12. Brakes: The stock brake is not to par when you need stop and go power for those
tight tracks. I upgraded my disk to (2) Penguin brake disks. Stopping power feels
more linear and will stop you in a hurry when the track calls for it. Note: a single
penguin disk is too thin and will not work. The Traxxas graphite disk would probably
be a better choice. There have been reports of the brake disk sticking on the N-4-t if
you put (2) little springs between the brake plates it will eliminate the possibility of
this occurring. You can purchase the springs used on the brake linkage from traxxas
cut them to 2-3 coils long and insert them between the brake plates.
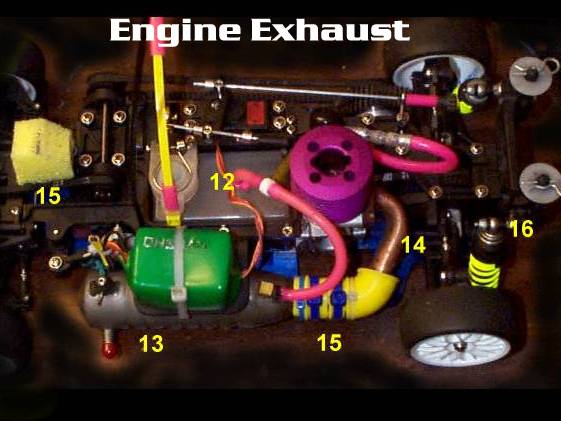
Of special importance is the plastic traxxas tuned pipe. It tends to leak quite badly, between the front and rear half. To prolong the life of the pipe use a tread locked 3 mm nut inside the pipe and use some loctite red on it. When you assemble both pipe half's together use some high temp silicone to seal them. Don't do any of the things floating around the web in regards to removing or reversing the inner cone. Increased Back pressure increases engine power and operating temperatures. The converging cone increases the intensity of the high speed pressure wave. This in turn will increase scavenging and engine power. Don't always trust what you read out on the web( a sort of self defeating statement ) The rubber 90 deg tuned pipe coupler included with the stock kit sucks... It seemed every time I got tangled with some body, it would brake. I bought 3 sets before I convinced myself that the design was flawed to begin with. If you take a look at the rubber header the thinnest part of the mold is actually where most of the stress is focused when the pipe takes a good hit. Invest in a good aluminum header from HPI, Traxxas ,MIP or Ofna. I rarely go for the HPI offering because it is grossly overpriced when compared to other products of the same or higher quality. If the $35 tuned pipe is a bit hard to swallow at first. Get an inexpensive plastic tuned pipe from HPI. It will enhance performance and when it breaks you can them invest in a good solid tuned pipe from MEGA/Serpent, Mugen, Paris, MIP, HPI, Traxxas, Associated or Ofna.
Next month we explain how to install a Novarossi 1 HP Engine w/ a slide carb linkage system on a N-4-T. Still to go is the Chassis setup article and engine tuning for racers...
Whoop some r/c butt!!!
New Tip of the month: This month we continue where we left off last time. How do we get a Novarossi Slide valve engine installed on the Nitro-4-TEC. The mods shown here will let you successfully get more HP. Note: THis won't make your car any easier to drive. If you have any weak drive train component or a questionable belt it will show itself in the first dozen runs with this beast of an engine. Make sure your rear belt is not loose, or you'll break it in a hurry. We want the rear belt snug, not tight. The rest of the car seemed to stand up well to the increased power.


Okay, now that you've seen the pictures lets explain what to do. First follow the instructions from the traxxas web site on how to install the Novarossi engine on the chassis. To summarize things a bit:
1. Install clutch on engine and determine the excess amount of crank shaft that you need to cut to attach the clutch nut snug with the fly-wheel.
2. Remove 5 mm grub screw from engine crank-shaft and cut the screw slightly longer than your measured dimension. Note: do not cut the front of the 5 mm grub screw, this is where the 3 mm hex-wrench goes. Always remove the grub screw and cut the back portion of it. Remember you need the hex-side intact so you can re-install the screw back on the crank-shaft.
3. Install grub screw on engine and clutch bell assembly. Tighten the clutch nut. If it's snug, good job. If it's loose, cut or grind a little more material from the grub screw and assemble the clutch again. Repeat until the clutch nut is tight. Don't forget to use loctite on the grub screw once you have it the correct length.
4. Take the engine mount and cut the center section out. You can use a hack saw, band saw, precision saw or dremel. Clean the cut with a file or sand paper.
5. connect engine to the (2) piece engine mount. Use lock tite on 3 mm screws.
6. Install header on engine. Use loctite on 3 mm screws.
7. Install clutch bell assembly(just like before). use Loctite on 3 mm screws.
This finishes the engine portion of the instructions.
Now for the not so obvious steps.
8. For the slide to work properly you need to grind off a small groove on the upper fuel tank rail. This is the plastic part that surrounds the fuel tank. The slide valve will interfere with the lip just under the slider. Remove a little plastic at a time from the fuel tank rail, until the slider will go over the lip without making contact with it. Note: You will be close to the tank, if your dremel or exacto blade slips you could damage the fuel tank. Work slowly and don't over do it on the cutting job.
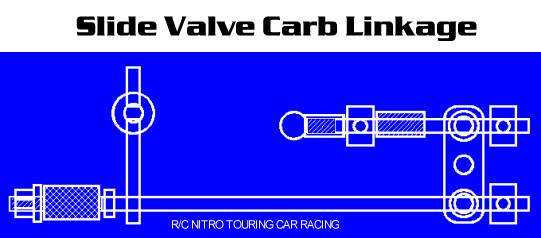
9. Assembling the slide linkage:
To get this section going you are going to need the following parts:
(1) Kimborough RC10 GT servo horn or Traxxas servo horn for your servo. Can be substituted for equivalent.
(2) linkage rod guides from Traxxas. These are the parts that screw to the servo horn and the linkage rods slide inside of them.Your current throttle linkage has
(2) of these. Traxxas part no# 3180
(2) 2-56 push rods that have 1 inch of thread at the end.
(1) 2-56 small ball cup. Typical brands are Dubro, Sullivan and great planes. This is the part that snaps on the metal ball on the throttle slider.
(1) plastic 2-56 nut. This is to fine tune the brake action.
(3) plated wheel collars 2-56.
(1) small spring. You can use the spring that's in the barrel carb linkage in your kit. Check the Traxxas site for Part no.
(1) small piece of silicone fuel tubing.
Cut the servo horns so that they resemble Mr. T "I pity the fool". Drill out holes on the servo horn to fit the rod guides. Make sure the holes are large enough so the guides can rotate freely. Cut one of the push rods so that it has 1/2" of threads showing and is 2 1/4 " long. Attach the ball end and the collar, then the spring. Slide it into the guide and secure with another collar. Now cut the remaining rod so that it has 1" of threads showing and is 5 5/8 " long. Thread the plastic nut into the rod and slide a piece of fuel tubing. Remove the brake cam wire from the shaft and insert it behind the fuel tubing. Now insert the rod end into the remaining guide and slide a collar at the other end of the slider. see picture.
10. Remove the throttle servo from the chassis rotate it 180 deg and re-install.
11. Attach the linkage to the carb and the cam lever on the brake shaft. test radio for proper throttle and break function. Re-adjust linkages as necessary, use pictures as a guide.
Next month we will go into detail on what tools to buy and how to use them to setup
the chassis. In the back burner We also have the final part to the four article series
with engine tuning for racers. Until next time...
Back to top
Part |
Difficulty level |
Description | Cost($) |
Engine | Easy | Get Motor Saver/ Dynamite air filter. Increased air flow better engine performance | 5-12 |
Easy | In-line Fuel Filter. More consistent needle settings | 3-10 |
|
Easy | Infrared Temp Gun. | 80-150 |
|
Suspension | Easy | Get a set of springs softer and harder than what you are using today. Note: If you use HPI springs you will need to purchase Associated type spring retainers(bottom) Trinity Congo springs are a direct fit. | 4-5 per pair |
Easy | Purchase 2,3 hole piston sets from traxxas.Better suspension tunability | 2 set | |
Easy | Purchase 60-80-100 Shock oil wt. Alongside shock piston a must have tuning aid | 3-4 each |
|
Easy | Purchase a complete sport shock set from Traxxas. Always good when you don't have time to change out shock oil on race day. | 20 pair |
|
Easy | Get both Electric and Nitro 4-Tec Anti-roll bar set. This will allow you to better fine tune your suspension | 5 set |
|
Drive train | Med. | Load up both diffs with thick grease. Will add stability on twisty tracks, help power transfer on corners. |
none |
Easy | Install "real" silicone fuel tubing on brake linkage. This will allow you to apply brakes more aggressively |
2-4 4' |
|
Exhaust | Easy | Install plastic tuned pipe half's with a thread locked 3 mm nut and some loctite. Use Crazy Glue to keep the half's from leaking. If the rubber O-ring is not glued into place the pipe will unscrew itself and pour oil all over your car. Don't over tighten the long screw, or you'll damage the fiber washer. | none |
Easy |
Install after market, HPI/TRAXXAS/MIP/PARIS tuned pipe. This mod will increase acceleration and general ruggedness. Note: you can purchase the pipe first and get the header later. | 30-50 |
|
Easy | Purchase Aluminum header. Will decrease the chances of a DNF when getting tangled up with obstacles - like walls. |
14-25 |