![]()
![]()
![]()
![]()
![]()
![]()
![]()
|
|
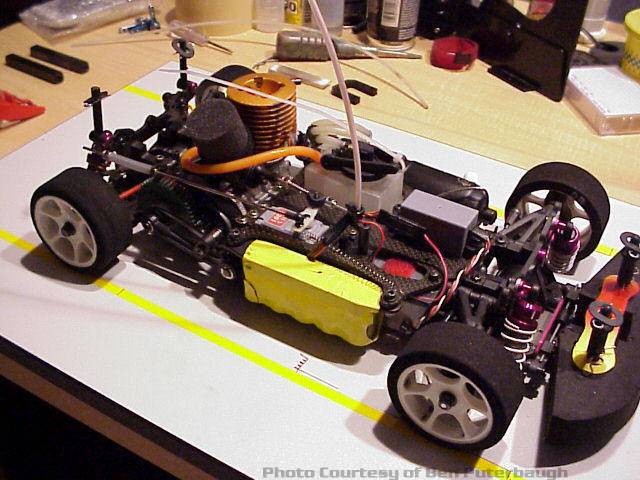
Racing Ofna's Nitro OB4-PRO
Intro:A lot of people have been asking me for some articles on the OFNA Nitro OB4. I've had my car since August 2000. All I can say is that it's awesome! My setup skills have definitely improved since I bought this car. What I found is that the NOB4 when properly setup can compete with any other car out there. Sometimes I'm beat by Traxxas Nitro 4-Tec's, but the truth is that once you learn how to setup a particular car, then it's up to the guy holding the control to do the rest. You can't win races by just spending a bunch of money, it takes practice and skill setting up a race car. No credit card bill is going to instantly going to give you that. It must be learnt the hard way. There is no substitute for practice. Let's not get out of focus here, the topic is Nitro OB4 and that's what we are going to talk about. There are three main problems that must be addressed with the car before you are ready to challenge the A-Main crowd. The first thing is steering servo alignment, the second is the one-way bearing on the two-speed and last on the list is the gear mesh issue w/ the rear gear differential. There are also other minor details that need to be covered; We will also go over those on a first come first serve basis. What would we have if we didn't finish the article with some chassis setup tips -We would have nothing This might be a little long, but it contains all that I've learnt about the
racing the OB4 in the almost 12 month's that I've had it.
It would be a farce to the OB4 racing community if I didn't give credit to the active brotherhood of NOR (Nitro OB4 racers) on the net. Most of us can be found on rctouring.com this group has been my companion since I got serious w/ racing this car. We as a group have been able to solve many of the small problems that are always lurking on the surface of a new design. We in a matter of weeks have been able to address many of the problems with real world solutions and along the way we continue to bring up to speed the rest of the growing stream of OB4 drivers. I invite you to sit down and go over the many pages of questions, replies and comments that have become a staple of our small tightly knit group of OB4 racing enthusiast. Something happened to rctouring.com -it sort of vanished... The new OB4 crowd
is now hanging out on
http://www.hpiracing.com forum go to the nitro non-hpi section and look for
OB4 version 1.0 thread. The racers there have been very helpful in getting
others up to speed. Construction Tips:The truth is that building the OB4 (PRO) is quite straight forward. When I built one of the original Ver. 1.0 kit the 2-speed shaft had a manufacturing defect and did not have the holes for the cross-pins drilled on it. A quick call to Ofna customer support and I had the part in a few days. Next on the list are the shock pistons. It is somewhat difficult to make out which of the shock pistons are the 1mm and the 1.2 mm ones. There are three pistons on each parts tree. Make sure you pick out 4 identical ones. The next step that is a little tricky is the differential construction. The instructions are quite clear, it helps to get a small needle nose pliers for the miniature e-clips that hold the bevel gears in place. Another thing that you need to understand is that the kevlar belts need to be fairly loose on the pulleys. Kevlar belts don't really stretch like the rubber one's found on other sport level kits. They also don't tolerate heat very well. If you run the belt too tight they will not last very long. Make sure the rear belt gives at least a 0.25 inch when you press your thumb against the middle of the belt. You may need to install the cams one notch forward from the stock location to ease up on the tension. The front diff cam can be left at the stock location. Don't worry too much if you think there is a lot of slop in the diff bearing adapters. Since the diff is always under tension it will not affect belt tension. I remember when I built the kit and found that the axles and diffs had more play than my Traxxas Nitro-4-TEC that I had been racing for over a year. Back then I was not a very happy camper. Even with the loose fitting hubs and cheap bearings all around, the car handles very precisely. What is the buzz on the Version 2. Kit:About 3 months ago Ofna made a rolling change to the OB4 Platform. This new variation was called the Version 2 kit. Version 2 kits give you the option of installing the middle belt behind the engine, just like Serpent's and Mugen's. If you have a side exhaust engine then you're going to need a Serpent or Mugen manifold. The good news doesn't stop there...The new kit also brings a ball-bearing adjustable middle belt tensioner. The new next-gen kit also brings all the parts to install the middle belt in-front of the 2-speed tranny like the original version 1 kits. These are the part no. that my second OB4 kit was missing. Contact Ofna customer service they will take care of you ASAP. On a side note: Ofna sure seems to have a lot of problems with their drive-train shafts. Maybe they will get it right on kit #3
You will also need a side exhaust manifold to adapt the pull-start COLT .12 to the kit. Ver 2.0 kit assumes you have a shinny new rear exhaust MT12 to put on the kit. thus it brings a rear exhaust manifold. I tried the serpent rear exhaust manifold with the funky chicken bend. It works okay but on your first hack the manifold will get bent and the rear belt tensioner will be shoved against the engine's back-plate. This is also another reason why I prefer the belt to be placed in-front of the engine (like Version 1 kits). The instruction manual: The version 2 instruction manual covers both the new and the old installations. Keep on turning the pages until you get to the addendum. You will see in detail the info for the new parts. Is there a conversion kit to go from Ver. 1 to Ver.2 ?Is there a conversion kit for placing the middle belt behind the engine on the original Version 1 kits? No. The graphite radio tray has new mounting holes for the belt tensioner. There are also two small bulkheads that are used to support the extra long middle belt shafts. This means 3 extra holes on the chassis. The original chassis has a milled 5/8 inch square opening to the right of the engine. Two of the extra counter sunk holes would have made the chassis thin around that area so the newer chassis don't have the 5/8 by 5/8 square cut out... I guess you could try to make the conversion, but what would it get you? I personally don't think that the stock belt location is all that bad. The only positive thing about the rear middle belt would be less maintenance. Those shielded little 5X8 bearings are really not that great. I usually don't get dirt in the front of the engine, the same can't be said about the rear Considering that the version 2 kits has a bunch of extra parts plus the shoe-clutch 2-speed tranny yet it still retails for the same amount of cash as version 1 kit. I think OFNA has increased the bang-for-the-buck level of the Nitro OB4-Pro by a few notches. The Steering Servo:
The only critical thing that you need to look for when installing the servo is that the steering ball links are parallel to the ground. Some of the OB4 racers complain that the car spins out at the end of a turn. Usually this is traced to a improperly mounted steering servo. There are a couple of plastic shims included in the kit to adjust the height of the steering servo. How do you know if your servo is shimmed correctly? Push down on the front suspension. If your toe-in changes when you pushed down on the suspension, then you need to either shim the servo up or down depending on whether you induced toe-in(shim servo down) or toe-out(shim servo up). Also keep in mind that since this servo is direct drive, the servo will see a little more action than if you buried it deep in a bell-crank mechanism with a servo-saver at each end. So, don't be surprised if you kill a couple of budget servos on your way to total track domination! The good side is that every once of torque that your servo can muster will go to turning the wheels, no sloppy links, no screws to tighten or bearing to go bad. I can't wait to put a smooth and fast race servo on my ride, the last budget servo lasted almost 6 month's. (Maybe Santa will buy me a Hi-Tech digital race servo Honey are you reading this? Part No ) The Lever Arm-Style Two-Speed Transmission:
Why does the one-way bearing fail? The rubbing between the steel bearing race on the 2-gear hub and the soft aluminum hub creates fine aluminum powder. This powder gets in the one-way bearing and kills it. The washer prevents the aluminum from rubbing on the bearing. It has fixed the problem. Now before every race I remove the e-clips, clean the one-way and the bearings and re-oil the bearings and place one-way grease or oil on the one-way bearing. I haven't had any more failures. There seems to be no more aluminum dust either. The new clutch 2-speed doesn't have this problem.
It doesn't matter which type of 2-speed you have you should still clean and re-lube the one-way before every race. Clutch Type 2-Speed:The 2-speed transmission that the new OB4 are coming out with (version 2) is basically a scaled back down serpent style clutch 2-speed. Instead of the hard engagement on the arm 2-speed, that as some of you know, if you've got a racing +1HP engine when that thing hits the 2nd speed you will loose traction for a fraction of a second. I noticed that at the end of the straight-a-way I would ease on the throttle to slow down for the turn at the end. Once I got the car lined up I would lean on the throttle HARD. Sometimes my rear end would break-loose for a short instant when the 2-speed kicked in. The new shoe-clutch system is more of a gradual transition into the second speed. There is no hard change over, instead there is a smooth transition as the clutch shoes gradually engage the 2nd gear hub. At some point the slippage will stop and the car will be fully engaged at the 2nd speed. I have not tried my shoe-clutch 2-speed yet, I just recently installed a 1HP engine on my OB4 to get more punch out of the turns. This weekend I'll test the racing engine with the finger style 2-speed. If I have time I'll change out the 2-speed transmission in the middle of the day, and test the shoe style two-speed. The only thing that I'm a little worried about is the wear and tear on the clutch shoes. I have found that the arm-style 2-speed is quite reliable and it's almost a set it and forget it deal. As long as you're shifting at the right spot, it will retain the setting quite well. I'm not sure if the 2-speed will mean more maintenance or more re-adjustment. Time will tell I guess. Also the clutch 2-speed has 2 very small 1.5mm hex screws that need to be adjusted. This means that it takes twice as long to adjust the clutch and it also means it's twice as hard to set correctly. Hey, no-one said racing would be less work! Clutch Type 2-Speed Field Test:
As I had predicted the clutch 2-speed is a little harder to setup. For the first dozen runs or so the clutch setting was very temperamental. It was all or nothing, no matter how small my change was. As the shoes break-in it starts responding better to adjustment. The bottom line is that the shifting is smooth and the car transitions into high gear without loss of traction. For High power engines the new 2-speed is definitely a step in the right direction. Wear and tear seems to be similar to the finger style, it's really too soon to tell. Whatever happens rest assured you'll be reading all about it here. Rear Gear Differential:
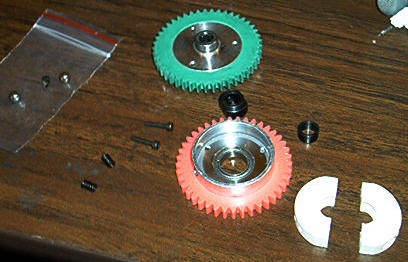
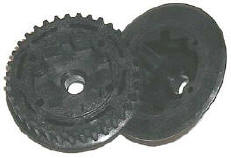
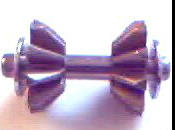
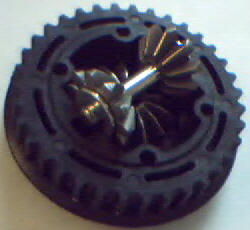
Well, After re-building my diff for the 12th time, I think I figured out what was wrong with the rear gear diff on the OB4. I thought that the rough gear mesh was axial spacing so I tried 0...1 even 2 diff gaskets and the more gaskets I put the worst the mesh felt. I then thought that it must be that the gears need to be broken in, so I filled the diff with tooth paste and chucked the diff on my drill. After 10 minutes of diffing the diff still felt rough. I cleaned the gears and filled them with metal-polish... Fifteen minutes latter the diff was still rough. I tore the entire diff and removed all casting flash from the gears. I then de-burred the spider gears. Put it all together... no difference, still rough. I put a spring between the spider gears and it got even worst -big time worst! I also noticed that all the gear break-in wear was focused on the outside of the gear, toward the edge of the spider to bevel gear mesh. The Fix:
I removed the spring and placed a Dubro 3mm ID 0.5 mm thick washer between the diff case and the spider gear shaft(3mm) so that the spider gears where pushed toward the center of the diff. Wow, now the mesh was perfect!
No grinding, no sticking, just Smoooooooth! I then opened up my 9 month old gear diff it was rough I had already re-built it because the stock gears had been transformed into a torque converter. I shimmed the spider gears and presto! Perfect gear mesh! Just though I might pass this on to you guys. I haven't had the same problem with the front diff. It's still going strong as assembled per the kit's assembly manual. It has held now for almost a year of racing and the gear mesh feels nice and tight. Long Term Gear Diff Testing:After a dozen more races the shimmed diff eventually got rough again... The rear diffs are something that you are going to have to work with from time to time. There is really no way around this. Inspect the rear differential before every race. Once the mesh feels rough even with the spacers in place then you will have to remove the bevel gears and shim them as well. I placed a thin 5mm ID Traxxas Teflon washer between the case and the bevel gears. This took up the slack that had developed in the out-drives and also pushed the gears closer to the spider gears. I also removed the gasket and sealed the diff with clear nail-polish. After a dozen more races you will probably need new gears to repeat the cycle. The only thing that is very apparent right now is that the gears themselves can't be the only ones at fault for the problem. If that was the case then the front diff would also be going out. I've had my OB4 for an entire year and it has seen a lot of racing action and the front diff has held with no problems, even with no shims. This leads me to believe that the gear case probably is the root-cause of the problem. So after you kill the original gears and go through a new set of spider gears maybe a new gear case will help keep the replacement gears in service for a little longer. The rear diff is not a huge issue, but it's something that you'll have to throw money at least a couple times a year. The gears are not expensive, it's more the hassle of having to re-build them every so often. I hope the designers of the OB4 are reading this. Guys fix the rear diff case! The only consolation I can give you is that some racers kill rear diff after a few month's of racing -While others are yet to have any failures in this area. It seems there is no clear way of knowing how long they will last. Coming soon a how-to-article: Bullet proof the OB4 Gear Diff.
Once Again NitroTouring.com bringing in the goods.
The Twin-Disk Braking System:
Enough humor! The stock brake linkage system is designed so that when you jam the brakes a small collar and a piece of fuel tubing pushes against the cam lever arm and pushes the steel pads against the brake disks. When you release the brakes, the pressure on the cam lever arm is let to pivot itself forward to release tension on the steel pads. The problem is that your assuming the following: A) The brake arm is pivoting on Teflon sealed bearings. B) The steel pads are going to slide through a threaded 3mm screw. Both items on the previous statement are false. The cam shaft is not supported by bearings and the area where the shaft pivots will quickly get full of dirt. This will prevent the cam from moving forward on its on. 3mm threads are by no means smooth so the steel pads also tend to hang up on the threads. When you combine these two items then the brakes will sooner or latter hang up. There are three ways of fixing this. The Fix:
Wire Routing:Wire routing is going to be a challenge for most. Even with a small receiver I found that sticking the receiver under the bottom plate was going to mean one of two things. Either the crystal changes where going to be a challenge or keeping the fuel off the receiver was going to be another. I chose to have neither and placed the receiver on the top deck. I used two Traxxas servo mounts in place of the old antenna/receiver holder. The receiver was held snuggly between the servo mounts. I found it was much easier to control the wire routing this way. Since I had removed the original antenna holder I drilled a hole on one of the servo mounts to put the antenna tube in. This cleaned up the wiring and allowed quick frequency changes; even while the body is still on the car.
Upgrading Chassis Fasteners:Replace all the 10mm self tapping screws that the kit brings with Dubro hex-head 3X12mm screws. They will not back out and will grip the plastic much better. The front bulkhead can be strengthened by replacing the screws that hold the front shock tower with 3X12mm ones. This will be an ongoing project for a couple of months until you make your way through the entire chassis. Don't use aluminum screws, unless you like replacing bulkheads. Another thing that needs attention are the aluminum washers used to hold the engine mount to the chassis. I found out that when the going got tough they would scrape the track and cause bad handling traits. I replaced the screws with Traxxas engine mount screws for the Nitro 4-TEC. This enabled me to remove the washers and keep every screw head hidden in the chassis to prevent hang ups. Fixing the Front Bumper:
The only part that seems to wear out is the front bumper. After a couple of real hard crashes it starts to bend upwards. This upwards movement cracks the edges of the mounting flange and the front of the bumper separates from the front edge of the chassis. Thus, exposing the chassis to damage. Normally this is fixed by replacing the bumper. I found a couple of design flaws that allowed this to happen: 1) The bumper material is too stiff and not flexible enough to return to the original shape after a strong collision.2) There is no top support on the bumper thus there is nothing to keep it from bending up. 3) The stock foam bumper holes are too far back so they shove the foam past the front of the bumper. The Andy's Honda Accord Body that is included in the kit has very little room upfront for the foam bumper. This forces you to trim the bumper excessively to be able to get the Lexan shell to fit the car. After the hack job there is not much foam left and collision damage will quickly be transmitted to the hard plastic bumper and the aluminum foam standoffs.4) The aluminum standoffs transmit a lot of the impact force on a concentrated area right at the base of the screw. It appeared that after a few hits the screws would bend out of shape, further directing the impact force upward. In some instances the bumper actually snapped where the screws passed through it. The Fix:
Note: By having the foam bumper touch the front bulkhead you are actually helping to keep the bumper from flexing upwards because you are actually compressing the rear of the bumper against the bulkhead. This is not as good as a serpent style unit which sandwiches the foam between an upper and lower plate, but still provides decent protection to the front end in case of a crash. The plastic standoffs and screws will flex back on impact thus, absorbing some of the crash energy. Spare Parts List:Probably the only thing keeping Ofna's OB4 from finding a place in every racers garage is parts availability. The parts are not on back-order, they are just not readily available off the shelf like other more popular cars like Associated, HPI and Traxxas. So if you break something, then it will basically end your aspirations to win the A-main At least for that weekend. Having said this there is only one place that I've found that can get you parts (3) days after you order them every time. When I found NitroHouse.com all my parts problems where resolved. I had tried some other mail-order companies and even some local Hobby-Shops and none proved to be as reliable as NitroHouse. I don't normally give this type of endorsement to anybody, If you want to race a Nitro OB4 and local parts availability is weak, then NitroHouse will be your invisible pit partner(as long as you pay your credit card bills). Rear Belt Alternative:If your OB4 rear belt dies, you can use a Traxxas Nitro 4-TEC rear belt. You'll need to move the diff cams all the way forward; it's going to be a tight fit. You will also need to let the car sit for a weekend as the belt needs some time to stretch. It's a little tight at first but after a couple of runs it will loosen up and work like a charm. The Traxxas belt uses a rubbery material; I felt this causes more friction in the drive train. Cost is really not a consideration, I think the Traxxas belt is a like $1.50 cheaper. The original Ofna belt is better, but anything is better than to be sidelined w/ a broken belt. The OB4 middle belt is the same as a Z10 front or rear belt so finding it at your LHS is usually not a problem. The front OB4 Belt is the same as a Z10 middle belt. That should cover the belt department for now. These are the parts that you'll need to have:
These are on the nice to have list:
These should be all the parts you need make sure to order your spares when you buy the car. Wow, this completes the first round of OB4 Tips and Tricks. |
Chassis:Nitro OB4 | ||
Engine:HPI/Novarossi | Track Surface:Cement Parking Lot |
|
Version: | 1.0 |
|
Camber: | F | -1.0 |
||
R | -2.5 |
|||
Caster | F | Minimum** |
||
Toe-in | F | 0.0 |
||
R | -2.0 |
|||
Ride-Height | F |
4.5 mm | ||
R | 5.5 mm |
|||
Droop | R | *** mm |
||
R | *** mm |
|||
| Differential | F | Gear 50,000wt | ||
| R | Gear 1/2 full 50,000wt | |||
Piston | F | 2-hole 1.2 mm |
||
R | 2-hole 1.2 mm |
|||
Shock Oil | F |
60 wt | ||
R | 50 wt |
|||
Springs | F | Black HPI Prog* |
||
R | Yellow HPI Prog* |
|||
Roll Bars | F |
None | ||
R | None |
|||
Tires | F | H13 LP |
||
R | Take-off WSB |
|||
Inserts | F | Top Extra Firm 24 mm |
||
R | Top Med 24 mm |
Fuel |
Wildcat 15% Nitro |
18% Oil |
||
Glow Plug | MC59 |
| ||
Engine Temp | 250 F |
| ||
Spur Gears | Stock 45T |
Stock 41T |
||
Clutch Gears | Optional 15T |
Optional 19T |
*HPI progressive springs with (2) close coils cut with dremel disk. (Basically the springs aren't progressive anymore)
**Both spacers toward the back, moving the front hubs to a more vertical position (less caster)
***Chassis droop was not more than a few mm. Less in the front more in the rear.
The thing that is most important when you want to be successful with this car is that you need to keep good notes. Pivot ball suspension car are great because you can "easily" adjust them to the track conditions. The down side is that you need to keep good records of your tuning changes and you have to measure the chassis with more precision. A couple of real hard wreaks and your setting can be off by quite a bit.
So every so often, after a hard wreak or when the car is not hooking up take out your setup tools and re-set the car to your base setup. For this car my base setup is the one listed on the setup section. Except that I increase caster by placing the small caster spacer in front. On tracks with fast wide sweeping corners your going to need more caster and thicker oil on the shocks to keep the chassis from leaning too much.
One of the most common problems for beginners with the Nitro OB4's is that they struggle to keep the rear end from sliding in the corners. This can be corrected by using thick silicone fluid in the front and rear differentials. By slowing down the diff action you will add on-throttle stability to the car in the corners. Something that also needs to be looked at is that the damping is not too light for the level of traction and the type of track that you are driving on. If you see the car whip the rear end around in the corners then you probably need to increase dampening especially in the front. You do this to help slow down chassis weight transfer.
Remember that chassis sway is a double edged sword. Without it you don't generate traction in the corners -too much and it can upset chassis balance enough to cause the rear to break loose and/or rollovers when coming into a turn.
Another thing to consider is that if the rear diff feels rough it will make the car over steer. Making it more difficult to find traction in the corners. Make sure the rear diff is fluid.
Still, if the rear end is loose and you haven't tried to balance front to rear traction then a tire change is probably where I would start. I've had my OB4 for about a year now and the car always seems to work best with "harder" tires with less traction up front than in the rear.
If you don't know where to start in the tire department I suggest you checkout the Sedan Tire 101 Article for possible solutions to common handling problems.
Hope this helps.
Whoop some R/C Car Butt!!!
Eric Perez
Team NitroRC.com

 I still remember
my first race with the OB4
I got hacked coming in to a turn and the steering
servo almost fell off the car, what a first impression! The screws provided in
the kit barely threaded into the plastic servo mounts, that explained why the
servo almost fell off the car. Replace the stock screws with longer 3X24mm
machine screws.
I still remember
my first race with the OB4
I got hacked coming in to a turn and the steering
servo almost fell off the car, what a first impression! The screws provided in
the kit barely threaded into the plastic servo mounts, that explained why the
servo almost fell off the car. Replace the stock screws with longer 3X24mm
machine screws.  If you have the lever
type 2-speed you need to install a washer between the stationary 2-speed arm hub
and the 2nd gear carrier. You would think one of the dozen washers included in
the 2-speed kit will work -but none of them do. The 2-speed shaft is 6mm OD, so
it will be very hard to find a washer that will fit. I cut a 5mm Traxxas Teflon
washer and slid it over the shaft. Looks funky, but it works!
If you have the lever
type 2-speed you need to install a washer between the stationary 2-speed arm hub
and the 2nd gear carrier. You would think one of the dozen washers included in
the 2-speed kit will work -but none of them do. The 2-speed shaft is 6mm OD, so
it will be very hard to find a washer that will fit. I cut a 5mm Traxxas Teflon
washer and slid it over the shaft. Looks funky, but it works! 

 After a couple of races
when everything seemed to be going well, misfortune struck after I did a quick
pre A-main cleaning. I shot the rear of the chassis w/ denatured alcohol and
simple green. Every thing looked fine except for the dirt that had found it's
way deep in the brake cam mechanism. As the A-Main race progressed the car was
acting funny. At first I didn't notice it but after a while the engine temps
started creeping up. Then the car started loosing speed; I knew something wasn't
right. After a quick inspection I noticed the car wouldn't roll well, I doused
the brake disk with fuel and the problem went away. After a couple of minutes,
it was fuel time again. I thought it was a little funny, pit stops for the brake
disk?
After a couple of races
when everything seemed to be going well, misfortune struck after I did a quick
pre A-main cleaning. I shot the rear of the chassis w/ denatured alcohol and
simple green. Every thing looked fine except for the dirt that had found it's
way deep in the brake cam mechanism. As the A-Main race progressed the car was
acting funny. At first I didn't notice it but after a while the engine temps
started creeping up. Then the car started loosing speed; I knew something wasn't
right. After a quick inspection I noticed the car wouldn't roll well, I doused
the brake disk with fuel and the problem went away. After a couple of minutes,
it was fuel time again. I thought it was a little funny, pit stops for the brake
disk?