| R-12 to 134a conversion | |||||||||||||||||||||||||||||||||||||||||||||||||||||||||||||||||||
| Here's what I used to complete this conversion: | |||||||||||||||||||||||||||||||||||||||||||||||||||||||||||||||||||
| Retro Kit. I suggest Castrol's
kit only because it includes "O" rings, 134a port valves,
and ester oil. New Accumulator. You old accumulator stores alot of mineral oil. Where-as 134a uses ester oil. Denatured Alcohol 1qt. Filter Tube. Also called expansion valve. Flexible Tubing Funnel Access to air compressor |
|||||||||||||||||||||||||||||||||||||||||||||||||||||||||||||||||||
| Its always a good idea
to have your A/C compressor professionally checked. I take my chances
and assume the compressor is good when I'm converting a system that
doesn't function at all. The GM compressors are VERY durable.
If your A/C doesn't work at all, goto the accumulator, remove the cap and push on the valve. If you hear a hiss, your A/C system's charge is more than likely too low to turn the compressor on. You may be able to charge the system (with R-12) and get a few years use until it will need charged again. But R-12 is extremely expensive, and considering the age the "O" rings, you might as well replace all the "O" rings and convert to 134a for many years of trouble free use. If your A/C system cycles on/off quickly, your charge is low. You've got a leak somewhere. It's usually an "O" ring or manifold line. At least you know your compressor good :-) |
|||||||||||||||||||||||||||||||||||||||||||||||||||||||||||||||||||
| What to do | |||||||||||||||||||||||||||||||||||||||||||||||||||||||||||||||||||
| Using cresent wrenches,
disconnect these fittings: All fittings in the front comportment (acculumaltor, evaporator, filter tube) At the condesner (under front facia) At the compressor At the manifold line (found in engine bay) You'll need to remove all fittings at one time to allow proper line flushing. Leave the old "O" rings in place at this time. Insert the flexable hose into each orfice. Using the funnel and tubing, pour approx. 4-6 oz. of denatured alcohol into the line. Remove the funnel, and replace it with the compressed air line. With a rag at the other end of the line, blow 120psi air through the system till no alcohol appears in the rag. Repeat this step a 2nd time for ALL lines.The purpose of line flushing is to remove all mineral oil. Completely remove the filter tube. Using needle nose pliers, remove & replace the filter (make sure to install new filter properly).If you have alot of metal shavings caught in your filter, you may want to consider a new compressor. I've found a small amount of metal shavings in all my retrofit jobs. Replace the "O" rings at each end of the tube. Coat each "O" ring with ester oil before reinstalling the filter tube. You'll be replacing the "O" rings at each fitting next. (Leave the evaporator & accumulator for next step) Before replacing the rings, clean the threads and fitting area with alcohol. Now apply a coating of ester oil to the new "O" ring and fitting surface. Tighten each fitting. The evaporator and accumulator must have ester oil added before sealing the system. The evaporator receives approx. 4oz of oil. The remaining oil is for the accumulator. Finally, replace the "O" rings and tighten fittings. Don't forget to swap over the pressure switch from your old accumulator. Install your High and Low pressure port valves (supplied with Castrol kit). High port is located to the right of the filter tube. Low port is located on the accumulator. You're ready to fill the system with 134a. I prefer to have my system professionally refilled. Have the tech pull a vacuum for 30 minutes minimum. This will insure all moisture is removed from the system, and also reassures there are no leaks in the system. |
|||||||||||||||||||||||||||||||||||||||||||||||||||||||||||||||||||
| QUICK How-To Pictorial Series | |||||||||||||||||||||||||||||||||||||||||||||||||||||||||||||||||||
 |
|||||||||||||||||||||||||||||||||||||||||||||||||||||||||||||||||||
 |
|||||||||||||||||||||||||||||||||||||||||||||||||||||||||||||||||||
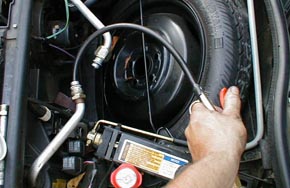
| Flush with alcohol
followed by compressed air. Complete this step on all lines/components |
|||||||||||||||||||||||||||||||||||||||||||||||||||||||||||||||||||
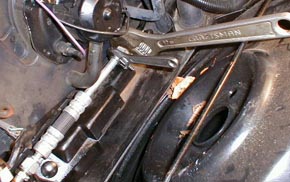
| Using cresent wrenches, remove each fitting. | |||||||||||||||||||||||||||||||||||||||||||||||||||||||||||||||||||
 |
|||||||||||||||||||||||||||||||||||||||||||||||||||||||||||||||||||
 |
|||||||||||||||||||||||||||||||||||||||||||||||||||||||||||||||||||
| Match the new "O" rings with the old | |||||||||||||||||||||||||||||||||||||||||||||||||||||||||||||||||||
| Install new "O" rings | |||||||||||||||||||||||||||||||||||||||||||||||||||||||||||||||||||
 |
|||||||||||||||||||||||||||||||||||||||||||||||||||||||||||||||||||
 |
|||||||||||||||||||||||||||||||||||||||||||||||||||||||||||||||||||
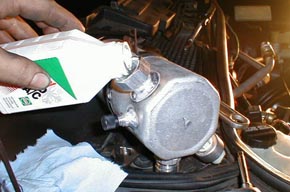
| Pour the remainder of the oil into accumulator | |||||||||||||||||||||||||||||||||||||||||||||||||||||||||||||||||||
| 4 oz.of oil into evaporator | |||||||||||||||||||||||||||||||||||||||||||||||||||||||||||||||||||
| Where to replace "O" rings | |||||||||||||||||||||||||||||||||||||||||||||||||||||||||||||||||||
 |
|||||||||||||||||||||||||||||||||||||||||||||||||||||||||||||||||||
 |
|||||||||||||||||||||||||||||||||||||||||||||||||||||||||||||||||||
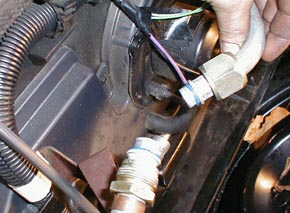
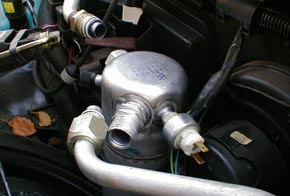
| At the accumulator | |||||||||||||||||||||||||||||||||||||||||||||||||||||||||||||||||||
| At the filter tube | |||||||||||||||||||||||||||||||||||||||||||||||||||||||||||||||||||
 |
|||||||||||||||||||||||||||||||||||||||||||||||||||||||||||||||||||
 |
|||||||||||||||||||||||||||||||||||||||||||||||||||||||||||||||||||
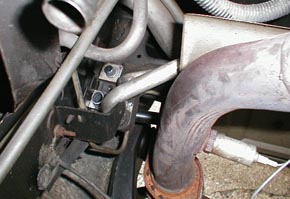
| Rear manifold
(found on lower left of engine bay) Except 84's are found at top center of engine bay. |
|||||||||||||||||||||||||||||||||||||||||||||||||||||||||||||||||||
| On the compressor | |||||||||||||||||||||||||||||||||||||||||||||||||||||||||||||||||||
 |
|||||||||||||||||||||||||||||||||||||||||||||||||||||||||||||||||||
 |
|||||||||||||||||||||||||||||||||||||||||||||||||||||||||||||||||||
| Don't forget the filter. Insert it correctly | |||||||||||||||||||||||||||||||||||||||||||||||||||||||||||||||||||
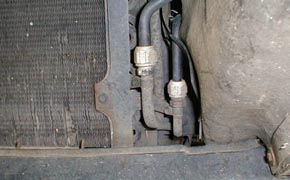
| At the condensor (under front facia) | |||||||||||||||||||||||||||||||||||||||||||||||||||||||||||||||||||
| [main|fiberglass parts|new parts|used parts|fastback GT windows|my garage|links|shows] |
This site has been created for Fiero Warehouse. All material from Fiero Warehouse.Com is ©Copyright 2005, Fiero Warehouse. All logos and images are reserved. Fiero Warehouse | Wheeling, WV 26003 304 845 4769 | contact@fierowarehouse.com Site Design and maintained by: Reality Graphics |