Whip Finish without tools


Välkommen"Some years ago, I had the pleasure of being taught how to make that excellent finishing knot, the Whip Finish, with just my hands".

"For the avid fly fisherman searching for the right knot to match the hatch, this one tied just with the hands, is perfect. No need for any hassle with too many tools while stalking the trout. Even very small flies can be finished with this finger trick. You don't have to worry anymore about forgetting the traditional Whip Finish Tool when you know this finishing technique" says Harry Salmgren, inviting you to try it for yourself.

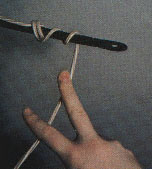
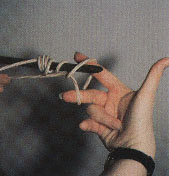
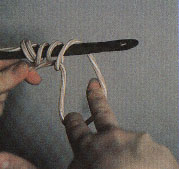
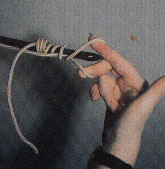
Please note: The photo sequence below is most easily viewed by clicking the arrow-bar on the left of each photo.

After a first read through, click on the bars to bring forward the next photo in the sequence at the speed of your choice. Viewed in this manner the photos give a simulated movement to the fingers tying the Finger Whip.


This article is a 'mini' version of the article 'Genialisk slutknut..' in issue number 3-1995 of Wilderness News/Vildmarks Nytt by Harry Salmgren. He is Editor in Chief in the Wilderness News/Vildmarks Nytt Magazine You can also find him in Bignami Fine Fishing Magazine as the Swedish Fly Fishing Editor.

The photos from one to nine show positions and finger settings for tying the whip finish accompanied by descriptive text.


go to next


The Finger Whip

The sequence for tying the Whip Finish using only the fingers, is illustrated with photos below. To make the moves easier to see and understand the hook and thread are oversize and should be viewed in a flowing sequence.


Fig 1: After the first half hitches to secure the thread, two fingers(index and middle finger) are placed on the tight thread.

go to next
Fig 2: By keeping the fingers spread, the thread is doubled back so the thread forms a large tight loop with the help of the fingers.
go to next
Fig 3: By using the middle finger as the leading finger, the loop is threaded over the hook shank. The thread is kept taut with the other hand.
go to next
Fig 4: This will result in a half hitch and also will allow the outspread fingers and the hand to turn inside it back to the original position in the first figure (fig 1).
go to next
Fig 5: For additional turns of thread, just repeat the motions as shown in Figure 3 and 4. See below.
go to next
Fig 6: The middle finger and index finger wind the thread keeping the loop open with the fingers spread once again...
go to next
Fig 7: Every repetition results in a new turn of the thread.
go to next
Fig 8: Finish the rotating motions by sliding one of the fingers out of the loop. Then tighten the loop....
go to next
Fig 9: ...until it tightens completely. Trim off and finish with a drop of tying varnish.


Fly tying in Wilderness News

The Finger Whip is fairly easy to learn.

For extra help there is an animated version here.

See you by the waters!

| Please-I want back to Flyfish´s Homepage |

This site is published © 1995-2002 HS Skriv & Utred/HSalmgren. All rights reserved. Republication or redistribution of "Fingerfärdig Slutknut´s" content is prohibited without prior written consent. Contact: HS Skriv&Utred

Thanks to L.J. DeCuir for the English translation.