Coloring in Photoshop:
I had some free time and decided it was about time for me to put in my two cents regarding coloring in Photoshop. Be prepared for a good amount of reading; it looks like more than it really is, though. In some parts, I'm assuming you have a working knowledge of where the tools are,yet I'm also aiming to help those who wish to learn the super basics of this as well.
There are two major options I have: cel-style with solid colors or airbrushing/digital techniques. Here I'm going to mix both, and I'll be writing this as I go along....I must be crazy. ^_^;
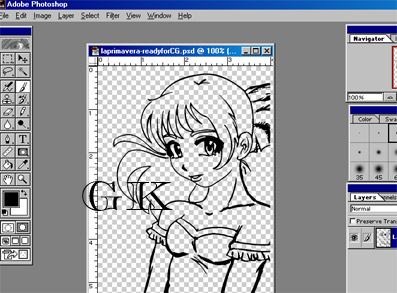
I did the drawing in Photoshop 5.5 with the paintbrush at about double the image size I was planning on for the finished product. Then, I took it into Adobe Streamline, a program that's handy to have but not needed, and let my tinkering with the Threshold option do its work. Unfortunately, it reduces my image size and I just don't know why that is. Now I'm working on something smaller, but at least I have my lineart. (See the MS-Paint tutorial for more information on preparing your own lineart. That is aimed for less quality lines, though, so until I write something up for photoshop-bound images, know to scan in greyscale at a good dpi like 300.)
I renamed Layer 1 to Lady: it's really a good idea to name your layers to avoid confusion--not to mention to be more professional about your CG. All you gotta do is double click on it in the Layers box. I also want to set layer Lady to Multiply. I don't always need it, but this option will let you color over white and under black. In this case, the rest of the pic is transparent; however, it's a very good thing to know of. *Now comes the real fun!*
I personally like to color the subject's skin first. Despite this, laying down all the base colors before doing details is a really good way to go. :) So, I'm just going to select all the places that will need a skin color with the Magic Wand tool and hold down the shift key each time I want to include another area (you're going to love that feature). You can also hold ALT to subtract an area. Sometimes you'll be better off doing this with the freehand tool.


If you feel that the area you filled is fine, check the Preserve Transparency box. This way, you'll color ontop of what you've done to this layer already. If you tried to color on her hair in the skin layer, for example, nothing would show up. (Be sure to uncheck if you wish to edit how much space you color within!) If you have the resources, mainly a lot of RAM on your computer, make the layers as you need them. I now have: Lady, skin, hair, outfit as separate layers.
The second picture features something annoying when you want to color: anti-aliasing. When you have desired soft lines, there is a gray/white outline that softens them. When I did a normal color fill of my selection (Edit> Fill...), this is what I got. There are two good ways out of many I'm sure exists to work with this. The first method is to expand your selection by at least 1 pixel (Select>Modify) The other, make sure you don't have preserve transparency checked, is to color on the layer the spots that bother you bit by bit. A combination of both seems to be best for me.
This is where all the steps have brought me thus far. Some people separate layers by color, too.

Generally, it's after this point that everyone goes there own way. I'll bring up a few tips and tricks, but you'll discover your what you like for yourself in no time. This is the starting point of a CG is many ways, and it's time for me to begin the details.
| Airbrushing | (Animation) Cel Coloring |
|
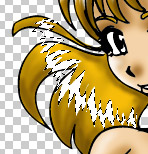
I use alot of the airbrush tool to get the soft look. It's almost always better to use a new value than just the Dodge/Burn tools. One way I like to highlight hair is by filling a selection of white like shown above. The fingertip tools will help you blend it in. You can also add one big curve line and smudge it. My lineart limits how I can color her hair, so think things like this through beforehand so you don't come across similar problems. |
<<::Coming Soon Perhaps::>> |
|
The metallic-look, which can be done better, is achieved by using sharp shades and highlights. Sometimes your darkest value will be next to white (usually if it is really metal). At this point, I will merge some layers to decrease the filesize and add in a background. |
|
 |
Back To Tutorials Section Return To Main Page