|

Gerda's original Dutch tutorial can be
viewed
here
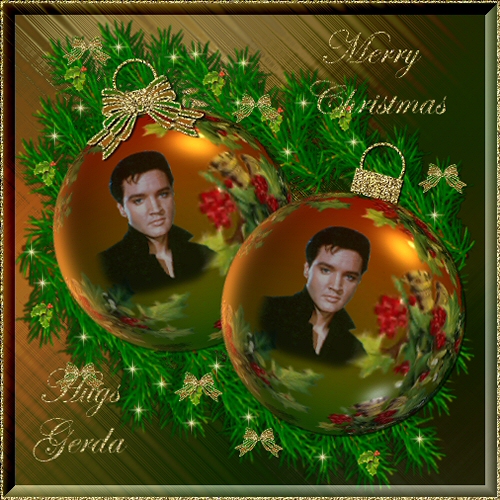
Christmas Balls
with a
touch of Elvis :-))
This tutorial was written for PSP 7 & 8
A good knowledge of PSP is required.
Gerda has made adjustments for PSP 9, 10, 11.
MATERIALS NEEDED:
FILTERS
Filters Unlimited
download
here
Filter freebies -
Free plugin van
Flamingpear
download
here
Funhouse
download here
Supplies
include:
Pine twigs
Gold pattern
Dingbat font ' Bows' .
Elvis
Download
here
You can use your own pics as well :))
NOTE: Right - click on the zip
file.
Choose the 'Extract to here' - option in
the drop-down menu
to open the file.
DO NOT click directly with the left mouse button
on
the downloaded zip file. Lycos will only show
an empty folder if you do that. :))
|
~~
* For
PSP 9, 10, 11 users:
* ~~
PSP
Balls and Bubbles presets
Download
here
The presets should be saved in
your PSP Presets
folder.
Or you can save it in your
own presets folder
and point PSP to the file.
If you don't know how to do it, click
here
|
LET' S BEGIN :))
Step1
Open a new transparent canvas, size 250 x 250 pixels.
Choose 2 colors from your tube, or use Xmas colors and
make a gradient:
Style - Linear
Angle - 0
Repeats - 0.
Fill the canvas with the gradient.
Add a new layer.
Now use any tubes or images to
fill the canvas. It doesn't have to be in any pattern.
Just do it randomly.
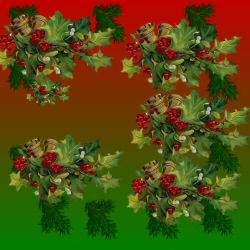
Merge all layers and save the image in your PSP Environmental Maps
or Patterns folder and make sure PSP is pointed
to these files in the File Locations.
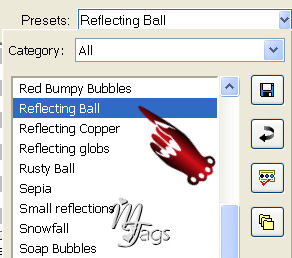
Step 2
Open
a new transparent image size 250 x 250 pixels.
Effects --> Artistic Effects --> Balls &
Bubbles.
Check the ' Single Ball ' as well as '
Maximum possible size' options.

In the Presets window:
Choose the ' Reflecting Ball' preset.
Next:
Click on the ' Maps' tab
Make sure both the ' Environment map' options
are checked.
On the right side, click on the small arrow next
to the picture.
A dropdown list of all the images available will
open.
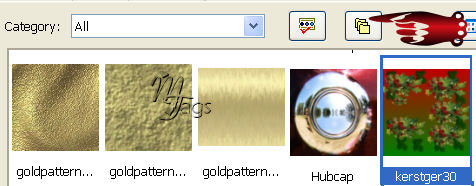
Find your own image that you have just saved as
a jpg.
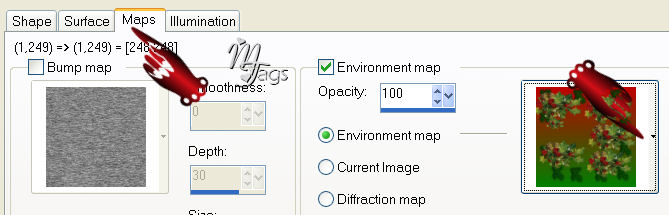
If it's not there, click on the " File
Locations' - icon
indicated below:
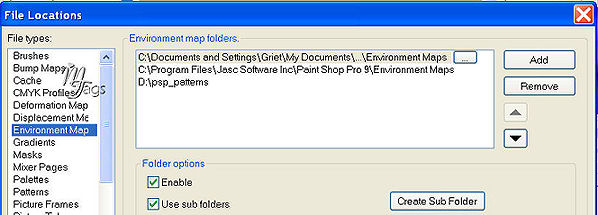
Your list of Locations will open.
Click on Environment Maps in the left Column.
If your PSP Patterns file is not listed in the
right column
just click on ' Add' in the top
right corner and scroll with your mouse up
in the dropdown list until you find your file.
Click on ' OK' and it should be listed.
Okay, now that you have
found your pattern and chose it as your
environmental map,
just click on Ok and your ball is finished.
Fun, huh? :-))
Step3
Open a new
transparent 500 x 500 pixel canvas.
Paste your ball as a new layer onto it.
We're going to make the top.
Add a new layer.
Change your foreground color to the gold pattern
that was included in the zip.
Activate the Selection Tool - Rectangle.
Draw a small square or rectangle - whichever you
like.
Fill with the gold pattern.
Effects --> 3D Effects --> Buttonize:
12 / 20 / 43 / transparent / white.
Deselect.
Drag it to the top of the ball.
Merge all layers visible.
Add a new layer.
Activate the Selection Tool again - Circle.
Draw a small circle and fill with the gold
pattern.
Go to Selections --> Modify --> Contract by 3.
Press delete.
Deselect.
Drag this layer to the top of the square behind
the ball.
If the ring is too big, just resize it.
Merge all layers.
Step 4
Open the
Elvis tube and paste onto the Xmas ball.
You can reduce the opacity of this layer to 95%
in the Layers palette if you like.
Merge layers visible.
You can save it as a tube.
Duplicate this layer and lock the duplicate.
Activate the other one.
Effects --> Filter Effects --> Flamingpear -->
Solidy B
Effects --> Filter Effects --> Funhouse -->
Xaggerate 100-72.
Unlock the duplicated layer.
Rotate this Xmas ball with 15 degrees left.
Edit --> Copy
Edit --> Paste as a new layer onto the canvas.
Back to the first Xmas ball:
Rotate it 30 degrees to the right.
Adjust --> Sharpness --> Sharpen.
Position where you like it. There' s no rules :)
Step 5
Open the '
Dingbats Bows' font.
Change the foreground color to the zipped gold
pattern.
Change the background to your gradient:
Gradient Angle should be 180, Style - linear 3
Add a new layer.
Activate the Text Tool.
Stroke width on 2.
If you want to make the bow type the letter ' e'
.
Add the bow to the xmas ball top.
Sharpen it.
Lock the background layer
( bottom layer )
Activate one of the others and merge layers
visible.
Unlock the background layer.
Step 6
Now you can just play with
some more ideas.
Add a new layer and add some pine leaves under
the balls.
Add new layers for all the additions so that you
can play around.
Merge all layers.
Add a 3 pixel border and fill with gold.
Select.
Apply any ' Inner Bevel' effect of your
choice.
Go to Effects --> Filters Unlimited --> Buttons
and Frames --> Glass Frame 3:
12-122
.
Even now there's no rules.
Just play around with all the possibilities.
Add a layer.
Add your text or watermark.
Merge all layers.
Save as jpg.
You're finished.
And Elvis is happy too :))
©Design by Gerda
Back to Index
Visit Gerda's Dutch
website here

Translated 6th December 2006

This website was created in March 2005 and is owned
by
©Magstags
Home |
Filter Links |
Email |Terms
Of Use
|