|


Gerda's original Dutch
tutorial can be viewed
here
Elvis in a Snow Globe
(guess to whom Gerda has dedicated this
tutorial ! :))
This tutorial was written for PSP 8,
but has been adpated for 9 and 10.
We're going to make everything ourselves, so it is
a long tutorial, but we' re going to have fun.
You need a good knowledge of PSP.
Materials Needed:
Filters
Filters Unlimited -
here
VM Toolbox -
here
Filters freebies from Flamingpear download
here
Supplies:
Preset Shapes - save it in your PSP
Preset Shapes folder.
Download here
PSP 9,10, 11 users: PLEASE NOTE!!
You need presets that is no longer
available in versions 9,10,11.
Download here
Save the presets in your PSP Presets
folder.
If you don't know how to do it
click
here
You need some tubes and images of your
own.
NOTE:
Right
-
click on the zip
file.
Choose the 'Extract to here' - option
in
the drop-down menu
to open the file.
DO NOT click directly with the left mouse button
on
the downloaded zip file.
Lycos will only show
an empty folder if you do that. :))
Let's begin ! :)
Step 1
Open a 350 x350 transparent image.
Choose two colors from your tube or take two
Christmas colors.
Change the foreground color to gradient:
Style - linear
Angle - 0
Repeats - 0
Fill the canvas with the gradient.
Add a new layer.
Add some Xmas tubes like pine leaves, etc.
Just paste it randomly onto the canvas.

Merge all layers.
Save as jpg in your PSP Patterns folder.
Make sure PSP is pointed to the file in the File
locations.
Step 2
Open a new 350 x 350 pixel transparent image.
Go to Effects --> Artistic Effects --> Balls &
Bubbles.
Choose the ' Single Ball' option and check the
' Maximum possible size' option.

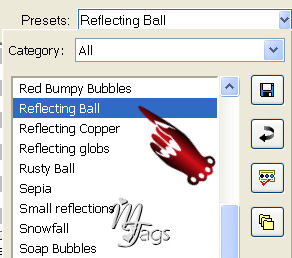
Choose the ' Reflecting Ball'
Preset in the Presets list.
Click on the ' Maps' tab next.
Check both the ' Environment Map' options.
Click on the small arrow next to the window on the
right.
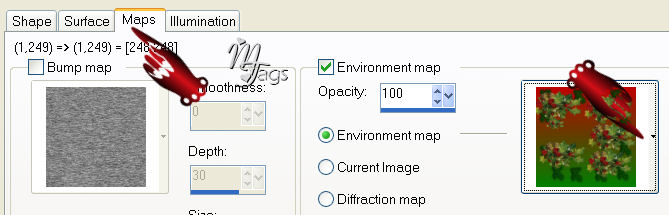
A Dropdown menu with all the images will open.
Find your jpg that you have created.
Click ' Ok' .
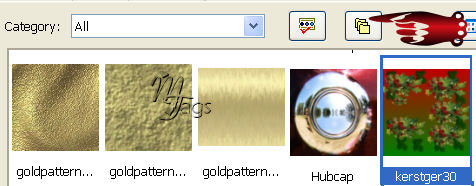
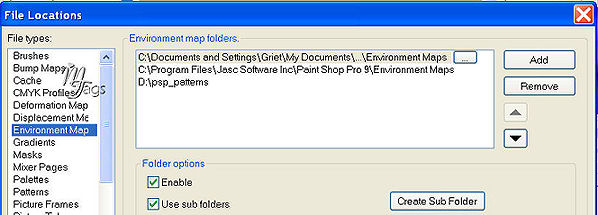
If your image is NOT there,
click on the File Location icon - indicated above.
A menu will open where you can direct PSP to the
file where you
have save it.
The globe is finished.
You can now save it as a tube before we proceed.
Step 3
Open a 500 x 500 transparent new image.
Paste the globe as a new layer onto the canvas.
Reduce the opacity of the globe layer to between
88 to 94%
in the Layers palette.
Merge all layers visible.
Step 4
The Stand
Set the foreground on the gold pattern,
background on gradient.
Activate the Preset Shapes Tool.
Find the cylinder.
Apply with these settings:

Draw a stand that will fit below the Elvis
snowglobe.

Step 5
Read carefully now! :))
Go to your Layers palette and note the little plus
sign
next to the Vector layer ( on the left)
Click on it.
A new set of layers will open.
The top one will be named ' cylinder' .
Next to this layer is another small plus sign.
Click on it.
A new set of layers open up.
The top one is a shadow layer.
Click ( double-click if you must) on it to open.
A window will open where you
have to change the color
as seen in the screenshots below.
Choose a color that is not present in your image.
Do not choose white either, since gold contains
white and will
pick it up if it is selected.
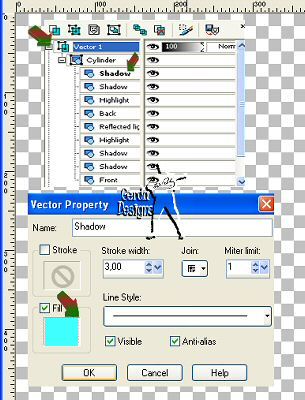
Click on ' OK' .
Click on the ' Vector layer in the Layers palette
and right-click
on it. Convert the Vector layer to Raster layer.
Activate the Magic Wand and click on the color you
have chosen.
Press delete on your keyboard.
Don't worry about the thin gold edge.
We will fix it.
Activate the deformation tool and resize the stand
to fit nicely below the globe.
Use your Eraser tool now to carefully erase the
top gold edge.
You can also use the
Selection tool ( Rectangle) to
select it and then press
the delete key on the keyboard.
Go to Effects --> Filter Effects --> VM Toolbox
--> Brightness/Noise -->
Brightness - 95.
You can now merge all layers visible
if you are happy with the results.
~~~TIME FOR A PITSTOP AND A COFFEE
REFILL!!! :)))~~~
Listen to Elvis and relax a few minutes.
PART 2 !!
Step 6
Duplicate this layer and lock the duplicated
layer.
Activate the other layer.
Resize to 50%
NOTE: ' Resize All Layers'
should NOT be checked!!
Go to Effects --> Filter Effects --> Flaming
Pear --> Solidy B.
Step7
Add a new layer.
Activate the Selection Tool -
Rectangle.
Keep the Shift key pressed down while drawing a
thin line
horizontally from left to right at the top of the
canvas.
Begin at the top left corner again and draw a thin
line from top to bottom
The two lines should form a unity.
Fill it with the gold pattern.
Apply a drop shadow of your choice.
Go to Effects --> Filter Effects --> VM
Toolbox --> Brightness/Noise -->
Brightness - 95 or your own
choice.
Deselect.
Copy this line and place it next to the other one.
See example.
Add an adornment of your choice.
Step 8
Add a 3 pixel border.
Fill with gold.
Apply an Inner Bevel of your choice.
Add a 5 pixel border
Fill with the gradient.
Add a 3 pixel border.
Fill it with gold.
Apply an Inner Bevel again.
Go to Effects --> Filter Effects -->
Filters Unlimited --> Button and Frames --> 3D
Glass frame 2 -
Frame size on 12.
Merge all layers.
Add a new raster layer.
Add your name or watermark.
Merge all layers again.
Step 9
The Animation
Open AS ( Animation Shop) and minimize.
Back in PSP:
Copy the canvas 3x ( Shift + D)
Set the foreground color on gold.
Activate the Airbrush.
Choose a round brush: size 4 or 5/ Hardness - 50.
Add a few dots to the globe.
Edit --> Copy the picture.
Open As and Edit --> Paste it as a new animation.
Back to PSP.
Activate the second snow globe .
Apply the Airbrush dots again.
Paste it ' after the current frame' in AS.
You do this by activating the first frame(blue).
Right-click on it and choose ' behind current
frame' .
Repeat the same process with the third snowglobe
in PSP.
Click on the second frame in AS and paste the
third snow globe behind current frame.
Go to Edit --> Select All in AS.
Right-click on the frames and choose the ' Frames
Properties' option.
Change the time to 35.
Click on the Animation icon to view the Animation.
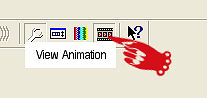
Click on it again to close the animation.
Save as a GIF file.
Tip
If the image changes too much when it goes through
the Animation Wizard,
open a new animation and when you save it,
try to change the colors to 255 in the Animation wizard - 1 pixel.
Then send the Elvis snow globe through the
animation again.
This way it might look a little bit better.
Enjoy your new Elvis snow globe !! :-)))

This
tutoral can be used freely, but please don't copy.
You may use a text-link to it.
Back to Index
©Design by Gerda
Visit Gerda's Dutch
website here

Translated
6th December 2006

This website was created in March 2005 and is owned
by ©Magstags
Home |
Filter Links |
Email |Terms
Of Use
|