 I made this tallow. |
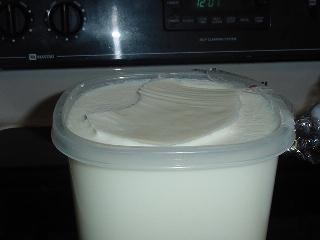 A closer look. |
 This is suet. I bought suet at the local grocery store. |
 Here is another look at the suet without the plactic wrap. |
 This is my setup to grind the suet. I double grind the suet. Meaning I grind it twice to make it very fine. You can also cut the suet up into small chunks. The smaller the pieces the faster the suet will render. |
 I freeze my suet after I cut it up into i/2 to 1 inch long strips. Freezing the suet makes it easier to grind. If it is not frozen it starts to melt with the heat of the grinder. |
 Now comes the more messy smelly part. Once you have ground the suet put it into a pot on low heat. You can put it in a crockpot to cook at low heat also. Add water to cover the suet with about a tablespoon of salt. The water and salt help to clean the tallow and remove any inpurities. |
 A close up of my suet. You can see it starting to melt. I took this picture before I added my water and salt. |
 As you can see I have my salt and water ready to put into my pot. The salt will grab hold of any inpurities to help make this tallow very clean. Let it cook on low heat for as long as it takes, several hours. Stir the suet mixture every so often to help break apart the pieces. As it cooks the tallow melts off the cracklings. |
 Here I have suet, salt and water in a crockpot to render. I put this outside, with the lid on. The reason for it being outside is because the cooking process is very smelly. My house tends to smell like a greasy spoon. I light candles and everything, but the smell lingers. So, outside is a good way to do this in the summer. |
 After you have cooked the suet you will need to strain it. I put a piece of cheesecloth over a large bowl and poured my suet mixture on top/through it. This allows the liquid to pass through and the cracklings to be removed. You may cook the cracklings further to get more tallow, but it really is not worth it. It gets very messy and will/can pop. I cooked some cracklings further and one piece popped and almost hit my face. |
 As I pull the cheesecloth away you can see the tallow water mixture in the bowl. Cover with plastic and put in the refridgerator overnight. In the winter you can put it outside. |
 The next day pull the bowl out and uncover. You will see a white disk. Congratulations, you have rendered tallow. The bag of cracklings you see on the bowl will go outside to feed the birds. |
 From this view you can see the three layers of rendered tallow. The first layer is the tallow. The second layer is a gel material that contains any pieces of meat or cracklings leftover. The third layer is water. |
 All that is left to do is to scrape off the second and third layers. Throw those layers away. Wrap the newly rendered tallow up in plastic. It is now ready for use. I put it in the freezer so that it will keep longer. |
If you are worried that your tallow is not clean enough you can clean it again. All you need to do is to put the tallow in a pot with water and cook it for a while - hovever long you want. Then pour it into a bowl and refridgerate it overnight. The tallow will rise to the top and the water will stay on the bottom of the bowl. |
There you have it. How I render tallow. I hope that these pages have been of some help to you. Happy soaping!
| Home | Page 1 making the soap | Page 2 unmolding and cutting | Page 3 making tallow |