
Napoleon may have reckoned that an army marches on its stomach, and we all know that the way to a man's heart is through his stomach, so it should be pretty obvious that the way to keep your campers happy is to feed the blighters and feed them well! At our camps we are noted for what the girls refer to as "seamless meals" - breakfast merges into elevenses, then it's time to prepare lunch, then we have afternoon tea and before you know it, it's time for our evening meal followed by supper! Visiting scouts have been amazed at our capacity for food : I just put it down to 24 hour fresh air and activity!
FIRES VS. STOVES ... EQUIPMENT ... FOOD STORAGE ... MENUS ... RECIPES
Wood fire or camping stove?
How you choose to cook the food depends on several factors: the age of the girls, the number of campers, whether you are doing central catering or patrol cooking, base camping or lightweight camping to name just a few.
Wood fires
are the cheapest means of cooking and certainly the way to go if you are catering for large numbers or
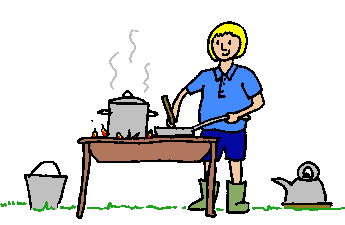
the whole group. The traditional "altar fire" is the most suitable method, and most equipped sites will have the necessary means of building them. A basic altar fire consists of a raised platform (sheet metal, corrugated iron etc.) on which to build your fire and a means of raising your cooking pots on grids above the fire. Oil drums halved lengthways are a popular fire base, with the fire being built in the bottom of the drum and a grid placed over the top for the pots; (see picture above) these drums do need a sturdy frame to keep them level and secure, but a lot of cooking pots, water etc. can be cooked or heated at the same time. Metal milk bottle crates, if you can get hold of them, make an excellent and sturdy base for an altar fire : stacked 2 high and 3 across, they will interlock and support a sheet for the fire base; bricks (preferably fire-bricks) will hold a raised grid for the pots above the fire. (Old oven shelves make excellent grids for the pots.) We have our own altar fire, a heavy angle-iron frame which in a previous existence held a bench saw but is now reincarnated as our "Camp Aga."
It is also perfectly possible to build a wood fire on the ground and cook over that, but there are problems attached, not least of which are : you will need BARE ground, and many sites do not allow turfing (cutting back the turf to expose the ground to lay a fire, then replacing the turf later), supporting cooking pots may prove a problem, and cooking over a low-level fire is a back-breaking exercise.
Whatever type of fire you decide on (or have to make use of) the one common ingredient is WOOD. A lot has been written on the merits of different types of wood - they usually recommend ash, beech, oak, holly, hawthorn or birch - but in practice you will have to burn what you can get. Wood for cooking needs to be as dry as possible - if it is damp it will smoke like crazy - I always take the added precaution of visiting a local wood yard and getting a sack of offcuts, just in case. When collecting wood, never cut living wood (it won't burn anyway) but try to find either fallen wood (stack to dry it out if necessary - check to see if it snaps easily, in which case it's dry enough to burn, and reject any with mould as it is probably waterlogged) or better still dead branches still attached to trees, which should be pretty dry. If you have to cut large branches into manageable pieces, please exercise extreme care : bush saws are much safer than axes and easier for the girls to use. Don't fall into the trap of trying to break branches by jumping on one end, unless your first-aider is adept at patching up cut lips, black eyes and bumps on the head.
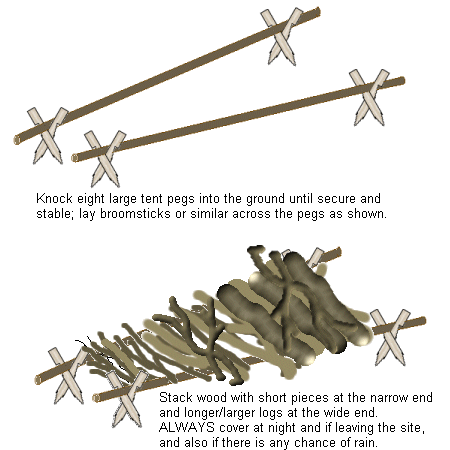
Build a good woodpile handy for your cooking fire, but not TOO close - you don't want it to burst into flames - sort the wood by size and stack neatly, raised off the ground to keep it dry and cover with a spare groundsheet or plastic sheeting in case of rain and always at night. A simple way of raising the wood off the ground is to knock in eight large tent pegs in pairs, crossing the pegs and resting two broomsticks or long branches across them; make one set of pegs closer together than the others, and you can stack the wood in graduated sizes (see diagram - a picture IS worth a thousand words!)
When it comes to siting and lighting your fire, you should check which way the wind is blowing first - you don't want to kipper the girls in their tents, and you need to stand upwind yourself. Lay the fire with plenty of punk (dry leaves, especially holly and sweet chestnut, pine cones, small twigs, dry grass etc.) or you can cheat and use fire starters or firelighters. (This is DEFINITELY allowable if it is pouring with rain and you are desperate for a cup of tea!) You can get extra long matches which save on singed fingers, and be prepared to have to teach the girls how to strike a match in these days of central heating and push-button gas fires. Once the punk is alight, slowly and carefully start adding more wood until the fire is burning well enough to add bigger pieces. You will find that sawn softwood catches easily but burns quickly - good for getting the fire going - but for a fire that lasts long enough to cook on you need to use the hardwood branches that you have collected. Make sure your Wood Patrol keeps the woodpile well stocked as you will be surprised at how quickly it goes down.
Gas stoves
Many units have a camping gas stove for emergencies (such as boiling a kettle for tea, coffee etc.....) but they can be expensive to run and to be much use you need a big one with a large free-standing gas bottle. If you decide to use a gas stove, start the camp with a new FULL bottle of gas. If you do need to change the bottle, do so well away from the girls, any fires, tents, etc. etc.
Trangias
are small, portable stoves which run on alcohol/methylated spirits. They are lightweight, compact (everything packs inside the windshield/pan stand sections) and are much used by Rangers etc. and for lightweight camping.

You might also want to consider using Trangias for patrol cooking : the standard Trangia set has two cooking pots, a frying pan and a kettle and is certainly adequate for a patrol of four girls; if they can have additional or larger pots even more can be fed.
Whichever type of cooking fire/stove you decide to use, you will need to have a fire bucket handy - to put out stray embers before they start a grass fire, douse smouldering pokers and to plunge any accidental burns or scalds (even if there is a scum of ash and insects on your fire bucket, burns and scalds must be cooled IMMEDIATELY and the fire bucket is usually the handiest place.) You will also need pot stands to place hot cooking pots on when removed from the heat - black sooty rings and scorch marks on the grass are a sign of a sloppy camper and are not acceptable. When you take pan lids off, put them down handle down/inside up, that way you won't transfer grass and dirt to your dinner when you replace the lid. You also need plenty of thick pot holders and/or oven gloves to handle the pots - the outsides, lids and handles get extremely hot especially if used on a wood fire. Cut-off legs from old jeans make excellent pot holders, just fold them into a suitable size and stitch roughly through all thicknesses to hold into place.
TOP

Cooking equipment and utensils
What you will need will depend on how many you are feeding and whether you are cooking centrally or patrol cooking. If cooking centrally (the girls taking it in turns to cook for everyone under the supervision of the QM, on a rota system) you will need a LARGE billy or two and several large dixies, at least two large frying pans and a giant economy-sized kettle. If you use conventional pans, make sure the handles are metal or fireproof materials.
Patrol cooking needs a set of smaller pans per patrol : the cheapest way of getting your unit equipped, especially if you have a lot of patrols, is to scour charity shops and car-boot sales where you can usually find bargains. It isn't essential to have a kettle for each patrol : they can always heat water for hot drinks in an ordinary pan. Car boot sales etc. are also an excellent source of utensils - ladles, fish slices, spoons, etc. but they need to be metal, not nylon/plastic. You will also need some good sharp knives for food preparation : keep them sharp, as you are more likely to cut yourself struggling with a blunt knife than when using a sharp one, and wrap the blades in foam or polystyrene padding for storage. Take several potato peelers (different styles - they will all be used to different ones at home) and don't forget a decent can opener or two - the gadget on your Swiss Army knife will certainly take can lids off but it leaves a viciously sharp edge to deal with (although it's better than nothing) : the advent of ring-pull cans seems to have been expressly with campers in mind!
The girls should all have their own crockery and cutlery - a melamine or plastic plate, dish and mug (metal, although unbreakable, gets very hot when used for hot meals and drinks and is most uncomfortable on bare knees!) and knife, fork, dessert spoon and teaspoon - in their own pot bag. It will save a lot of headaches if all this personal stuff is named - either scratched into the underside or painted on with enamel paint. Nail varnish also works but does wash off eventually, and name labels stuck on almost invariably float off with the first wash.
Before using pots - dixies, billys, frying pans, kettles etc.
- on the fire, it is advisable to coat the outsides well with
either a paste made of washing powder (we swear by Persil) or
thick washing-up liquid, or I have it on good authority that
toothpaste is also excellent although I have not tried it myself.
You do not need to clean the outsides of the pans at all while
you are at camp - a coating of soot will build up quickly and
this matte black surface actually absorbs the heat better than
the shiny surface, thus speeding up cooking. When you finally
strike camp and clean all those sooty black pans thoroughly,
the soot should come off fairly easily thanks to the initial
coating you gave them. (When cleaning the pans during the week,
rest them on a piece of newspaper on the grass or a table and
wash and rinse the insides thoroughly - don't put them in the
washing-up bowl or immerse in water.)
TOP
Food Storage
If you are going to keep your campers well-fed and healthy, how you store the food is very important. If you are on a site where there is access to fridges and even freezers, then storage should not be a problem, but many campsites do not have these facilities so you will have to prepare in advance.
When planning your menus, keep food storage in mind : fresh meats have to be refrigerated or eaten on the day of purchase, and fresh milk will also turn sour quickly in warm weather. You can get round the milk problem by using UHT or long-life milk, and pasteurised yoghurts, which need no refrigeration, taste exactly the same as "fresh" ones. A good insulated cool box can be used with several ice blocks, especially if you pack it with your sausages, bacon etc. frozen and eat them as they defrost, but once the ice blocks have defrosted, unless you have facilities for re-freezing them, then it becomes just another storage box.
Keep your store tent well-ventilated by opening the flaps and hanging the sides each morning (this will also air and dry the canvas and sod cloths) and store everything off the ground - not only will this keep air circulating, it will prevent the grass from yellowing. You can raise boxes by knocking in tent pegs vertically and standing the boxes on them, or you can construct a rack similar to the one illustrated for a woodpile (only keep the sides parallel!) Old bread crates, turned upside down, make excellent raised shelves and have the added advantage in that when the right way up, you can pack everything into them for transport and storage. Use muslin or old net curtains to completely cover all food (even unopened boxes and packets) and keep flies and other unwanted visitors out.
An old but very useful gadget for storing milk, butter, cheese etc., is the hanging larder : to make one of these you will need a piece of muslin or net curtain (not one with lots of holes in it!) some string, a couple of spare plates, cake tin lids, trays etc. and a shady place to hang it in.
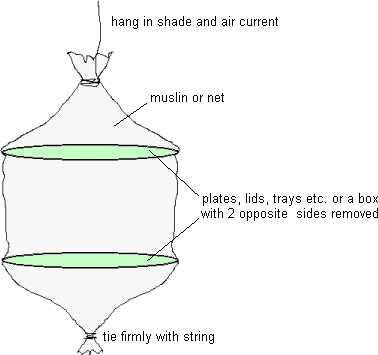
Wrap the net tightly round the plates, lids
or box,overlapping the ends (this will be your "way in" to the
larder but it also needs to keep flies out.) Tie one end tightly;
if using plates etc. you will need spacers eg. wood to keep
the "shelves" apart (or you can make a single-shelf larder)
or a box will have inbuilt shelf spacers. Use your own ingenuity
- make it as elaborate or large as you want and materials permit.
When you are satisfied tie the top off tightly and leave a length
of string to hang the larder up. It needs to be high enough
to be out of the reach of marauding wildlife - foxes, badgers
and even hedgehogs (which CAN climb very well!) - but easily
accessible to you. Ideally you can use a tree branch with plenty
of shade and a breeze around it, and your milk should stay fresh
and your butter firm.
TOP
Menus and recipes
This page is getting just a teeny bit out of hand, so I have decided to put sample menus and a selection of recipes on a new page of their own.
HOME | PLANNING | CAMPSITE | THEMES | HEALTH | ACTIVITIES | CAMPFIRE | RAIN | LINKS
|