Ok, first of all
let me say that I'm not planning to create a definitive reference guide
on cockpit editing or something like that but simply a quick start reference
on how to create a custom cockpit for XvT crafts, using Mark Samios' TIEEDIT
1.28. Notice that most of the information found here can be found in the
TIEEDIT 1.28 Help File. Read it carefully. I'm assuming that all of you
know what I'm talking about.
Cockpit
Files
A cockpit set is
formed by 3 file types:
.LFD
files - in these files are stored the graphics
of the main cockpit view, side views and some other craft instruments,
such as the Threat Display and the Inflight Map. Each graphic has it's
own .LFD file and many of them are common for different craft (such as
the standard view used by all TIEs) and even between Imperial and Rebel
Craft (the Threat Display, for example). Our main goal, so far, is to make
at least new main front views but side views are desirable, of course.
Here's the main TIE
Interceptor view, as loaded into TIEEDIT:

.PNL
files -
in these files are stored the Panel
Instruments graphics, small bitmaps
made from the main cockpit graphic. During flight, they actually overwrite
the main cockpit view. We might separate them in 3 categories: the normal
parts (so far, an exact match of a
certain part of the main view), the damaged
parts (the
damaged version of a certain part of the main view. It shows up when our
craft is hit and overwrite both the main view and corresponding normal
part) and the eletronic
parts (power indicators, hull condition
icon, missile lamps, etc). Most likely, we'll be wanting to modify some
of the normal and damaged parts but it's not recommended to play with the
eletronics but there are exceptions. Think carefully before starting.Note:what
I said is valid to all Imperial craft. Towards Rebels ones, however, is
seems that LucasArts only made the damaged and eletronic parts (the only
exception seems to be the CMD display). In my humble opinion, it makes
editing a Rebel craft a little more difficult: once the normal parts of
a Imperial craft overwrite the main view, we can easily create a "base
graphic" changing the main view graphic with another filled with one color.
Taking a screenshot of it, we may create our new cockpit based on it.
TIE Interceptor normal
parts:

TIE Interceptor damaged
parts:

TIE Interceptor eletronic
parts:

A base graphic using
the TIE Interceptor cockpit. Notice the normal parts "floating". Sorry
for the low quality of some pictures.

A base graphic using
the X-wing cockpit. Notice that there are no normal parts here:

.INT
files - the cockpit descriptor files.
It holds a lot of information such as the names of the .LFD files which
will be used as views, the position of each panel instrument and much more.
Unfortunately, the TIE Fighter (for what TIEEDIT was mainly designed),
X-Wing and XvT .INT files are not compatible. It means that, and I want
to make this very clear, WE CAN NOT CHANGE
INSTRUMENTS POSITIONS IN XvT, at least so
far. Some information, such as the .LFD files to be used, can be easily
edited with an hexeditor (I made some UGE modules to make this). So, be
careful. Create your new art around the original one. You may successfully
create new instruments layouts, only respect the bitmaps sizes.
What
you need
- Mark Samios' TIE
Fighter Editor (TIEEDIT) v. 1.28b. Get it atMark
Samios Page;
- a graphic editor
to make new art (Paint Shop Pro is very
good);
- cockpit descriptor
files (.INT files) from TIE Fighter. Don't worry about that, modified TIE
Fighter .INT files will be available to make your life easier =);
- FLIGHT.OVL (from
T/F floppy version) or Z_TIE__.EXE (from T/F CD) somewhere in your disk.
A potential big problem if you don't have any version of T/F but, once
again, don't worry. There is a way to play around it.
- Draconious Ship
Patch installed (if the game is not patched, some craft may be unflyable
or not be available, such as the Missile Boat and TIE Defender).Ship
Patch by Draconious
TIEEDIT
1.28
Very well, boys and
girls,
I won't even try to give a very detailed description of Mark Samios' great
editor. For this, he made a very good help file. The pictures provided
here should help to put you in the subject.
Ship Parts Editor

Ship Attributes Editor
(not used by XvT)

Cockpit Palette Editor

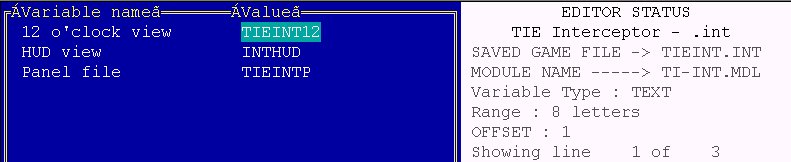
Modified
TIE Fighter .INT files
In order to load
XvT cockpit files into TIEEDIT, we need to use original cockpit descriptor
files (.INT) from TIE Fighter (floppy or CD). Then, depending on what cockpit
you are editing, you must rename the .LFD and .PNL files to match the names
stored in the T/F .INT files. For example, to edit the XvT X-wing cockpit
files, the best option is to use the T/F Gunboat .INT. Then we should rename
the X-W files to match GUN files: Xwing12.lfd to Gunbt12.lfd, Xwingp.pnl
to Gunboatp.pnl, etc. To save your time (and patience...), the following
files are available for you:
_t-f.int,
_t-i.int, _t-b.int, _t-a.int, _gun.int, _x-w.int, _y-w.int, _a-w.int and
_z-95.int
These are TIE Fighter
.INT files, modified to load XvT cockpit files without renaming. Get all
of them downloading this zip
file.
Creating
a new XvT cockpit based on an existing one
When creating a custom
cockpit for TIE Fighter, the logical sequence would be create first the
new art (main and side views and panel parts) and then start TIEEDIT. But
once we can not edit the panel parts positions in XvT, any new panel part
bitmap we create must have the same size of the original. How to know which
parts we may want to modify and where they are? For me, the easier way
is to have a base graphic or mask, if you prefer, to work with. It's made
by replacing the main front view graphic of an existing cockpit with a
new graphic filled with a light color. Then we can start XvT, enter a mission
using the craft which front view has been modified and take a screenshot
of it. Let's do it. The craft used will be the TIE Interceptor, which cockpit
will be turned into a custom TIE Defender one (version
1, for XvT only, still available for download).
Although I have worked only with the 640x480 resolutions, these instructions
should also work for the others.
- first, using a
graphic editor, create a new 640x480x256 color BMP. Fill it wiht a light
color;
- to work with ease,
create a new directory (cp_temp, for example) to make your work. Copy into
it the XvT tieint12.lfd and tieintp.pnl
files from the CP640 directory as well the _t-i.int
file provided here and the new BMP you just created.
Remember to make a backup of your XvT files. Although we are not editing
panel parts so far, the presence of the .PNL file
is required;
- start TIEEDIT 1.28.
Click on "Open File". Select _t-i.int.
You will be prompted to choose between the FLIGHT.OVL
or Z_TIE__.EXE files. If you have one of them, select
it. If you don't, simply go the XwingTie directory
and manually select the Z_XVT__.EXE file. We can't
modify it with TIEEDIT but it will allow us to load the cockpit files.
In a few seconds, the T/I front view must be loaded;
- now, click on "Import
Image". Select your BMP. Make sure it's a 256
colors BMP or nothing will happen;
- after the new BMP
is loaded (it takes some time), click on "Save", then
"Close"
and exit TIEEDIT;
- copy the modified
tieint12.lfd
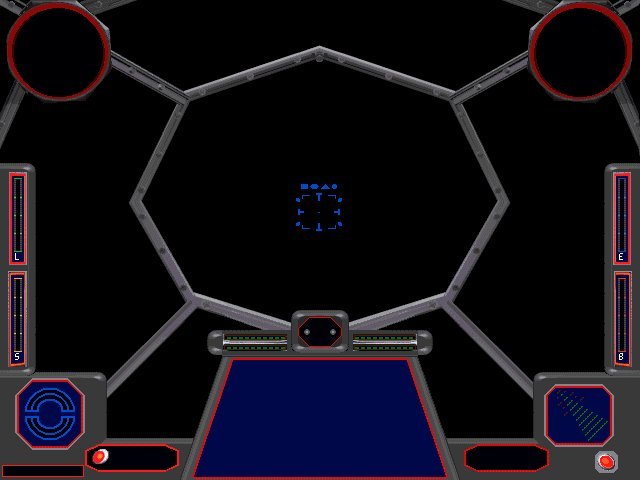
back to the CP640 directory and start XvT. Choose
a mission using the TIE Interceptor. When you fly it, you should see something
like the picture:
- Take a screenshot
of it and leave XvT. Now, we may start our new cockpit art. Remember: it
must be a 256 colors BMP.When
I made the TIE Defender cockpit, I cut and past some parts of the T/D cockpit
from TIE Fighter. Here is the final picture:
Some new panel instruments
bitmaps were made, too. The name at the side of each part is how they are
named in the Ship Parts Editor of TIEEDIT.

Notice that some
parts of each picture, currently black during editing will be transparent
when loaded.

In order to know
the correct size of these small bitmaps, the best thing to do is to export
them from the .PNL file.
- start TIEEDIT and
load the T/I cockpit as described above;
- click on "Ship
Parts" to open the Ship Parts Editor;
- on the Ship
Parts Editor, click on "Cockpit Parts";
- using the slide
bar, choose the cockpit part you want to export and click on "Export
Part". Set the name of a new BMP and click
on "Ok".
When editing an Imperial
cockpit, notice when using the Ship Parts Editor that
the bitmaps match correctly the cockpit parts' names. When editing a Rebel
cockpit, you will notice that they don't even because the Rebel craft don't
use normal parts and don't have some bitmaps available such the ones used
for the Beam Weapon. That's way using a Rebel cockpit on an Imperial craft
shows it completly messed up.
Loading
and saving your new art
Before loading the
new bitmaps into TIEEDIT, we must use the Cockpit Palette
Editor to set 2 important colors: the Mask (Transparent)
Color and the Radar Color. As the name suggest,
the Mask color is used to let us see outside our fighter.
The default value of it is RGB 0,0,0 and I suggest
let it this way. So open your new front view bitmap in your graphic editor
and make sure that only the "space" uses the Mask
color (I use the Color Replace function of Paint Shop
Pro to first eliminate the RGB 0,0,0 color and replace
it with the closest one, usually RGB 0,0,8. Then,
I fill the "space" with the RGB
0,0,0 color). Also, some, if not all, panel parts bitmaps will have
sections which must be transparent, too. Correct them. Now, we must set
the Radar color. Open the Cockpit Palette
Editor clicking on "Cockpit Palette". Find
the Radar Color (third line, fourth color from right
to left) and set the RGB values for it (usually 0,0,1
or 0,0,2 works fine). Now go back to the graphic editor and fill
the radars on the front view bitmap with this color
as well the normal radar parts. Save your work. Now
we are ready to load the new art.
- if TIEEDIT is not
open, start it, load the cockpit files and set the Mask
and Radar colors. Now let's load the new frot view
bitmap. Click on "Import Image". Select the
new bitmap and click on "Ok". It will take some time
to load as TIEEDIT will apply the LFD palette to it
which remembers me: it's a little hard to make TIEEDIT convert the GREEN
color and variations so try not to use it (most of the original cockpits
don't use them, except in the eletronic parts). After the new bitmap is
loaded, save your work. If you are editing the Gunboat
or a Rebel cockpit, which also have side
views, you may want to chanbe them, too. Open the Ship Parts
Editor. Click on "Cockpit Views". Use the slide
bar to choose a new view to edit and click on "Process Cockpit".
The correspondig view will be loaded and can be changed as you changed
the main view.
- let's load now
the new panel parts. Open the Ship Parts Editor and
click on "Cockpit Parts". Use the slide bar and choose
what part you want to replace. Click on "Replace Part".
Choose the new bitmap for that part and click on "Ok".
Follow these steps for all parts to be replaced. Save your work and exit
TIEEDIT.
Installing
a custom cockpit
Ok, now we have a
modified TIE Interceptor cockpit. To use it as the TIE Defender cockpit
we must first rename the files: tieint12.lfd to tiedlx12.lfd
and tieintp.pnl to tiedlxp.pnl.Always
remember to give new names to the new cockpit files you make. Now, we need
a custom .INT file for our new cockpit. Once we have
edited the T/I cockpit, copy from the CP640 directory
the tieint.int file. Place it in a directory where
it may be edited with the UGE utility available in
the download section. Due to patch settings, this directory most likely
must be named C:\UGE_TEMP.
- in the directory
where you placed the tieint.int file, extract the
contents of the xvt_util.zip file and also UGE,
if you don't have it. My utility is a set of modules to edit the XvT cockpit
descriptor files (.INT) as well the z_xvt__.exe
file, where the name of the cockpit to be used by each craft is set. Start
UGE.
The following screen should show up (colors have been enhanced):