Home
Advanced Modeling
More Advanced Modeling:
Reworking An Existing Model
Original model idea inspired by Miyoken's tutorial modeling a guitar.
This tutorial was written assuming you have a somewhat advanced knowledge of hamaPatch or have at least browsed the hamaPatch Help and have experience using topics covered in the Beginning Tutorial and the Advanced Tutorial (specifically knowledge of extrusion, connecting points, and spline/curve operations).
You can Download a zip file containing models from various stages of the tutorial. These models will be referred to at the end of the section to which they relate.
Grid size assumed to be .5. Adjust Grid Setting by clicking Show on the View window, choosing Grid Setting and typing .5 in the Size field.
Introduction
If you followed the Advanced Tutorial: Modeling A Guitar then you should have a guitar model that is not quite finished. If not Download the aforementioned Zip file containing hamaPatch models and open guits00.hmp to see the finished product from the previous tutorial. I was never satisfied with this model and feel that some things need to be added to it before it will be acceptable. Some things must be created, some things must be added on to existing points, and some things must be created via the destruction of existing parts. All these operations will be useful if you ever wish to rework one of your own models later or if you find a model on the internet you wish to use, but it needs something added to it.
Multi Colored Body
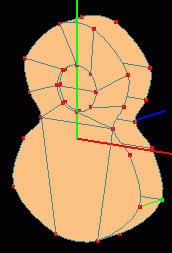 Many guitars have a body consisting of two different colors (one on the face of the body and another on the back and side). Using the Dialog Window select the guitar_body layer and choose Show Only Select Object via the etc. button below the selection field. Click the Copy button on the Dialog Window under the Object tab and a new layer should appear called guitar_body(copy) rename this layer to guitar_body_back by clicking the ... button next to the name and typing in the box that appears. Change the color to the same dark brown as the guitar_neck layer by clicking the colored box and adjusting the settings as needed. Eventhough the guitar_neck layer is not shown you can select it from the Dialog Window. Click its color box next to its name and click Add to Custom Colors then choose this new color from the bottom selection in the guitar_body_back layer. Select the original guitar_body layer and rename it to guitar_body_face. In the guitar_body_face layer switch to a Perspective view and select a curve connecting the back of the guitar to the front using the
  Hand Select Curve tool from the Patch toolbar and click the
  Delete Curve tool. Continue this process until there are two separate splines. Select all points of the back spline and press the Delete key. You should now have only the face with the hole in the current layer.
 In the guitar_body_back layer Show Only Select Object, switch to a Front view and
  Square Select the circles making the hole and press the Delete key. In a Perspective view use the Hand Select Curve tool to select each curve from the waist points to the bottom and use the Delete Curve tool to delete the remaining curves making a face on the body. You should now have a two colored guitar body. Save current progress. guits01.hmp

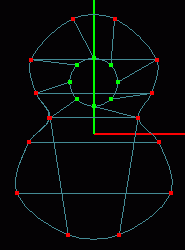
Binding
Create a copy of the guitar_body_face layer via the Copy button on the Dialog Window and rename it guitar_binding. Square Select and delete the hole's circle and the extra curves making the face just as in the guitar_body_back layer, until you have a single spline outline of the guitar body. In a Front view Select - All points, choose Model - Translate from the menu and type -.01 in the Z field. The binding needs to be slightly above the face so that it will be seen and for the same reason it must also be slightly larger than the body. In a Front view Square Select only the top two and bottom two points. From the menu choose Model - Scale and type 1.01 in the Y-field. Select - Inverse and use Model - Scale to scale by 1.01 in the X-axis. Select - All points, click the  Extrude tool and use Model - Translate to move the extrusion -3 along the Z-axis. In a Right view Square Select only the top and bottommost points of the extrusion and use Model - Scale to scale the selected points by .97 in the Y-axis. Select only the middle points of the extrusion and Model - Scale by .95 in the X-axis. Select the entire extruded portion and use Model - Translate to move it back 3 spaces along the Z-axis to its original location. You should now have the top of the binding.
 The extruded portion should still be selected so choose Select - Inverse from the menu to choose the original spline. Click the Extrude tool and use Model - Translate to move the extrusion .09 along the Z-axis. The top binding should now be finished, but we still need a bottom binding, but we do not know how thick the body is for the placement. Switch to the guitar_body_back layer and select all points. Choose Model - Align Points from the menu and click the check box to the right of the Z field. Click the Max button for Z and then highlight the number that appears in the Position field, right click the mouse and choose Copy then click Cancel. Go back to the guitar_body_binding layer Select - All points and click the
  Clone tool. Choose Model - Flip Z and then Model - Translate. In the Z field of the Translation box right click the mouse and choose Paste then click OK. The lower binding is now situated the exact width of the body from the upper binding. This only worked because the Z Min was 0.000. If the Min had been something else we would have had to subtract the Min from the Max to get the entire width. Save current progress. guits02.hmp
Tutorial created by Jonathan Lee Jan. 12, 2001. Updated Jul. 14, 2002 for version 2.8.1.
Submit question, comments, or ask for further instruction from draven2561@hotmail.com
Part 2
Home