Home
Back to Part 1
Beveled Head
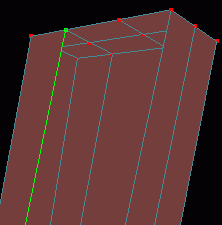 The head of this guitar is just too sharp and flat it really needs to be beveled. Switch to the guitar_neck layer, click the etc. button on the lower part of the Dialog Window and choose Show Only Select Object. In a Perspective view Pan up to the head and Zoom in. One at a time, use the
  Hand Select Curve tool to select the curves extending from the middle points on the top of the head and delete them to eliminate the faces on the front and back of the head.
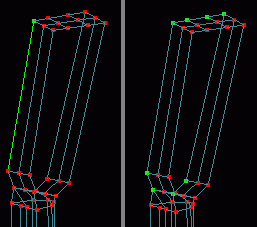 Now select a curve that follows the head of the guitar then choose Select - Spline from the menu. The top of the upper outline of the head should now be selected. It is sometimes necessary to select a point and a curve then use Select - Spline to see what points hamaPatch calculates as part of the spline. Had the entire neck been selected after the previous operation we would have known that the whole thing was one extruded spline and we would have had to separate the head outline even further, clone it then reconnect to form the bevel. Since the head is one self contained spline click the
  Extrude tool, choose Model - Translate from the menu and type -.05 in the Z field and .01 in the Y field. Choose Model - Scale from the menu and type .97 in the Y field and .95 in the X field. Repeat the process for the back spline of the head but when translating enter -.01 for Y and .05 for Z (keep the scale entries the same). In a Perspective view Zoom in and connect the top and bottom corresponding points on the new extrusions just as the originals were connected earlier (remember to use the
  Peak tool on the added splines). Save current progress. guituts03.hmp
 Tutorial created by Jonathan Lee Jan. 12, 2001. Updated Jul. 14, 2002 for version 2.8.1.
Submit question, comments, or ask for further instruction from draven2561@hotmail.com
Part 3
Home