Home
Back to Part 3
Clean Up
Everything I wanted to add is now there and I just need to make sure the model is separated and grouped as best as possible and make sure there are no lingering problems.
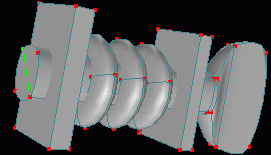 I now notice that the tuners were never capped, they end as open cylinders. In a Perspective view Zoom in and add a spline to the end of each tuner then Peak each spline to close all the tuners.
 The reason that the gears were placed in a separate layer from the rest of the tuner assembly was that they would not need to be included in a scene in which only the front of the guitar was displayed and could easily be left out this way. However, if the gears would not be needed in the display then neither would the boxes on either side of the pegs or the tori threads currently in the guitar_tuners layer. So in the guitar_tuners layer Square Select at least one point from each box in the tuner assemblies and Select - Connected. Choose Edit - Cut from the menu, switch to the guitar_gears layer and choose Edit - Paste from the menu. Go back to the guitar_tuners layer and do the same with the tori. Save current progress. guits05.hmp
That is it. You should now have a decent looking guitar model and you should know how to modify an existing model. Remember that if you want to separate a connected object into many unconnected objects you should make copies and then take off what each particular piece does not need so that everything stays in its original place and use Multi Obj afterwards if you need to move the separated object. Also if you add anything to an existing object (such as a bevel) check all views to make sure that no original pieces intersect the new addition and compensate as necessary.
 Tutorial created by Jonathan Lee Jan. 12, 2001. Updated Jul. 14, 2002 for version 2.8.1.
Submit question, comments, or ask for further instruction from draven2561@hotmail.com
Home