Before we proceed you must know what is meant by image map. Image map is a method where we can divide the image into hotspots. Hotspots are the regions on the single image which links to different web pages when clicked on that area.
Following are the steps to create Image Map using Dreamweaver
Step 1
Insert an image on which you want to create image map.
Step 2
Select an image by single click on the image and notice the change in properties windows.

Step 3
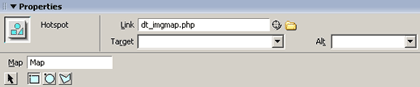
Click on any hotspot tool found in properties window. Mark the area on image where you want the hotspot.

Step 4
Set the properties like link, target and alt of hotspots as per the requirements.
Step 5
Repeat the steps to create more hotspots on the image. The image below contains hotspots that are linked to same page.

The code looks like this
Image code
<img src="images/imagemap.gif" width="410" height="34" border="0" usemap="#Map" class="img" />
Map code
<map name="Map" id="Map">
<area shape="poly" coords="2,21,26,3,56,3,56,34,3,35" href="dt_imgmap.php" />
<area shape="rect" coords="58,3,142,36" href="dt_imgmap.php" />
<area shape="rect" coords="144,4,212,34" href="dt_imgmap.php" />
<area shape="rect" coords="216,2,288,33" href="dt_imgmap.php" />
<area shape="rect" coords="293,2,338,33" href="dt_imgmap.php" />
<area shape="rect" coords="344,3,409,32" href="dt_imgmap.php" />
</map> |

