|
37. Click on the "Magic Wand Tool," 38.Click on the "Flood Fill Tool" 39. Left click inside the "Marching Ants" and the "Boot" will flood fill with "Black." |
 |
| Go to "File/save" and click Ok and it will be saved in a .psp extension. | |
|
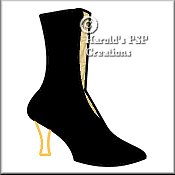
Lady's Hand Painted Boot
Tutorial .. Page2 |
|
37. Click on the "Magic Wand Tool," 38.Click on the "Flood Fill Tool" 39. Left click inside the "Marching Ants" and the "Boot" will flood fill with "Black." |
|
| Go to "File/save" and click Ok and it will be saved in a .psp extension. | |
|
40. Now to draw the "Heel" for the boot. Click on the "Layers Option Pallet."
41. Click on the "Color Options pallet." |
 |
|
42. Click on the "Drawing Tool," 43. Start at co-ordinates W=70 x H=245 and draw a line down to co-ordinates W=80 x H=310. 44. Now to create the Bezier curve. Left click at co-ordinates W=80 x H=270 and then a second left click at co-ordinates W=80 x H=280. |
|
| Go to "File/save" and click Ok and it will be saved in a .psp extension. | |
|
45. Click on the "Drawing Tool," 46. Start at co-ordinates W=80 x H=310 and draw a line across to co-ordinates W=100 x H=310. Click Ok. |
 |
|
47. Click on the "Drawing Tool," 48. Start at co-ordinates W=100 x H=310 and draw a line up to co-ordinates W=100 x H=260. 49. Now to create the Bezier curve. Left click at co-ordinates W=95 x H=295 and then a second left click at co-ordinates W=95 x H=280. |
|
| Go to "File/save" and click Ok and it will be saved in a .psp extension. | |
|
50. Now to create the "Bottom Trim." Click on the "Drawing Tool," 51. Start at co-ordinates W=70 x H=240 and draw a line across and down to co-ordinates W=150 x H=320. 52. Left click at co-ordinates W=130 x H=270 and then a second left click at co-ordinates W=145 x H=295. |
 |
| Go to "File/save" and click Ok and it will be saved in a .psp extension. | |
|
53. Now the second part of the "Bottom Trim." Click on the "Drawing Tool,"
51. Start at co-ordinates W=150 x H=320 and draw a line across to co-ordinates W=290 x H=315. 54. Left click at co-ordinates W=200 x H=335 and then a second left click at co-ordinates W=240 x H=335. |
 |
|
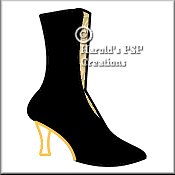
55. Click on the "Magic Wand Tool," 56.Click on the "Flood Fill Tool" 57. Left click inside the "Marching Ants" and the "Heel1" will flood fill with "Gold." Deselect. [Go to "Selections/select none" and click Ok, or press keys "control+d" together] |
|
| Go to "File/save" and click Ok and it will be saved in a .psp extension. | |
|
58. Make sure that you are still on the "Heel1" layer. Click on the "Magic Wand Tool,"
59. Go to "Image/effects/sculpture" and choose the following settings:
|
 |
| Go to "File/save" and click Ok and it will be saved in a .psp extension. | |
|
60. Now to draw the "Inside Heel" for the boot. Click on the "Layers Option Pallet."
61. Click on the "Color Options pallet." |
|
62. To start with and to maintain the same curve for the inside heel, we will overlap one
of the curves on "Heel1."
63. Click on the "Drawing Tool," 64. Start at co-ordinates W=100 x H=310 and draw a line up to co-ordinates W=100 x H=260. |
 |
|
65. Now to create the Bezier curve. Left click at co-ordinates W=95 x H=295 and then
a second left click at co-ordinates W=95 x H=280. The "Dark Gold" curve will cover the
previous "Gold curve."
66. Click on the "Magic Wand Tool," 67. Go to "Edit/copy" and click Ok. Now go to "Edit/paste/paste as new selection." Click Ok. 68. Click on the "Mover Tool" |
|
|
69. Click on your "Eraser Tool," 70. Click on the "Layers Option Pallet." |
|
| Go to "File/save" and click Ok and it will be saved in a .psp extension. | |
|
71. Click on the "Layers Option Pallet" 72. Go to "layers/merge/merge visible." Turn all the layers on again. Make sure that you are still on the new "merged layer." Right click on this layer and in the box that "pops up," click on "properties" and rename the layer, "Heel." There should be 3 layers. Click Ok. |
|
| Go to "File/save" and click Ok and it will be saved in a .psp extension. | |
|
73. While still on the "Heel" layer, Click on the "Magic Wand Tool," 74.Click on the "Flood Fill Tool" |
 |
| 75. Left click inside the "Marching Ants" and the center white part of the underside of the "Heel" will flood fill with "Dark Gold." Deselect. | |
|
76. Now to draw the "Gold Trim" for the boot. Click on the "Layers Option Pallet."
77. Click on the "Color Options pallet." |
| To Page 3: | To Tutorial Index: |