Folk Art
Plate
Tutorial |
 |
|
I have been amazed at the skill of many Folk Artists as they display their talents in
various forms. One of these is the designs on "Plates and Dinner Ware." I wanted to see
if I could reproduce these designs in PSP.
This is a simple tutorial designed with PSP 6.02 but can be easily completed in other
versions with slight adjustments and one in which you can use your creativity. Have fun.
Copyright © by Harold E. Jones .. 2001-2002. |
|
Level of difficulty: Intermediate |
 |
19. Click on the "Layers Option Pallet."  , you should have 5 layers. "Layer 1 [transparent layer];
color layer; plate rim layer; plate inner layer and font1 layer." , you should have 5 layers. "Layer 1 [transparent layer];
color layer; plate rim layer; plate inner layer and font1 layer."
20. The "Font1 layer" should still be active. Right click on the "font1 layer" and in
the "Options box" that pops up, click on "Duplicate." You wont see anything happen.
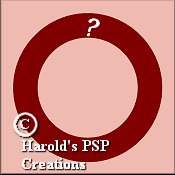
21. Go to "Image/mirror" and a second question mark will appear.
|
 |
|
22. Go to "File/save/" and your work will be saved as "plate1.psp." Save your work often
and always in ".psp" extension until the final "save as." |
|
23. Click on the "Layers Option Pallet." , you should have 6 layers. "Layer 1 [transparent layer];
color layer; plate rim layer; plate inner layer; font1 layer and copy of font1 layer."
24. Turn off "Layer 1; color layer; plate rim layer and plate inner layer" by clicking on
the small "glasses." There will be small red crosses on each of the "glasses."
25. Go to "Layers/merge/merge visible." The "Font1" and "copy of Font1 layers" will now
become "merged." Turn the layers back on again by clicking on the small red crosses.
26. Right click on this new merged layer and in the Options box that pops up, click on
"properties" and rename this layer "Font1."
|
|
27. Go to "File/save/" and your work will be saved as "plate1.psp." Save your work often
and always in ".psp" extension until the final "save as." |
|
28. Click on the "Layers Option Pallet." , add a new layer and name it "font2."
29. Click on the "Text Tool"  and when the "Tool Options pallet" opens choose the following settings.
"Font=CommercialScript MT; Size=30; Keystroke=G [Capital G]; text color=white." and when the "Tool Options pallet" opens choose the following settings.
"Font=CommercialScript MT; Size=30; Keystroke=G [Capital G]; text color=white."
30. While the "G" is still active, "Marching Ants" surrounding it, go to "Image/flip".
Move the "G" to the right side of the "Double Question marks."
|
 |
|
31. Go to "File/save/" and your work will be saved as "plate1.psp." Save your work often
and always in ".psp" extension until the final "save as." |

|