|
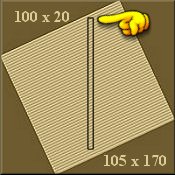
6. Open the duplicate of your diagonal image. Follow steps 4 & 5, only make your selection 5 x 150. Save this image as "goldcord 5.jpg". |
 |
 |
|
6. Open the duplicate of your diagonal image. Follow steps 4 & 5, only make your selection 5 x 150. Save this image as "goldcord 5.jpg". |
|
|
|
7. Open a new image w=200 x h=200, 16.7 million, background color=white.
Add a new layer and name it tassel box." Click on the Selections Tool Start at co-ordinates w=50 x h=50 hold down the left mouse button and drag down and to the right until you have a rectangle approx. w=80 x h=100. Release the mouse button and the "marching ants" will appear. |
 |
|
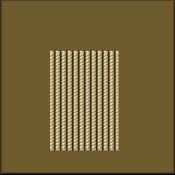
8. Open your "goldcord 5.jpg" image. Click on the "Flood Fill Tool" Click on the "Mover Tool" |
|
|
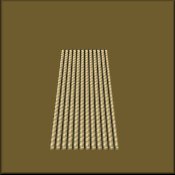
9. Click on the "Deform Tool" |
 |
|
10. Your "goldcord 5.jpg" should still be open. If it is not then open it.
Click on the "goldcord 5.jpg" image and then go to "Edit/copy" then activate your main image. Go to "Edit/paste/new layer." Now go to "image/rotate/left=7. Click on the "Mover Tool" |
 |
| 11. Repeat this step twice more with the "rotation set at right=9," for the second cord, and "rotation set at left=8" for the third single cord. You can vary these settings and the placement of the single cords till they look about right to you. Remember, that as each single cord is set on a separate layer, you will need to activate that layer to reposition the cord with the "Mover tool." | |
|
12. Make sure the "Layers Option Pallet" Click on the "Deform Tool" 13. Turn on layer 1 & 2 again. If you have to re-align the top of the 3 cords with the top of the "tassel rectangle," Activate layer 3 and use the "Mover tool." Turn off layer 1 and go to "layers/merge/merge visible." |
|
14. You now have 2 layers. Layer 1 and layer 2 [merged]. Activate layer 2.
Click on your "Eraser Tool," 15. Go to "selections/select all," then "selections/invert." The "marching ants" should appear around the "tassels rectangle." Go to "Edit/copy" then "Edit/paste/new image." |
 |
|
16. You could turn this finished "Tassels" image into a Tube if you wish. Go to
"file/export/export as tube." Name the tube and click Ok.
While this new image is still activated, go to "File/save as" and save as a "tassels1.psp." Saving in this format will enable you to "work on the tassels" at a later date. |
|
| Congratulations.You have finished. Well done. | |
| Back: |
| Return to Tutorial Index: |
|
This tutorial is written by Harold E. Jones.
Other than for personal use, No part of this tutorial maybe copied or reproduced on any other Web site without permission from me, the author. Harold E. Jones - Copyright © 2001. |