|
Terrarium
Indoor Garden Tutorial |
 |
|
Terrarium
Indoor Garden Tutorial |
|
|
Victorian Homes often displayed Terrariums. Indoor Gardens housed in Glass containers.
Many of these Terrariums were quite elaborate setups.
This tutorial was designed in PSP 6.02 and can be completed in other versions
|
| Level of difficulty: Advanced |
|
|
1. Open new image, width="350" height="350", 16.7 million colors, Transparent.
Click on the "Color Options pallet." 2. Add a new layer and name it "Color." Click on the "Flood Fill Tool"
|
|
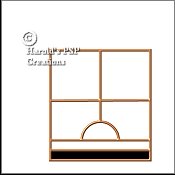
3. Add a new layer and name it "Front." Click on your "Preset Shapes Tool,"
4. Open the "Grid" by clicking on the keys "Alt+v" and the "Grid" will cover the Image. Start at co-ordinates width=100 x height=100. Hold down the left mouse button and drag down and to the right until you reach co-ordinates, w=300 x h=320. Click Ok. You will have a "Dusty Gold" rectangle. |
 |
|
5. Click on the "Drawing Tool" 6. Repeat the process. Draw a line starting at co-ordinates w=100 x h=280 across to
co-ordinates w=300 x h=280.
|
|
7. Add a new layer and name it "Front 2." Click on the "Drawing Tool"
8. Repeat the process. Draw a line starting at co-ordinates w=200 x h=100 down to co-ordinates w=200 x h=200. |
 |
|
9. Click on the "Layers Option Pallet" 10. Duplicate the image by pressing the keys, "Shift+d." Go to "File/save as" and save this Duplicate image as, "Rear.psp." Mininmize this duplicate image to be used later as the back panel of the "Terrarium." |
|
11. Add a new layer and name it "Circle." Click on your "Preset Shapes Tool,"
12. Start at co-ordinates width=200 x height=280. Hold down the left mouse button and drag down until you have a circle of 75 pixels. Click Ok. You will have a "Dusty Gold" circle. |
 |
|
13. Make sure that you are still on the "Circle Layer." Click on the Selections Tool
14. Start at co-ordinates w=150 x h=280 drag across and down until you reach the co-ordinates w=250 x h=330. The "Marching Ants" will appear. Go to "Edit/cut," and click Ok. The bottom half of the "circle" will disappear. Deselect. Click the keys, "Control+d" or go to "Selections/select none" and click Ok. 15. Click on the "Drawing Tool" |
|
16. Click on the "Layers Option Pallet" |
|
17. Click on the "Magic Wand Tool" 18. Go to "image/effects/sculpture" with the following settings: "Presets=Copper; Size=100%; Smoothness=6; depth=3; ambience=10; shininess=0; color=white; angle=315; intensity=50; elevation=30." Click Ok. |
 |
|
19. Now is the time to start organising for the "Potting Mix" which will be in several
sections. Click on the "Magic Wand Tool" 20. Click on the "Color Options pallet." 21. Click on the "Flood Fill Tool" |
|
22. Now to put the "Clear Glass" in the "Front Panels." Make sure that you have the "Front"
layer active. Click on the "Magic Wand Tool" 23. Add a new layer and name it "Cutout1." Go to "Image/effects/cutout" and apply the following settings. "Color=black; Opacity=60; Blur=10; Vertical=2; Horizontal=2." Click Ok. 24. Add a new layer and name it "Cutout2." Go to "Image/effects/cutout" and apply the following settings. "Color=black; Opacity=60; Blur=10; Vertical=-2 [minus]; Horizontal=-2 [minus]." Click Ok. 25. Make sure the "Layers Option Pallet" |
|
26. While the "Front" layer is still active, Click on the "Deform Tool"
27. Hold down the "Shift" key and place the cursor on the right side and on the "Middle Box." An "arrow" will appear. Hold the left mouse button down and "Skew" the right hand side of the "Front Panel" by moving the image up 10 pixels. [Notice that the left hand side stays where it is.] Click on "Apply." Go to "File/save" and press Ok. The image will be saved in .psp extension. |
 |
|
28. Open up the back panel image that was minimized, "rear.psp." Click on the
"Magic Wand Tool" 29. Go to "image/effects/sculpture" with the following settings: "Presets=Copper; Size=100%; Smoothness=6; depth=3; ambience=10; shininess=0; color=white; angle=315; intensity=50; elevation=30." Click Ok. |
| To Page 2: | To Tutorial Index: |