|
30. Click on the "Magic Wand Tool" 31. Click on the "Flood Fill Tool" |
 |
| Terrarium Indoor Garden Tutorial - Page 2: |
|
30. Click on the "Magic Wand Tool" 31. Click on the "Flood Fill Tool" |
|
|
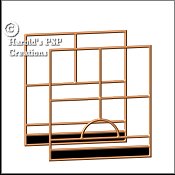
32. Now to put the "Clear Glass" in the "Rear Panels." Make sure that you have the "rear"
layer active. Click on the "Magic Wand Tool" 33. Add a new layer and name it "Cutout1." Go to "Image/effects/cutout" and apply the following settings. "Color=black; Opacity=60; Blur=10; Vertical=2; Horizontal=2." Click Ok. 34. Add a new layer and name it "Cutout2." Go to "Image/effects/cutout" and apply the following settings. "Color=black; Opacity=60; Blur=10; Vertical=-2 [minus]; Horizontal=-2 [minus]." Click Ok. Deselect. 35. Go to "layers/merge/merge visible." Right click on this new merged layer and in the box that "pops up," click on "properties" and rename the layer, "rear." Go to "Edit/copy." Deselect. |
| 36. Activate the main image, "terra.psp." Make sure that you have the "front" layer highlighted. Go to "Edit/paste/paste as new layer." The "Rear Panel" will appear in front of the "Front Panel." While this new layer is highlighted, Right click on this layer and in the box that "pops up," click on "properties" and rename the layer, "rear." There should be 4 layers. Background [layer1], color layer, front layer and rear layer. Go to "File/save" and save your work in .psp extension. Click Ok. |
|
37. Click on the "Mover Tool" 38. Make sure that the "rear" layer is still highlighted. Click on the "Deform Tool"
|
|
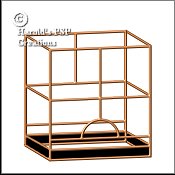
39. Hold down the "Shift" key and place the cursor on the right side and on the
"Middle Box." An "arrow" will appear. Hold the left mouse button down and "Skew" the right
hand side of the "rear Panel" by moving the image up 10 pixels. [Notice that the left hand
side stays where it is.] Click on "Apply."
40. Click on the "Layers Option Pallet" |
 |
|
41. Activate the "Front layer" [this should be the top layer]. Add a new layer and
name it "left side."
(a) Click on the "Drawing Tool" |
|
42. Click on the "Magic Wand Tool" 43. Go to "image/effects/sculpture" with the following settings: "Presets=Copper; Size=100%; Smoothness=6; depth=3; ambience=10; shininess=0; color=white; angle=315; intensity=50; elevation=30." Click Ok. Deselect. |
 |
|
44. Click on the "Magic Wand Tool" 45. Click on the "Flood Fill Tool" |
|
46. Now to put the "Clear Glass" in the "Left Panel." Make sure that you have the "left side"
layer active. Click on the "Magic Wand Tool" 47. Add a new layer and name it "Cutout1." Go to "Image/effects/cutout" and apply the following settings. "Color=black; Opacity=60; Blur=10; Vertical=2; Horizontal=2." Click Ok. 48. Add a new layer and name it "Cutout2." Go to "Image/effects/cutout" and apply the following settings. "Color=black; Opacity=60; Blur=10; Vertical=-2 [minus]; Horizontal=-2 [minus]." Click Ok. Deselect. |
|
49.Make sure the "Layers Option Pallet" 50. While you are still on the "left side" layer, go to "Selections/select all." Then "Selections/invert." The "Marching Ants will surround the "left side" panel. Go to "Edit/copy" and press Ok. 51. Add a new layer and name it "right side." Go to "Edit/paste/as new selection." Click on
the "Mover Tool" |
|
52. Click on the "Layers Option Pallet" |
 |
|
53. Make sure the "Layers Option Pallet" 54. Click on your "Preset Shapes Tool,"
|
|
55. Start at co-ordinates w=50 x h=270 drag down and to the right until you have a
rectangle, w=200 x h=50. Click Ok.
56. Click on the "Deform Tool" |
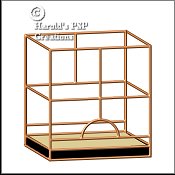 |
| 57. Hold down the "Shift" key and place the cursor on the right side and on the "Middle Box." An "arrow" will appear. Hold the left mouse button down and "Skew" the right hand side of the "Potting mix panel" by moving the image up until it is "inside" the "Rear" and "Right side" panels. Click on the "corner" boxes as well as the "middle" boxes and do the same to the left hand side until you have the Dusty Gold "Potting mix" panel on the "inside" of the "front" and "Left side" panels. | |
| To Page 3: | Back to Page 1: |