Double the rod measurement for fabric width.
- Because the lining is sewn to the edge, the valance is completely reversible.
- Plan matching colors--one side with stripes, the other florals--or two completely different shades.
- Use a suspension rod fitted within the window recess to show the window trim. Measure the desired length for the curtain from there.
- When determining fullness, use three times the rod width for this valance.
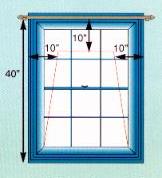
Determining Measurements
To determine fullness of the valance, measure the length of the rod, including side returns, if appropiate, and double the measurement for heavy fabrics or triple for lighter-weight fabrics. Here, a 30" rod needs fabric 60" wide. Piece widths if necessary.
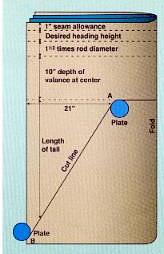
Shaping the Valance
Cut fabric and lining to determined measurements.
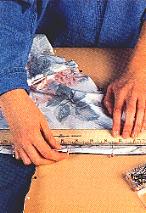
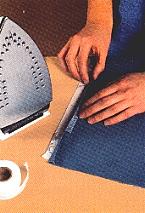
To shape, fold fabric and lining in half lengthwise. Use tailor's chalk to mark cut line as shown. Point A is 21" from outer edge (two times 10" plus 1" for seams).
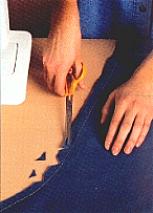
Cut tail and center following chalk lines.
- Pin cut lining and fabric together, right sides facing. Measure desired heading height plus 1/2" down from top edge and mark the top of the rod pocket with tailor's chalk.Then measure and mark depth of rod pocket.
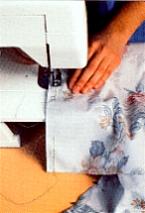
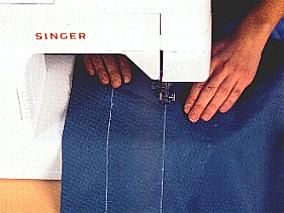
- Stitch 1/2" seam from both top corners down to rod pocket tops. Then start at one rod pocket bottom and sew down the side, around curve to the other side, and up second side to the rod pocket bottom.
- The top edge and side openings for the rod pocket are not stitched. Clip curved seams at the top and bottom of the valance so that there is no puckering. Trim to 1/2" if the seam allowances are uneven.
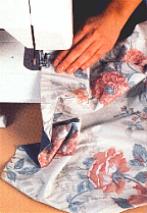
- Cut four pieces of fusible webbing 1/2" wide and the depth of the rod pocket. Fuse the raw edges under at the ends of the rod pocket where there is no stitching. Turn the valance right side out and press.
- Turn under 1/2" along both of the raw edges across the top of the heading and press. Pin together so that the edges match exactly. Topstitch as close as possible to the edge to finish it off.
- Using tailor's chalk and a straightedge, mark a line for the top and bottom of the rod pocket on the lining side and pin along both of the lines. Check face side to make sure fabric is flat (no puckers or pleating). Topstitch along both lines to create the rod pocket. Then insert curtain rod into the rod pocket and softly gather and shape the finished valance.
NOTE:
- Use leftover fabric from valance to make a matching pillow cover or other accessories.
- When selecting fabrics for the lined valances, be sure one of the fabrics is opaque to prevent light from passing through. Otherwise the prints and colors will interfere with each other.
Visit my other pages!
Home
Main Directory
My Family ~ Country Cookin'
Webrings ~ Favorite Links
Decorating Center ~ Household Tips ~ Rainy Day Projects
Holidays ~ Awards Received ~ Winners ~ Make and Save ~ Bookstore
Parenting Funnies ~ Computer Humor ~ Special Causes
Favorite Short Stories ~ Banner Exchange
Gifts Received
Sign My Guestbook
Background by: