This page has moved to http://www.dustyant.com/win32. Please update your bookmarks.
Click here to download the source code for this tutorial.
GDI (which stands for graphics device interface) is what enables you to draw on the screen without worrying about the underlying hardware. GDI functions also allow you to draw on other output devices like the printer, memory devices and metafiles. Windows provides functions that let you draw - among other stuff - lines, circles, text and images in variooous colors and styles.
You can think of GDI as a drawing kit complete with paintbrushes, watercolors, canvas, rulers and other instruments.
The first thing you must understand is device contexts. A device context is a structure that defines a set of graphic objects and their associated attributes, as well as the graphic modes that affect output. The graphic objects include a pen for line drawing, a brush for painting and filling, a bitmap for copying or scrolling parts of the screen, a palette for defining the set of available colors, a region for clipping and other operations, and a path for painting and drawing operations.
Following our analogy, a device context can be considered as a canvas with certain special properties. You can draw and paint on this canvas and it will always appear to others the way it was intended, even if the canvas were transformed into a sketch paper or a post-it note.
Before your application draws anything on screen, it must get its device context.
This is done through the GetDC() call which is defined as
HDC GetDC(HWND hwnd). After you are done with drawing, you must release it. This is done by the ReleaseDC() call defined as int ReleaseDC(HWND hwnd, HDC hdc).
Pens and Brushes are used to draw lines and paint interiors of closed objects.
Now that all the theory is out of our way, let us put our new knowledge to practice. In this chapter we will build an application that lets us draw lines, rectangles, circles and bitmaps.
We will begin with our skeleton code that draws a simple window.
// draw.c // Pravin Paratey #include// Variables HWND hwndMain; // Main window HWND // Functions LRESULT CALLBACK MainWndProc(HWND hwnd,UINT msg,WPARAM wParam,LPARAM lParam); int WINAPI WinMain(HINSTANCE hInstance, HINSTANCE hPrevInstance, LPSTR lpCmdLine, int nCmdShow) { MSG msg; WNDCLASSEX wcx; // Fill in the WNDCLASS Struct wcx.cbSize = sizeof(WNDCLASSEX); wcx.style = CS_DBLCLKS; wcx.lpfnWndProc = MainWndProc; wcx.cbClsExtra = 0; wcx.cbWndExtra = 0; wcx.hInstance = hInstance; wcx.hIcon = LoadIcon (NULL, IDI_APPLICATION); wcx.hCursor = LoadCursor (NULL, IDC_ARROW); wcx.hbrBackground = (HBRUSH) COLOR_BACKGROUND; wcx.lpszMenuName = NULL; wcx.lpszClassName = "Draw"; wcx.hIconSm = NULL; // Register class if(!RegisterClassEx(&wcx)) return 0; hwndMain = CreateWindowEx(0, "Draw", "Draw Example Application", WS_OVERLAPPEDWINDOW, CW_USEDEFAULT, CW_USEDEFAULT, 400, 300, NULL, NULL, hInstance, NULL); ShowWindow(hwndMain,nCmdShow); while(GetMessage(&msg,NULL,0,0)) { TranslateMessage(&msg); DispatchMessage(&msg); } return msg.wParam; } // Callback function for the Main Window class LRESULT CALLBACK MainWndProc(HWND hwnd,UINT msg,WPARAM wParam,LPARAM lParam) { switch(msg) { case WM_DESTROY: PostQuitMessage(0); break; default: return DefWindowProc(hwnd,msg,wParam,lParam); } return 0; }
A real application would use a toolbar to let the user select the shape to draw. Since creating a toolbar is too much trouble, we’ll address this by using character input from the keyboard to switch between the drawing shapes.
Lets keep a global variable drawShape to indicate the current tool. Add the following lines at the beginning of the file. The lines to be added are shown in bold.
#includeNow add the following code to the MainWndProc message handler. This will select the current tool.
LRESULT CALLBACK
MainWndProc(HWND hwnd,UINT msg,WPARAM wParam,LPARAM lParam)
{
CHAR ch;
	switch(msg)
	{

	case WM_CHAR:
		if(!drawing)
		{
			ch = (TCHAR) wParam;
			switch(ch)
			{
			case 'n': // NULL
				drawShape = SHAPE_NULL;
				break;
			case 'l': // LINE
				drawShape = SHAPE_LINE;
				break;
			case 'r': // RECTANGLE
				drawShape = SHAPE_RECT;
				break;
			case 'c': // CIRCLE
				drawShape = SHAPE_CIRCLE;
				break;
			case 'f': // FREEHAND
				drawShape = SHAPE_FREEHAND;
				break;
			}
		}
		break;

	case WM_DESTROY:
		PostQuitMessage(0);
	…
To draw a shape we will have to
This means handling the WM_LBUTTONDOWN, WM_MOUSEMOVE and WM_LBUTTONUP messages.
Erasing and drawing this ghost or “rubber” shape is achieved by setting the draw mode of the pen to NOTXOR. NOTXOR has the property that drawing twice undoes the effect of the first draw.
If the drawing flag was set,
LRESULT CALLBACK
MainWndProc(HWND hwnd,UINT msg,WPARAM wParam,LPARAM lParam)
{

	CHAR ch; // This will contain keyboard input
	HDC hdc; // Handle to the device context
	HBRUSH hbrush; // Handle to BRUSH object
	HBRUSH hOldBrush; // Stores the old BRUSH object
	HPEN hPen;
	static POINT oldPoint; // Stores the old point
	static POINT beginPoint; // Stores the begin point
	POINT thisPoint; // Stores the current point
	static bool drawing = false;
	int ropOld; // Stores the old Raster Operator
	RECT rc;

	…

	case WM_DESTROY:
		PostQuitMessage(0);
		break;

	case WM_LBUTTONDOWN:
		// Says, We've begun drawing
		drawing = true;
		// Store the begin point
		beginPoint.x = LOWORD(lParam); // Returns x co-ordinate
		beginPoint.y = HIWORD(lParam); // Returns y co-ordinate
		// Store the old point
		oldPoint = beginPoint;
		break;
	case WM_LBUTTONUP:
		if (drawing)
		{
			drawing = false;
			// Get Device context
			hdc = GetDC(hwnd);
			// Set ROP
			ropOld = SetROP2(hdc, R2_NOTXORPEN);
			// Get this point
			thisPoint.x = LOWORD(lParam);
			thisPoint.y = HIWORD(lParam);
			switch(drawShape)
			{
			// This statement isn't needed
			case SHAPE_NULL: // Do Nothing
				break;
			case SHAPE_LINE:
				// Erase old line
				MoveToEx(hdc, beginPoint.x, beginPoint.y, NULL);
				LineTo(hdc, oldPoint.x, oldPoint.y);
				// Reset ROP
				SetROP2(hdc, ropOld);
				// Draw permanent one
				MoveToEx(hdc, beginPoint.x, beginPoint.y, NULL);
				LineTo(hdc, thisPoint.x, thisPoint.y);
				break;
			case SHAPE_RECT:
				// Erase old rect
				Rectangle(hdc, beginPoint.x, beginPoint.y,
					oldPoint.x, oldPoint.y);
				// Reset ROP
				SetROP2(hdc, ropOld);
				// Draw permanent one
				Rectangle(hdc, beginPoint.x, beginPoint.y,
					thisPoint.x, thisPoint.y);
				break;
			case SHAPE_CIRCLE:
				// Erase old circle
				Ellipse(hdc, beginPoint.x, beginPoint.y, oldPoint.x, oldPoint.y);
				// Reset ROP
				SetROP2(hdc, ropOld);
				// Draw permanent one
				Ellipse(hdc, beginPoint.x, beginPoint.y, thisPoint.x, thisPoint.y);
				break;
			}
			ReleaseDC(hwnd, hdc);
		}
		break;
	case WM_MOUSEMOVE:
		// Have we begun drawing?
		// Is the left button down?
		if (drawing && ((MK_LBUTTON & wParam) == MK_LBUTTON))
		{
			// Get Device context
			hdc = GetDC(hwnd);
			// Set rop to NOTXOR so that we can draw and erase
			ropOld = SetROP2(hdc, R2_NOTXORPEN);
			// Store this point
			thisPoint.x = LOWORD(lParam);
			thisPoint.y = HIWORD(lParam);

			switch(drawShape)
			{
			// This statement isn't needed
			case SHAPE_NULL: // Do Nothing
				break;
			case SHAPE_LINE:
				// Erase old line
				MoveToEx(hdc, beginPoint.x, beginPoint.y, NULL);
				LineTo(hdc, oldPoint.x, oldPoint.y);
				// Draw new one
				MoveToEx(hdc, beginPoint.x, beginPoint.y, NULL);
				LineTo(hdc, thisPoint.x, thisPoint.y);
				break;
			case SHAPE_RECT:
				// Erase old rect
				Rectangle(hdc, beginPoint.x, beginPoint.y,
					oldPoint.x, oldPoint.y);
				// Draw new one
				Rectangle(hdc, beginPoint.x, beginPoint.y,
					thisPoint.x, thisPoint.y);
				break;
			case SHAPE_CIRCLE:
				// Erase old circle
				Ellipse(hdc, beginPoint.x, beginPoint.y, oldPoint.x, oldPoint.y);
				// Draw new one
				Ellipse(hdc, beginPoint.x, beginPoint.y, thisPoint.x, thisPoint.y);
				break;
			}
			oldPoint = thisPoint;
			SetROP2(hdc, ropOld);
			ReleaseDC(hwnd, hdc);
		}
		break;

	default:
		return DefWindowProc(hwnd,msg,wParam,lParam);
	…
The LineTo function draws a line from the current position to the point specified in its arguments. Before drawing a line, we must move our pen to the starting co-ordinates. This is done through the MoveToEx function.
Raster Operations specify how the current PEN and BRUSH colors will be combined with the colors on the screen.
X	Y	XOR(X,Y)	NOT(XOR(X,Y))
0	0	0		1
0	1	1		0
1	0	1		0
1	1	0		1
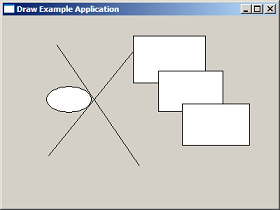
This is a good time to compile and run your app. Try switching tools and drawing a few lines, rectangles and ellipses. Your screen should look something like this,
The inside of the rectangle and circle is filled in white because it is the default brush. If you don’t want the insides to be filled, add the following code.
... ReleaseCapture(); // Get Device context hdc = GetDC(hwnd);// Set brush to hollow logbrush.lbStyle = BS_HOLLOW; hbrush = CreateBrushIndirect(&logbrush); holdbrush = (HBRUSH)SelectObject(hdc, hbrush);// Set ROP ropOld = SetROP2(hdc, R2_NOTXORPEN); // Get this point thisPoint.x = LOWORD(lParam); ...SelectObject(hdc, holdbrush); // Restore the brush DeleteObject(hbrush); // Free memory ReleaseDC(hwnd, hdc);...
To change the fill color, add the code:
... ReleaseCapture(); // Get Device context hdc = GetDC(hwnd)hbrush = CreateSolidBrush(RGB(255,0,0)); //RED brush holdbrush = (HBRUSH)SelectObject(hdc, hbrush);// Set ROP ropOld = SetROP2(hdc, R2_NOTXORPEN); // Get this point thisPoint.x = LOWORD(lParam); ...SelectObject(hdc, holdbrush); // Restore the brush DeleteObject(hbrush); // Free memory ReleaseDC(hwnd, hdc);...
Windows provides a variety of functions to draw text. We will use the DrawTextEx() function defined as
int DrawTextEx(
    HDC hdc, // handle to device context
    LPTSTR lpchText, // pointer to string to draw
    int cchText, // length of string to draw
    LPRECT lprc, // pointer to rectangle coordinates
    UINT dwDTFormat, // formatting options
    LPDRAWTEXTPARAMS lpDTParams // pointer to structure for more options
   );
Add this code to draw text:
WM_CHAR
... case 'c': // CIRCLE drawShape = SHAPE_CIRCLE; break;case 't': // TEXT drawShape = SHAPE_TEXT; break; ...WM_MOUSEMOVE
... case SHAPE_CIRCLE: // Erase old circle Ellipse(hdc, beginPoint.x, beginPoint.y, oldPoint.x, oldPoint.y); // Draw new one Ellipse(hdc, beginPoint.x, beginPoint.y, thisPoint.x, thisPoint.y); break;case SHAPE_TEXT: // Erase old text rect Rectangle(hdc, beginPoint.x, beginPoint.y, oldPoint.x, oldPoint.y); // Draw new one Rectangle(hdc, beginPoint.x, beginPoint.y, thisPoint.x, thisPoint.y); break;...WM_LBUTTONUP
case SHAPE_TEXT: Rectangle(hdc, beginPoint.x, beginPoint.y, oldPoint.x, oldPoint.y); // Reset ROP SetROP2(hdc, ropOld); rc.left = beginPoint.x; rc.top = beginPoint.y; rc.right = thisPoint.x; rc.bottom = thisPoint.y; DrawTextEx(hdc, strOut, lstrlen(strOut), &rc, DT_END_ELLIPSIS|DT_NOCLIP|DT_WORDBREAK, NULL); break;
If you minimize the window and restore it, you’ll notice that everything you’ve drawn is erased. This is because Windows sends the WM_PAINT message to your application telling it to redraw its client area. To keep persistent drawings, you’ve got two options – to keep a list of all objects and draw them on every call to WM_PAINT or to keep a snapshot of the image and redraw it on WM_PAINT.