Manual

Camera Features
Section 2
Functional Descriptions
/Illustrations:
Video Component
VCR Component
Lighting
Sound
Displays
Warning systems
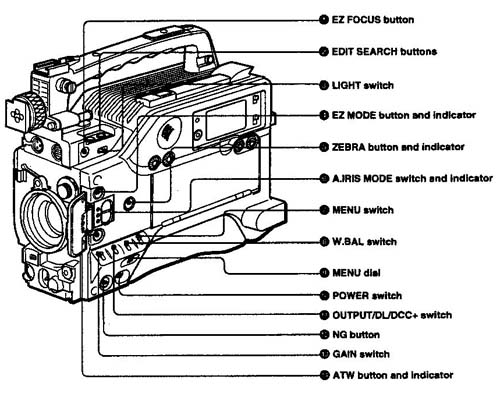
 MAJOR FUNCTIONALITIES 1. 2. 3. 4. 5. 6. Video Setup Overview Using the video component involves the following parts: Filter control, lens mount, shutter switch, viewfinder, white/blk switch, white balance switch, EZ focus, Edit search, EZ mode, zebra button, auto iris, menu, white balance, power, output Dl.DCC, bars, NG, gain, ATW Illustration Display Field
|
Sony DSR 300A Professional Digital Video Camera VIDEO SETUPThe following steps must be taken to operate the video component: 1. Load the battery pack 2. Turn on the power 3. Ensure a blank, blacked (see section 3) tape is installed in the VCR cassette compartment 3. Discern the two most typical lighting conditions and procede to the first of these. You must record a white balance setting to tell the camera the light exposure to use when filming. 4. To record a white balance, find a white sheet of paper and have someone hold it in front of your lens. Select the white balance button setting #1. The camera's memory will record the amount of light going through the lens in this light condition. 5. Record a second white balance by going to your second lighting site. Select the white balance button #2 and hold the paper in front of the lens. The camera's memory will record this light setting. Note: When you go to shoot the first setting, select the white balance button #1. When you go to shoot the second setting, select the white balance button #2. 6. If the lighting conditions have changed, you may select ATW , whereby the camera will automatically follow these conditions. This mode is not as accurate as if you can set the white balance as described above but is sometimes necessary when you need to make adjustments on the fly. 7. Select the Auto Iris mode.Three settings exist: BACK L, SPOT L and STD. BACKL-Use this setting when there is a lot of background light . This condition can cause the light metre to read the background light and render the foreground too dark. Use of BACK L compensates for this condition. SPOT L-Use this setting when you need extra light on one particular subject and compose the shot so that it is in the middle of the lens. STD-Use this setting in standard conditions where light is evenly distributed. 8. Set the GAIN switch. Three settings exist: HIGH, MEDIUM, LOW HIGH-This setting represents a gain of 18 dB. Use this setting very sparingly in very low light. The higher the gain setting, the grainier the image. This is caused by amplification of light created by the high gain setting. MEDIUM-This setting represents a gain of 9 dB. Use this setting when light is a little too low. This setting compromises the quality of the image less than the HIGH setting. LOW-This setting represents 0dB gain. Use this setting
in normal lighting conditions as much as possible. |
