Tutorial: Textures in Microsoft Picture It!

I wrote this tutorial using Microsoft Picture It! Photo. The technique also works in Picture It! 2000, and I have every reason to believe it will work in all versions of the program. The menu may look different, but these features should be there, somewhere.
This tutorial is graphics intensive, because I prefer to illustrate steps whenever possible. It may take time to load.
 |
We'll be making a dress, but this technique works for textures anywhere.
The first step is to draw the dress in your normal graphics program. I used the GIMP, but Paint would have done just as well. Use a slightly darker color for the outline, and don't bother shading at all. Save it as a high-color bitmap, and make a copy, just in case.
Next, open your file in Picture It! Click on the image once to select it. Whatever you do, don't move the doll! If you move it, it will get fuzzy, and you'll need to go back to your saved copy.
|
 |
Now that you've selected something, you can selected "crop or trim" from the menu. Find "create a cutout" and select it. We're going to make a cutout of the dress, so we can add texture.
There are several ways to select your cutout. Pick select by color. |
 |
Leave options 1 and 2 alone. Use the dropper to select your dress. Depending on the range of colors you set, it may select the inside, or the inside and the outline. If the dress color is close to the skin, it might select that, too!
If the dropper is selecting too much, change the range of colors and keeping going back and undoing until you've selected just what you want.
Here, I've selected the outline, but sometimes I leave it out. It's really up to you. |
 |
When you move on to the next set of options, you'll see the areas you selected in their original color. If you've made a mistake, go back and fix it. Otherwise, select "Leave in the original project" and accept the settings.
If you forget to change this option, your cutout will appear in a new project, and you'll have to delete it and make another one.
So, now you have a cutout of just the dress. Whatever you do, don't move it! If you move it, it will get fuzzy and you'll have to make another one. |
 |
It's time for the secret of great textures! Go back to the menu, and find the "Illusions" option. In my program, it's under "Photo and color effects."
Now, prepare for lots of trial and error. Go down the menu, checking the effects of the various illusions. Illusions can add patterns, textures, and even colors to your dress. One that looks bad on this cutout may be perfect for another, so I always check all of them, even if it takes a while. Be patientsome illusions take time to load.
When you find an illusion that looks like it might be interesting, click "Change advanced options," and see if you can edit it to make it even better. |
 |
Most illusions allow you to change the transparency. This one option is enormously useful, because you can soften the effects for a more natural texture.
Here, I've selected the illusion "Pointillist: Blocks" and changed the transparency to 40. I like the look, so the only thing left is to save and exit!
Note on saving: Just select "Save." When you do, it will ask you if you want to save it as a Picture It! file. You don't. Instead, click "No" to save it as a bitmap.
Yay! We have a texture!
|
 |
You aren't quite in the clear until you open your doll in a simple program such as Paint. One of the side effects of that cutout is that sometimes it blurs a little around the edges.
Once you've opened the file, fill the background with a bright, contrasting color. Then, zoom in and paint or erase over the fuzz.
|
There you have it! You've finished your first texture in Picture It! Of course, the doll isn't done. You'll need to load her into your favorite graphics program, do the shading, and add all the other things that make a complete doll. I'm afraid pixel shading will no longer work, but you can do everything else as usual.
Tada! 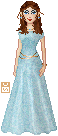
Need instructions for non-pixel shading? Try Lauren's Shading a Dress in Picture It! if your dress is essentially one color, or Sarah's Evening Gown with Dodge and Burn (in the GIMP) if you've chosen a texture that has a variety of colors. I'll make a tutorial on an alternate shading method for Picture It! if there is interest.
If you really love pixel shading, try shading your doll before adding the texture. You'll invariably lose some of the shading, but you might be able to find a combination that doesn't require any shading on top of the texture.
A tip: If you want to do separate textures on different parts of the doll (say, a shirt and skirt), do each as a separate session in Picture It! When you have more than one cutout, there's a greater chance of one or both being blurry.
A Few Dolls Using Textures
  
All bases on this page are from Eleni Aranelwa.
|
