| Home │ Pt I │ Pt III | ||
An introduction to the Group Policy Editor in Windows XP Professional Edition Part IITopics on this page: Adding a Group Policy Object to the console
Adding a Group Policy Object to the consoleThe GPO can be added from a local computer or a remote Active Directory. After clicking Add above, the Welcome to the Group Policy Wizard opens (Fig. 1). For a standalone computer, click Finish. For a computer in a network domain, click Browse.
Fig. 1. Welcome to the Group Policy Wizard.
For computers on a domain, choose This computer or Another computer and browse to select the GPO's location (Fig. 2). If the computer is a standalone workstation this and further steps would not be necessary. The Local Group Policy Object will load.
Fig. 2. Choose the computer location.
Select the GPO location and enter the GPO name (fig. 3).
Fig. 3. Select the GPO location and name.
Click the Advanced tab for more options (Fig. 4).
Fig. 4. More options in the Advanced tab. The Group Policy EditorLaunch the Group Policy Editor on its own (not as part of an Microsoft Management Console snap-in) by going to: Start, Run, gpedit.msc and OK (Fig. 5):
Fig. 5. Start, Run gpedit.msc, OK.
The Group Policy window opens (Fig. 6); the Extended tab on the right pane contains a brief description of a selected item on the right.
Fig. 6. The Group Policy window showing Local Computer Policy.
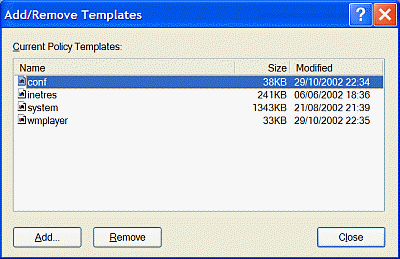
TemplatesThe Local Computer Policy is divided into two main subsections: the Computer Configuration and the User Configuration and each is further divided into three main subsections: Software, Windows and Administrative Templates. Their tree structure is shown in part III. There are four administrative templates loaded by default: Conf.adm (conference or netmeeting), Inetres.adm (Internet restrictions), System.adm and Wmplayer.adm (Windows Media Player). The settings in these templates are split under both the Computer Configuration and the User Configuration, Administrative Templates subdirectory. On the right pane, the Extended page shows a description of the highlighted item. If a template is not shown, you can add it by right clicking Administrative Templates, choose Add/Remove Templates; you can also remove a template that you don't need from here: this will help to start the mmc faster (Fig. 7).
Fig. 7. Administrative Templates, Add/Remove Templates.
In the Add/Remove Templates dialogue box, choose the template to add or remove; here the four default templates are shown (fig. 8)
Fig. 8. Add/Remove Templates showing four default templates.
Copyright © 2003 by Kilian. All my articles including graphics are provided "as is" without warranties of any kind. I hereby disclaim all warranties with regard to the information provided. In no event shall I be liable for any damage of any kind whatsoever resulting from the information. The articles are provided in good faith and after some degree of verification but they may contain technical or typographical errors. Links to other web resources may be changed at any time and are beyond the control of the author. Articles may be added, removed, edited or improved at any time. No support is provided by the author. All the products mentioned are trademarks of their respective companies. Last updated 12 Feb 2004 |
|
|