| Home │ RC Part II │ RC Part III │ Repair Windows XP │ | ||
| Recovery Console Commands at a glance:
attrib |
Recovery Console in Windows XP (Part I)Topics on this page:
IntroductionThe Recovery Console (RC) is a text mode recovery tool in Windows XP (dated from Windows 2000). It is on the Windows XP CD (in both versions) and you can install it to the hard disc (KB 216417) as an extra boot option. You can use the Recovery Console to repair system files and the boot sector (but Microsoft has cautioned against using it for boot sector viruses: see Part II) but you cannot access the user folders by default as a security guard (unless you change a policy in Windows XP Professional's Group Policy Editor). The setup text mode can read and access FAT and NTFS partitions subject to some limitations. Many users are unfamiliar with the RC and when there is a system failure leading to non-bootable system it may be too late to learn how to use it. If you cannot boot (not even in Safe Mode or the Last Good Configuration) you can use the RC to restore to an earlier system restore point (if you have enabled system restore; KB 307545).
Factory PCs and laptopsIn factory PCs and laptops with recovery CDs the RC may not be available on the CD. Even when you try to use a full version CD or attempt to install it to the hard disc there may be problems with authentication of the Administrator password even when it is blank (KB 308402). Installing SP1 does not seem to have cured the problem in one laptop I've tried it on. I've not tried using the new set of bootable floppies which Microsoft also suggested.
Dual and multi-boot systemsIf you have two or more Windows XP installations, you only need to install one instance of the RC on the hard disc (in fact you cannot install more than one) or if run from a Windows XP CD, you will be given the option to choose which one to repair. If you wish to repair Windows 2000, use the Windows 2000 version instead.
Automatic logonYou can enable automatic logon to the RC via the Local Security Policy mmc snap-in, Security Settings, Local Policies, Security Options, Recovery Console: enable Allow automatic administrative logon policy (KB 312149). The registry key responsible is: HKEY_LOCAL_MACHINE\SOFTWARE\
Allow Floppy Copy And Access To All Drives And FoldersYou can use the Group Policy editor in Windows XP Professional to set a policy to Allow Floppy Copy And Access To All Drives And Folders under Security Options, details, Recovery Console: Allow Floppy Copy And Access To All Drives And Folders. The registry key is: HKEY_LOCAL_MACHINE\Software\Microsoft\Windows NT\CurrentVersion\Setup\RecoveryConsole This also enables you to change the environmental variables with the set command (KB 310497).
MethodSet the BIOS to boot from CDROM if this option was previously disabled. If your system is still bootable, set to boot from CDROM before the system disc (usually IDE0 or 1 if you use IDE drives). Insert your Windows XP CD into the ROM drive and start the computer. When you see this message Press any key to boot from CD on the top of the black screen, press any key immediately (within three seconds) to go to setup, otherwise the CD will be bypassed and the BIOS will attempt to boot from other devices (normally the hard disc; fig. 1). If you don't see this message, make sure your monitor display settings are correct, i.e. the message is not off the screen at the top.
Fig. 1. Press any key to boot from CD.
Wait for set up to finish detecting and loading files (the screen would be the same as installing Windows the first time, when you're prompted to press F6 for SCSI drivers, then F2 for ASR in Windows XP Professional, then the files are loaded into memory); the Welcome to Setup blue screen then appears (fig. 2). The F2 option for automatic system recovery (ASR) is a feature supported only in Windows XP Professional and requires that you have previously prepared an ASR floppy and used NTBackup to back up your system partition; it is not part of the Recovery Console.
Fig. 2. Welcome to Setup screen.
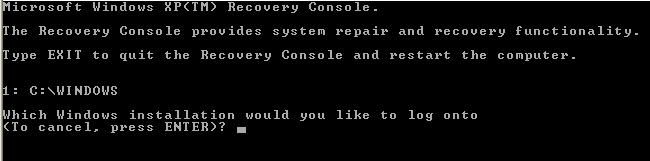
To access the RC, choose the second option (press R; the is the first R option). If you wish to do an automatic repair, don't choose this option; instead press ENTER to go to set up Windows (refer to my article on repair here). To quit, press F3. The next screen (now black) lists the existing Windows installations on your computer; there may be only one or more present. If there is more than one, type the corresponding number (not the path or name) to select the correct Windows installations to use the RC on (fig. 3).
Fig. 3. Which Windows installation to log onto.
Even if there is only one instance of Windows, you need to type 1 and press ENTER. You will then be asked to type the Administrator password: this is the account that is built-in (equivalent to the root administrator account in Unix) and cannot be deleted. This is NOT the same as any user accounts with administrative privileges you subsequently add after installation. In Windows XP Home edition, this Administrator account password is BLANK (empty) by default during installation. In Windows XP Professional you will be prompted to enter a password during installation. If you forget this password, you would not be able to run the RC. Note that in factory PCs there may be a bug (see above). Press ENTER after you've typed the password (fig. 4).
Fig. 4. Type the Administrator password.
You then see a command prompt with a non-blinking cursor (see bottom of fig. 6). For a list of all the available commands, type Help and press ENTER (fig. 5 and 6). This list is also available if you search Recovery Console in the Help and Support Center. I suggest you print out a hard copy for future reference. There're 28 commands (in the list on the screen, a few are duplicated, such as CD and CHDIR which are the same) available. The net command is unavailable although listed (see KB 314058). You can use capitals or small letters when entering them.
Fig. 5. RC commands (first screen).
Fig. 6. RC commands (second screen).
Many commands are similar to MS-DOS commands or those in the Windows command prompt (cmd) but there are fewer of them and fewer switches. The commands do not support wild cards (*). The DISKPART command replaces the old FDISK in Win9x and Windows 2000. There is no DELTREE or XCOPY. For repairing the boot sector, boot.ini and master boot record, the BOOTCFG, FIXBOOT and FIXMBR commands are useful. These and other commands will be explored further in parts 2 and 3.
Go to TOP Go to Part 2.
ReferenceKB 216417 HOW TO: Install the Windows Recovery Console KB 307654 HOW TO: Install and Use the Recovery Console in Windows XP KB 308402 'The Password Is Not Valid' Error Message Appears When You Log On to Recovery Console in Windows XP KB 310497 How to add more power to Recovery Console by using Group Policy in Windows XP Professional KB 314058 Description of the Windows XP Recovery Console KB 312149 HOW TO: Enable Administrator to Logon Automatically in Recovery Console
Copyright © 2003-2004 by Kilian. All my articles including graphics are provided "as is" without warranties of any kind. I hereby disclaim all warranties with regard to the information provided. In no event shall I be liable for any damage of any kind whatsoever resulting from the information. The articles are provided in good faith and after some degree of verification but they may contain technical or typographical errors. Links to other web resources may be changed at any time and are beyond the control of the author. Articles may be added, removed, edited or improved at any time. No support is provided by the author. This is not an official support page for any products mentioned. All the products mentioned are trademarks of their companies. Created 26 Feb 2004; last updated 24 Oct 2004 |
|