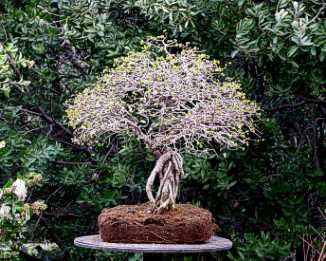
 1.- Frente del árbol.
 LAS BONSAI
TALLER 10 WORKSHOP 10
Transplante de un Olmo chino 1a parte
Chineese elm repotting procedure 1st stage
1.- Frente del árbol.
Front view of tree.
 2.- Vista trasera del
árbol.
2.- Vista trasera del
árbol.
Rear view of tree.
 3.- Se elimina
el musgo que cubre el sustrato.
3.- Se elimina
el musgo que cubre el sustrato.
We remove the moss.
 4.- Acercamiento.
Closer-up.
 5.- El
sustrato se ve bastante agotado y degradado por lo que el
5.- El
sustrato se ve bastante agotado y degradado por lo que el
transplante es necesario.
Repotting is necesary due to old soil.
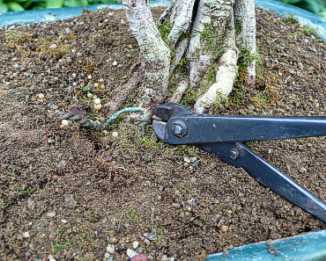 6.- Cortamos
el alambre que mantiene el árbol firme a la maceta.
6.- Cortamos
el alambre que mantiene el árbol firme a la maceta.
We cut the wire which holds the tree firmly to the the pot.
 7.- Detalle inferior
del alambre que fija la rejilla a la maceta.
7.- Detalle inferior
del alambre que fija la rejilla a la maceta.
Detail of wire that fixes the plastic drainage screen to the pot.
 8.- Doblamos el alambre para permitir que el pan de raices sea liberado.
We free the wire in order to liberate the root system.
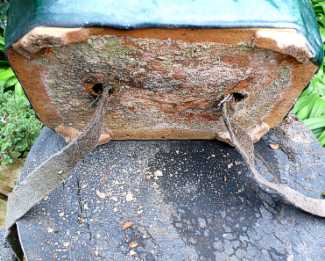 9.- Hacemos lo mismo en la perforación de la maceta que contiene el otro
alambre. Esta
9.- Hacemos lo mismo en la perforación de la maceta que contiene el otro
alambre. Esta
árbol se encontraba sobre una bandeja autorregante, por lo que los dos trozos de paño
gris que emergen de las dos perforaciones son usados para conectar el sustrato con el
agua de la bandeja. El paño se humecta y transporta el agua al sustrato y raices por
capilaridad.
With the same procedure we free the wire of the other pot perforation. This tree rested
over an auto-irrigating tray, so the two pieces of grey cloth that emerge from the pot
holes are used to connect the substrate with the water of the tray. The cloth is moisturized
and transport water to the root system by capilarity.
 10.- Con una palita vamos
soltando el pan de la maceta cuidadosamente.
10.- Con una palita vamos
soltando el pan de la maceta cuidadosamente.
With a little shovel we relief with care the root system from the pot.
 11.-
Hacemos una palanca suave con la palita sobre el pan y la maceta
11.-
Hacemos una palanca suave con la palita sobre el pan y la maceta
With the shovel we lever gently the root system.
 12.- Seguimos con este
procedimiento alrededor de todo el contorno, teniendo especial
12.- Seguimos con este
procedimiento alrededor de todo el contorno, teniendo especial
cuidado de no forzar mucho para evitar que la maceta pueda quebrarse.
We follow this procedure around the contour of the pot , having special care not to
forze the shovel in order to avoid breaking or damaging the pot.
 13.- El pan de
raices con el sustrato se va desprendiento lentamente.
13.- El pan de
raices con el sustrato se va desprendiento lentamente.
The root system with the substrate is slowly released.
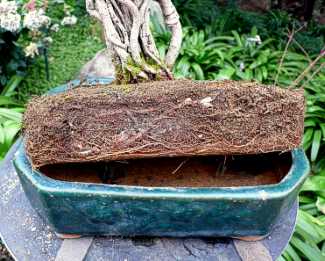 14.- Ya hemos
liberado el pan de raices de su maceta.
14.- Ya hemos
liberado el pan de raices de su maceta.
We have already released the root system of the pot.
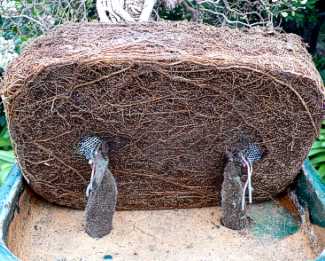 15.- Vista del
fondo del pan de raices. Se puede apreciar que varias raices gruesas y largas
han
15.- Vista del
fondo del pan de raices. Se puede apreciar que varias raices gruesas y largas
han
crecido alrededor de la maceta, lo que indica que el transplante era muy necesario.
Bottom view of the root system. We may appreciatte thin and thick roots al over the pot,
then the repotting was more than necessary.
 16.- Detalle de las raices.
Root detail.
 17.- El árbol presentado sin su maceta.
The tree without the pot.
 18.- Acercamiento
Close-up
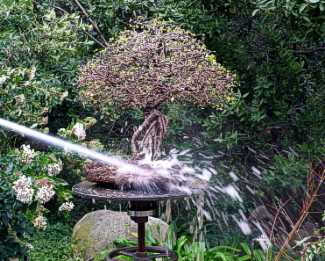 19.- Con agua y aplicando bastante presión sobre el pan vamos eliminando el
sustrato.
19.- Con agua y aplicando bastante presión sobre el pan vamos eliminando el
sustrato.
With a jet of water applied to root system we remove the old soil.
 20.- Hacemos esto por todos los lados acercando y alejando el chorro de agua,
para
20.- Hacemos esto por todos los lados acercando y alejando el chorro de agua,
para
así ir soltando las raices.
With the jet we get closer and away from the roots in order to release the roots
from the soil.
 21.- Lentamente las raices van apareciendo.
Slowly roots appear.
 22.- Hemos eliminado ya practicamente todos los restos de sustrato.
We have eliminated almost all traces of the substrate.
 23.- Vista inferior del pan limpio. Es más fácil retirar ahora las rejilla y
el paño de humectación de la
23.- Vista inferior del pan limpio. Es más fácil retirar ahora las rejilla y
el paño de humectación de la
autorregante.
Bottom view of the clean root system. It is easier now to remove the drainage screen and the cloth.
 24.- El árbol apoyado en su base.
The tree at its base.