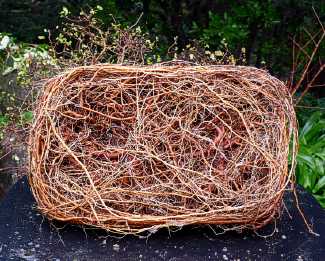
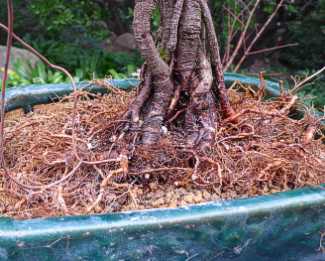
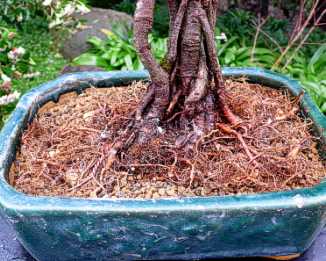
 25.- Se puede ver en la parte inferior del pan la compleja trama de raices.
LAS BONSAI
TALLER 10 WORKSHOP 10
Transplante de un Olmo chino 2a parte
Chineese elm repotting procedure 2nd stage
25.- Se puede ver en la parte inferior del pan la compleja trama de raices.
The complex root system is seen in a bottom view.
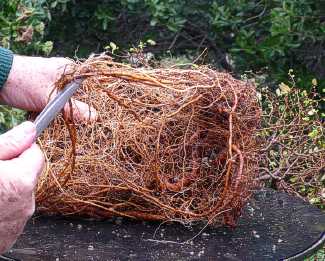
 26.- Con un rastrillo u desenrollador vamos soltando con especial cuidado las
raíces para no
26.- Con un rastrillo u desenrollador vamos soltando con especial cuidado las
raíces para no
dañarlas.
With a rake we release the roots with care to avoid damage.
 27.-
27.-
 28.- Podemos realizar esta labor también con las manos.
We may also do this job with our hands.
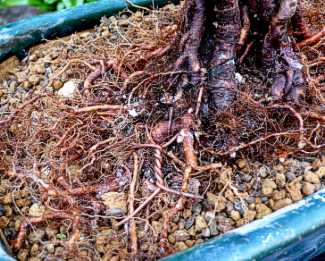
 29.- Hemos soltado ya algunas raices muy largas.
We have already released some very long roots.
 30.- Luego
eliminamos la 1/2 del pan de raíces, cortando las raíces más gruesas hasta un
punto
30.- Luego
eliminamos la 1/2 del pan de raíces, cortando las raíces más gruesas hasta un
punto
donde se encuentre una raicilla fina. Eliminamos además cualquier raíz que se encuentre
con signos de podredumbre.
Then we trim 1/2 of the roots length, cutting thick roots in a point where we can find a fine root emerging.
We also get rid of al roots that may have signs of rot.
 31.- Las raices que van quedando con parte del trabajo ya realizado.
Here we show the root system left after part of the work has been done.
 32.- Vista de las raíces que han quedado mirando el frente del árbol.
Roots of the front view of the tree.
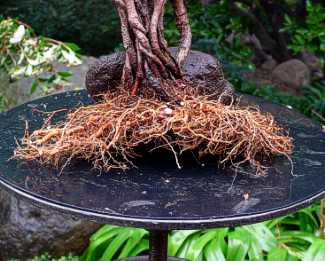 33.- Vista de las raíces que han quedado mirando la parte trasera del árbol.
Roots of the rear view of the tree.
 34.- Lavamos la maceta con agua a presión y luego cortamos dos nuevas rejillas
plásticas
34.- Lavamos la maceta con agua a presión y luego cortamos dos nuevas rejillas
plásticas
dimensionadas de acuerdo a las perforaciones de la maceta
We wash the pot with a water jet and we cut and provide two new plastic drainage screens according to the pot holes dimensions.
 35.- Presentamos las rejillas, los alambres para rejillas, el paño para el
autorregante y más
35.- Presentamos las rejillas, los alambres para rejillas, el paño para el
autorregante y más
abajo los dos alambres más largos que se usarán para fijar el árbol en posición en la
maceta.
Here we see the necessary elements such as drainage screens, two copper wires for the plastic
screens, auto-irrigating cloth and two long copper wires used to fix firmly the tree to the pot.
 36.- Doblamos los alambre para las rejillas.
We then give shape to the two smaller copper wires to be used with the screens.
 37.- Introducimos las dos puntas de cada horquilla con una separación igual al
diámetro de la
37.- Introducimos las dos puntas de cada horquilla con una separación igual al
diámetro de la
perforación.
We introduce the both ends of the wire loop in the screen with a distance equal to the hole dimention.
 38.- Las dos rejillas y sus horquillas listas.
Both screens with wire loops in position.
 39.- Colocamos en posición primero el paño para el autorregante como se
indica.
39.- Colocamos en posición primero el paño para el autorregante como se
indica.
We first position the auto-irrigating cloth as shown (only if you have an auto-irrigating tray).
 40.- Se sacan las dos puntas del paño por la parte inferior de la maceta
We then introduce the two ends of the irrigating cloth through the bottom holes of the pot.
 41.- Se introducen luego por la parte superior de la maceta las rejilla con su
horquilla de alambre.
41.- Se introducen luego por la parte superior de la maceta las rejilla con su
horquilla de alambre.
Drainage screens with their wire loops are then placed in the two holes of the pot.
 42.- Luego se introducen por la parte inferior de la maceta los dos alambres
para fijar el árbol.
42.- Luego se introducen por la parte inferior de la maceta los dos alambres
para fijar el árbol.
We then introduce from the bottom of the pot the two long copper wires needes to fix the tree
to the pot. Both ends of one should go to the front and both ends of the other to the back
of the pot.
 43.- La maceta está lista para recibir el sustrato de la base.
The pot is now ready to receive the soil of the base.
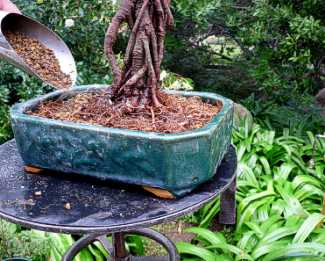
 44.- Se agrega sustrato base que es de granulometría gruesa para permitir el
buen drenaje.
44.- Se agrega sustrato base que es de granulometría gruesa para permitir el
buen drenaje.
We put base soil wich has a thicker granulometry in order to have good drainage. ( 3-4mm)
 45.- Se agrega luego sustrato de bonsai para
HOJAS CADUCAS de granulometría más fina.
45.- Se agrega luego sustrato de bonsai para
HOJAS CADUCAS de granulometría más fina.
We then add DECIDUOUS TREES Bonsai soil of a finer particle granulometry.
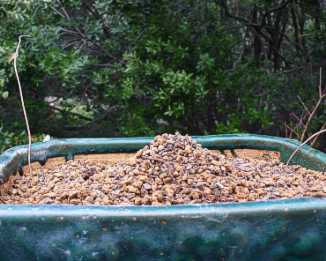 46.- Se deja una protuberancia en el lugar donde se colocará el árbol en la maceta para
asegurar que en el fondo del pan de raíces no queden espacios de aire.
We add more soil in the center of the pot where the base of the tree will rest in order
to assure that now air pockets are left.
 47.- Agregamos hormonas enraizantes a las raíces y posicionamos el árbol sobre
el
47.- Agregamos hormonas enraizantes a las raíces y posicionamos el árbol sobre
el
sustrato haciendo pequeños giros hasta que encontremos la altura adecuada para
que se destaquen bien el nebari de raíces.
We add rooting hormones to the roots and then we position the base of the tree over the
soil. We start then to make small but strong turns with the tree over the soil until we find
the right position and height of the root nebari so it emphasizes the style.
 48.- Debemos pasar los alambres largos de posicionamiento por un lugar donde
obtengamos un
48.- Debemos pasar los alambres largos de posicionamiento por un lugar donde
obtengamos un
buen anclaje.
We have to position and pass through the root system the two long copper wires in order to
anchor the tree to the pot.
 49.- Una vez que el árbol se amarra, traccionamos bien el alambre, unimos las
dos puntas y luego vamos
girando
49.- Una vez que el árbol se amarra, traccionamos bien el alambre, unimos las
dos puntas y luego vamos
girando
hasta que estos queden bien firmes y así evitar que el árbol se mueva.
Once the tree is in the desired position, we pull the wires and get the two ends together, then we start to turn
them in order to tighten the tree in place.
 50.- Podemos cortar las puntas sobrantes de alambre o doblarlas para apisonar hacia abajo
alguna raíz rebelde .
Excess of wire may be cut or bend against other roots to mantain them in position.
 51.- Estamos listos para cubrir entonces el pan de raíces con sustrato
We are now ready to cover the roots with bonsai soil.
 52.- Agregamos el sustrato de granulometría más fina hasta cubrir la maceta.
We add bonsai soil of finer granulometry to cover completely the pot.
 53.- Con un palillo eliminamos los bolsillos de aire que puedan quedar.
With a chop stick we elimiante the possible air pockets left.
 54.- Usamos el palillo y también los dedos, para ir apisonando suavemente.
Chop stick and fingers may be used.
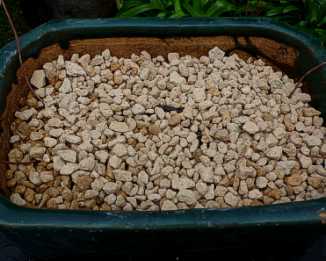
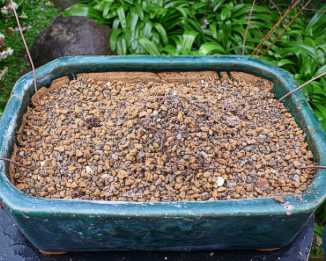
 55.- El sustrato ya está colocado.
Soil in the pot is ready.
 56.- Aquí podemos apreciar el nivel en que debe quedar el sustrato
respecto del borde de la maceta.
Here we appreciatte the level that the soil must have in the pot.
 57.- Luego regamos abundantemente.
We then water the bonsai.
 58.- El Olmo está transplantado pero le falta un poco de musgo para mejorar su
presentación.
58.- El Olmo está transplantado pero le falta un poco de musgo para mejorar su
presentación.
The Elm is already repotted but we require some moss to improve appearence.
 59.- Colocamos el musgo sin que este se acerque mucho al nebari.
We put moss taking special care that it does not reach the nebari.


60.- Vista frontal del Olmo antes y después. Las raíces las hemos dejado un poco más expuestas para mejorar la sensación de apoyo.
Front view of the Elm before and after repotting. Roots have been left more exposed to improve support sensation.


61.- Vista trasera del Olmo antes y después.
Rear view of the Elm before and after.