All
the |
(Navigation bar
directly below.)
*******
© A.J. Goldsby,
2009.
(All rights reserved.)
****************
Click HERE
to see the page
for my downloads.
****************
Click HERE
to see any chess
items that I have
that are ...
FOR SALE!
****************
![]()
****************
Buy a book
from Amazon.com
(And help me out as well!)
T.
Lichtenhein (2420)
- Paul Morphy (2800)
(Note: The
above ratings are basically extrapolations, based on
what the players would be [minimally] rated in the year 2000.)
(ECO Code =) [C55]
1st American Chess Congress
New York City, NY, 1857.
[by A.J.Goldsby I]
[ (c) 1998 - 2004 © 2005 ]


________________________________________________

One of the most brilliant games of the last century. (And probably one of my "Top Ten" favorite Morphy Games!!) It shows just how much talent Morphy really had. ALL the other Masters present during the game labeled Paul's 12th move a mistake. It is actually a very brilliant move, and reminds me greatly of another chess genius, M. Tal.
***
This
game is a brilliant example of the "Two-ROOK Sacrifice."
(The Anderssen "Immortal Game" was probably the first great
example of
this technique.)
***
This game has also been savaged by many writers who have greatly disparaged White's play. Yet few (if any!) players have successfully found ALL of Black's moves. And I have showed this game dozens and dozens of times over the years. Even MASTER's have failed to correctly find all of Black's moves.
***
(Click HERE to see this this game on a java-script re-play board.)
***
Note: I have annotated this game many times over the years.
1.
e4 e5;
Morphy's favorite response against 1. P-K4, or 1. e4. Morphy delighted in piece
play, and there is more than ample opportunity for it in the Open Games.
2.Nf3
Nc6; 3.d4, (!?)
At one time thought to be inferior, but revived by Garry Kasparov in some of his
World Championship
encounters. (It is most likely that this move will lead to the Scotch Game, or even
... the Scotch Gambit.
Click here
to go to my "Traps Page.")
It is certainly completely playable, and abides by all the opening principles.
[ 3.Bc4 Nf6 4.d4 exd4 5.e5, is the normal move
order to
arrive at the position we achieve in the game. ].
3...exd4;
4.Bc4, (!?)
Gambiting a pawn, which was common and accepted at that time.
[ 4.Nxd4 is a straight Scotch Opening. ].
4...Nf6; 5.e5!?, {Diagram just below.}
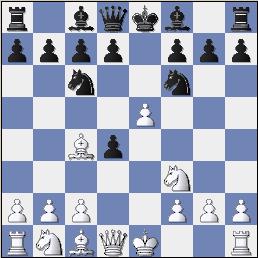
(The position after 5.e5!?)
White thinks to disturb Morphy's development.
[ 5.0-0!? Nxe4; transposes to The 'Max Lange Attack.' ].
Reti writes: "The most important thing in an open position is to bring ALL the pieces into play as quickly as possible. In open games, it is possible to obtain a perhaps superficial, but rapid and - for all practical purposes - an often sufficient opinion in regard to a position; simply by counting the [number of] pieces that have been developed." (R. Reti, in "Masters of the ChessBoard. " Pg. # 33.)
(In other words, if I have two pieces developed and my opponent has developed
five, then my opponent may have a very large advantage. Things such as being ahead a pawn
in such a situation is of a secondary, and a greatly
diminished consideration.)
Now the great Morphy plays:
5...d5!;
Black (Morphy) does not move or retreat a
well-posted piece. Instead he vigorously counter-attacks in the center! (Hitting White's
Bishop.) We now have transposed to a Scotch Opening.
***
This thrust (5.e5, d5!), is common today, but was practically unheard of in Paul Morphy's time.
***
"If 6. exf6, dxc4; 7.fxg7 Bxg7; and Black stands well." - Reinfeld.
6.Bb5 Ne4!; {Diagram just below.}
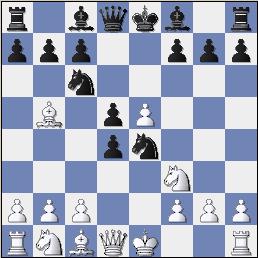
(The position after 6...Ne4!)
Again, no retreating!
Black's Knight occupies an advanced square in the center ... securely anchored by a pawn. This is known as an "outpost."
(You should always strive to get your Knights to a square of this
type.
-----> A good definition of an outpost is: "An advanced
square, in or near the center, - or very near the opponent's King - where the
Knight can occupy this square and is NOT easily driven off. The
square should be firmly anchored (protected) by one of your own pawns. The
'driving away' process should always involve a significant weakening of
your opponents' Pawn structure." - LM A.J. Goldsby I)
7.Nxd4 Bd7; 8. Nxc6?!, ('?')
With this move, White will lose a tempo in the opening, which is not a good idea.
(White's Bishop on b5 will be forced to retreat, or move again. Another loss of time.)
[ Better was: 8.Bxc6 bxc6; 9.0-0, ("+/=") ECO says this position
is nearly equal.
9...Be7; 10.f3 Nc5; 11.Be3 Ne6; 12. Qe2 0-0; 13.c4!? Nxd4; 14.Bxd4 Be6;
15.Rd1 c5; 16.Be3 d4; 17. Bf2 Rb8; 18.b3 Qd7; 19.Nd2 Rbe8;
("=")
Black may even be slightly better
here. ("=/+") Variation by A.J. Goldsby I.].
8...bxc6; 9.Bd3 Bc5!;
Rapid and active development! Morphy was never one to play passive moves.
Notice Morphy has a threat against f2 now.
***
Also please notice how Morphy has three pieces developed to his opponent's one!
***
"It is interesting that this natural move has been sort of forgotten by modern theory." - GM C. Ward
*******
10.Bxe4, Qh4!; (Maybe - '!!') {Diagram just below.}
This, and Black's next move, are in reality so complicated that I seriously doubt many people could have calculated this combination to its logical conclusion. (See the analysis below!!)
Perhaps Paul Morphy was guided by his superior intuition! (?) Perhaps just sheer genius?

(The position after 10...Qh4!)
The move, 10...Qh4 is a zwischenzug, or an in-between move. This is a nice way for Black to keep the advantage.
11.Qe2,
This has the appearance of being a {half-way} decent move.
GM Edmar Mednis writes:
<< A perfectly reasonable move. White wants
Black to capture on e4 with his pawn and thus be left with a
broken pawn structure on the
Queenside. After the routine 11.0-0, Qxe4; Black has, at no cost to himself;
the advantage
of the Bishop-pair in an open position. He therefore has a very pleasant advantage.
>>
[See: "Practical {Chess} Opening Tips," page # 21-23.]
[ Not 11.Bf3?? Qxf2#; or if 11.g3?? Qxe4+;
12.Qe2 Qxh1+; 13.Qf1 Qxh2; ("-/+") ].
11...dxe4; 12.Be3?, (?!) (Maybe this move is only dubious.)
"Certainly now 12.0-0 would be better." - GM Chris Ward
[
12. 0-0, (E.C.O.). 12...Rb8; ("=/+") is slightly better for Black,
but VASTLY better than
the game continuation. ].
Reti writes: "In open positions, especially in cases of retarded development, the safety of the King should be the first consideration. Castling was therefore imperative." (R. Reti, in "Masters of the Chess Board," pg. # 35.)
12...Bg4!!; (Maybe - '!!!')
This move had to be calculated VERY precisely. In fact, in order to be 100% sure of the win, Paul Morphy would have had to calculate OVER 15 moves ahead!!!
(I don't think Morphy calculated this far ahead, but probably relied on his incredible intuition, instincts, and just plain PURE GENIUS.)
Edge wrote (in a similar situation) that although the winning line may have been very complex, Morphy never calculated for longer than 5-10 minutes. Sometimes Morphy would respond instantly with a tactical shot that would simply amaze his contemporaries.
It is too bad that we will never be able to accurately test Morphy's powers of calculation. But I would be willing to bet, that he would have been able to hold his own with any player of any age, judging from what we do know - and what people have written about Morphy.
(I remember seeing this game as a very young person. I played - sensing the possibility of Qc4 - 12...Bb6. This move would lead to a slight advantage for Black, especially if White captures on d6 and undoubles Black's pawns.)
---> GM C. Ward calls this a stroke of genius - that was carefully calculated out to the end.
13.Qc4, {Diagram just below.}

(The position after 13. Qc4!?)
It appears that Black has outsmarted himself, for it seems that Black must lose material. But all this has been calculated out to the very end by Morphy!
GM Mednis writes:
"White must counter-attack, since the safe 13. Qd2, loses routinely to 13...Rd8, with mate on d1 coming up."
[ 13.Qf1? Bxe3; 14.g3 Qg5; 15.f4,
If 15. fxe3?? Qxe3+; 16.Qe2, (forced)
16...Qxe2#.
15...Qf5; ("-/+") and
Black has won a piece.
Or 13.Qd2? Rd8; 14.Qc3 Rd1#. ]
13...Bxe3!;
Black fearlessly continues the attack.
14.g3!,
[box], {Diagram?}
This
move is forced, and shows just what a strong player Lichtenhein was.
Many Masters have played 14. Qxc6+ here. (When I showed them this position and asked them what the correct move was for White.)
{Castling was an idea worth consideration here for White.}
[ Now
Soltis and
Reinfeld give: 14.
Qxc6+, { "?!" -
A.J.G. }
14...Bd7!!; The only way to make
progress. Black sacrifices one rook,
(offering two;), all to get to White's King.
( 14...Kf8; {'?'} 15.Qxa8+?! Ke7; 16.g3, "~" (Maybe '±')
Chris Ward gives the line: (</=) 14...Ke7!?; ('?!')
15.Qxc7+ Kf8;
16.Qd6+ Kg8; 17.g3 Qh3; 18.fxe3? Qg2;
"-/+" {Diagram?}
... "when either White suffers a
heavy material loss or is mated."
- GM Chris Ward )
15. Qxa8+ Ke7; 16. g3!, Forced. Taking the rook on h8 loses.
( 16.Qxh8?? Qxf2+; 17.Kd1 Bg4#)
16...Bxf2+!; 17. Kxf2 e3+!; 18. Ke1,
***************************************************************
The alternatives were clearly worse. I.e., :
Var. #1.) 18.Kg1 e2!; 19.gxh4, e1Q+; 20.Kg2 Qe2+;
21.Kg3 Rxa8; ("-/+")
Black is winning easily.
{Other moves may also win here for Black. 21...Qxe5+; 22.Kf2 Qd4+;
23.Kf3 Rxa8; 24.Re1+ Kf8; 25.Nc3 h5!; ("-/+")}
Var. # 2.) 18.Kxe3? Qg5+; 19.Kd4 c5+!; 20.Kd5 Be6+; 21.Kxc5 Qxe5+;
22.Kb4 a5+!; 23.Ka4 Qd4+!; 24.c4 Qxc4+; 25.Kxa5 Rxa8+; 26.Kb6 Qb4+;
27.Kc7 Rc8#;
Var. # 3.) 18. Kg2?? Qh3+; 19. Kg1 Rxa8; ("-/+")
Var. # 4.) 18. Kf3?? Qh5+; 19. Kxe3 Rxa8; ("-/+")
Var. # 5.) 18. Ke2?? Qc4+; 19. Kxe3 Rxa8; ("-/+")
So it appears that 18. Ke1, is clearly forced here.
***************************************************************
(Returning to the main analysis line.)
18...Qb4+; 19. c3 Qxb2; 20.
Qe4,
[
And now if: 20. Qxh8? Qf2+!; The most direct.
(Also winning
is: 20...Bg4!?; ("-/+") 21. Nd2 Qxd2+; 22. Kf1 Qf2#.)
21. Kd1 Ba4+; 22. Kc1 Qc2#;
or 20. Qf3 Qxa1!;
{ Not: (a1.)
20...Qc1+?; 21.Qd1.
("=")
or also bad is: (a2.) 21.Ke2?? Bb5+; 22.c4 Bxc4#. }
21.Qb7 Qxa2; 22.Rf1, Rd8; ("-/+") and now Black is winning easily. ]
20...Qc1+; 21. Ke2 Bb5+; 22. c4, Bxc4+; 23. Kf3,
( Or 23.Qxc4 Qxc4+; 24.Kxe3 Qc5+; {"-/+"} )
23...Qxh1+; 24. Kxe3 Qe1+;
25. Kf3 Qf1+; 26. Ke3 Qe2+;
27. Kf4, (Or
27.Kd4? Rd8+;), 27...g5+!;
28. Kf5 Be6+; 29. Kxg5 Qxe4; ("-/+") Black
is winning easily.]
(The end
of the Reinfeld / Soltis Variation.)
***
(And now we return to the analysis of the actual game.)
14...Qd8!;
"Even in retreat, Morphy finds a way to attack!"
(Threatening a mate on d1, should White become careless. [ 14...Qh6; 15. Qxe4 Bc1; ("-/+") ].)
15.fxe3,
The alternatives here are clearly inferior.
[ 15.Qxc6+?
Bd7; 16.Qxe4 Bb6; and Black has won a piece. ("-/+")
Or 15.Qxe4?? Qd1#. Or 15. Nc3, (To cover d1.) 15...Bb6; ("-/+") ].
15...Qd1+;
16.Kf2 Qf3+!;
One
New York reporter wrote (in his newspaper) That White had
probably been expecting the capture of the Rook on h1 here. (Not
16...QxR/h1?!; 17. QxP/c6+, and White gets a lot of counterplay.)
17.Kg1 Bh3!!;
(Black has other ways to win here, but this is clearly the best!
AND the quickest!)
18.Qxc6+ Kf8!;
Black
offers to give away BOTH his Rooks, the first with check!!
(It was not until I began analyzing this game with students again that I
realized how difficult some of these moves are to find for the average player. July,
2001.)
***
18...Ke7?;
gives White needless counterplay. 19.Qxc7+, and the game goes on.
(This is the line that most of my students choose at this point.)
19.Qxa8+ Ke7; ('!') {Diagram just below.}
(Not 19...Bd7?; Which gives White more chances.)

(The position after 19...Ke7.)
White Resigns. 0 - 1.
(Mate is unavoidable. I.e., 20. Qxe4!?, Qf1#!)
(If the White Queen grabs the Rook on h8, Black will deliver checkmate. In fact, Black threatens mate in one THREE different ways!) Please notice that White is helpless to give aid to his beleaguered King. Also examine the final position. The extra pieces (The White Rooks.), that White has in the corners are of no use. This is what becomes of neglecting your development! (A.J.G.)
Reinfeld wrote: "The two-Rook sacrifice is one of the most elegant tactical themes in the attacking player's repertoire." (Here Morphy brings it off with flair and panache'!) "Anderssen introduced this beautiful motif in 1851 in his famous 'Immortal Game' with Kieseritsky. That game was undoubtedly known to Morphy." (Fred Reinfeld, in "Great Games by Chess Prodigies.")
Anyone who is interested in studying this game further, I must heartily recommend Richard Reti's classic book, "Masters Of The ChessBoard." [Dover, 1976.] (If you can find a copy.) There you will find many pages of notes and observations on this game that are absolutely sublime!!! (Reti referred to this game as a very brilliant and wonderful game.)
***
(Bibliography) -
I have consulted many books in annotating this game. They are:
# 1.) "The Games of Paul Morphy," by Sergeant. [Dover.]
(I also consulted "The Unknown Morphy," by the same author.)
# 2.) "The Exploits of Paul Morphy ... " by F. Edge. [Dover.].
# 3.) "The Evolution of Opening Theory," by Pachman and Little.
# 4.) "Paul Morphy: Extraordinaire," by many authors. [Dover.].
# 5.) "Paul Morphy," [The Pride and Sorrow of Chess];
by David Lawson. [
(c), 1976.].
# 6.) "Practical (Chess) Opening Tips," by GM Edmar Mednis.
[Cadogan Publishers; Copyright, 1997.].
# 7.) "Great Games by Chess Prodigies," by Fred
Reinfeld.
(Copyright, 1967;
MacMillan Publishers.)
# 8.) "Masters of the ChessBoard," by R. Reti. [Dover.].
# 9.) "Paul Morphy, and the Evolution of Chess
Theory;"
by Macon
Shibut. [Caissa Editions; (c), 1993.].
#
10.) "The Genius of Paul Morphy," by GM Chris Ward. (Gm. # 6,
pg. # 23.)
Copyright (c) 1997, Published by Cadogan Chess. (Dec, 2004.)
(I also consulted several opening books while preparing the annotations of this game. This includes: ECO, MCO, & NCO.)
***
(I have also seen this game in many other books over the years, but these were the ones with the best annotations.)
***
(Page last updated, Monday / December 27th, 2004. Last edit or save on: 06/28/2009 .)
This game - and the diagrams - were initially generated with ChessBase 8.0, although I have spent many hours slowly improving this page and refining its appearance. Today I spent several hours checking the analysis and cleaning up the page a bit. Friday; April 14th, 2006.
Just so you know, this is the most
in-depth analysis of this game you
will see anywhere!! No one has
ever bothered to annotate this game
as thoroughly as you see here!
**********
Stay tuned and keep checking back.
I plan on SOON having all ten of
Morphy's best games here on my web-site for your
enjoyment!!
Click HERE to see another of Morphy's fantastic games!
Click HERE to see maybe Morphy's best game ever!!
Click HERE now, to see THE definitive web-page on Paul Morphy!!
***
Click HERE to return to the "Annotated Games" page.
Copyright (c) (LM) A.J. Goldsby I
Copyright
(©) A.J. Goldsby, 1995 - 2009.
Copyright © A.J. Goldsby,
2009. All rights reserved.
![]()