Using
the Colour Palette
The
first thing we need to do is to put a bit
of colour on our image.
Use
your floodfill tool  and single click on your image.
Your
image will now be the same colour as one
of the colours in your Colour
Palette. If you left clicked it will
be the same colour as the first colour and
if you right clicked it will be the same
colour as the second colour. I left
clicked so this is what mine looks like:
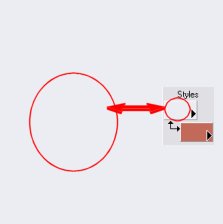
You
will notice that there is a double-headed
arrow between the 2 colours in this part
of your Colour Palette.

Single
left click on those arrows. You'll
notice that you still have the same
colours, but they have changed place
now.

With
your floodfill tool still selected, single
click on your image again, like you did
above. I left clicked above so I'm
going to left click again. This is
what my image looks like now.

Congratulations!
Now you know the basics of how to use the
Colour Palette!! :o)
If
you look up at the top of your Colour
Palette, you will notice that the colours
in the top part have changed place now
too.

You
will notice that there is a double-headed
arrow between those 2 boxes too.
Single left click on them and you will
notice that the colours have swapped
places back to where they were
before.
These
2 sections of the Colour Palette do the
same thing with solid colours. There
are differences between them that I will
go into later, but for now, let's think of
them as doing the same thing.


